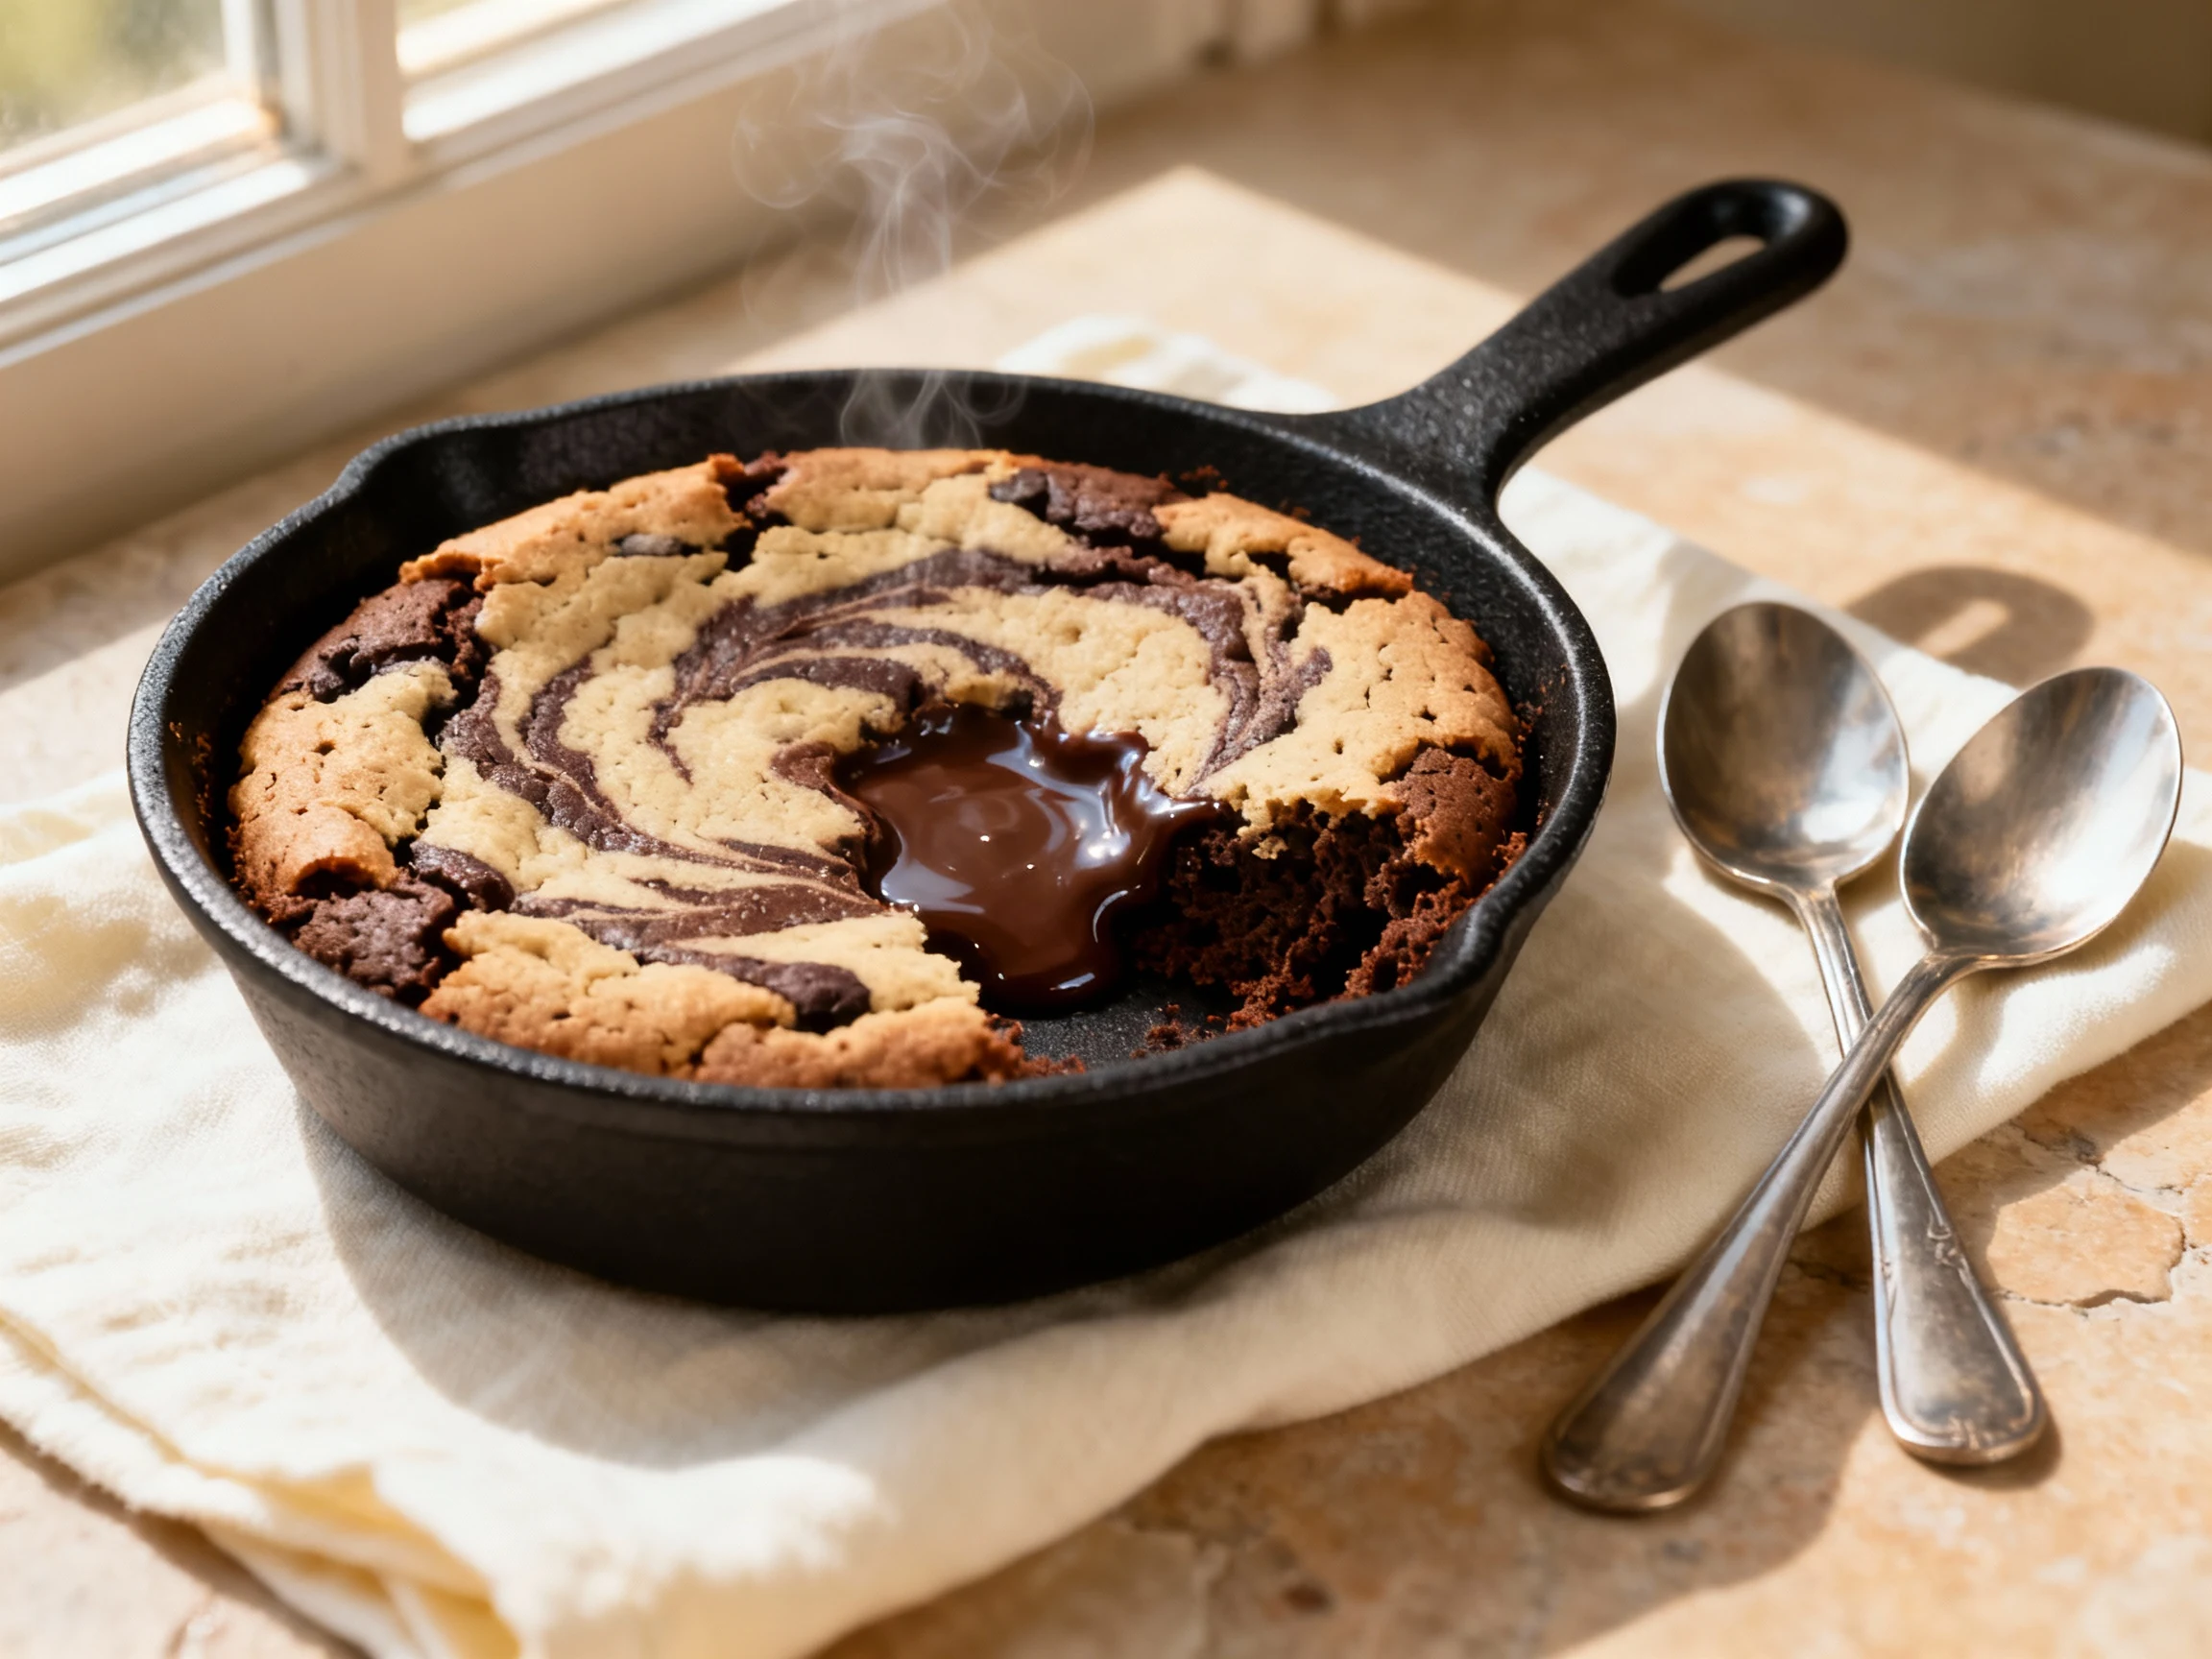
Skillet Brookie for Two (gooey Center) in 20 Minutes Flat
Small-batch cookie–brownie bliss for date night or cravings, baked in a mini skillet with a molten middle using simple pantry staples.
You want dessert now, not in an hour, and definitely not a whole tray whispering your name at 2 a.m. Enter the mini skillet brookie: crispy, crinkly edges with a gooey, molten center made for two spoons and zero regrets. It hits that cookie-craves-brownie sweet spot without a mixer, specialty gear, or a mess. Ten minutes of prep, a quick bake, and you’re in business. Low-key? This is the neatest “we deserve it” dessert you can make on a Tuesday.
Why This Recipe Works

This small-batch method starts with a single base dough that splits into “cookie” and “brownie” halves, so you get swirl action without juggling two full batters. Melted butter hydrates the flour fast and makes the edges crisp while keeping the inside tender. A single egg yolk gives richness and chew without the extra white, which could dry out such a small batch.
A touch of cornstarch softens the crumb and keeps the center plush, while a restrained amount of flour plus cocoa in one half ensures fudgy density. Baking in a 5–6 inch skillet concentrates heat at the edges (hello, crisp ring) and protects the middle for that gooey center. Pulling it at the right moment—when the top is set but still glossy in the middle—locks in the molten pocket you’re here for.
What You’ll Need (Ingredients)
- Unsalted butter: 3 tablespoons (42 g), melted and slightly cooled, plus a dab for the skillet
- Light brown sugar: 3 tablespoons (36 g), packed
- Granulated sugar: 2 tablespoons (25 g)
- Egg yolk: 1 large
- Vanilla extract: 1/2 teaspoon
- All-purpose flour: 1/2 cup minus 1 tablespoon (about 55 g)
- Cornstarch: 1/2 teaspoon
- Baking soda: 1/8 teaspoon
- Fine salt: 1/8 teaspoon
- Unsweetened cocoa powder: 1 tablespoon (about 5 g), for the brownie half
- Milk or water: 1 to 2 teaspoons, to loosen the brownie half
- Chocolate chips or chopped chocolate: 1/4 cup (45 g), semisweet or dark
- Optional: 1/8 teaspoon espresso powder (boosts chocolate flavor)
- Optional: Flaky sea salt for topping
Equipment: 5–6 inch cast-iron or oven-safe skillet; small mixing bowl; spatula; spoon.
Cooking Instructions
- Preheat the oven to 350°F (177°C). Lightly butter your 5–6 inch skillet. If using cast iron, you can also warm it empty in the oven for 5 minutes—hot edges = crisp edges.
- Stir the wet ingredients. In a small bowl, whisk the melted butter, brown sugar, and granulated sugar until shiny and cohesive, about 30 seconds. Add the egg yolk and vanilla; mix until smooth.
- Add the dry base. Sprinkle in the flour, cornstarch, baking soda, and salt (plus espresso powder if using). Fold just until no dry streaks remain. You’ve got a soft cookie dough.
- Stir in the chocolate. Fold in about 3 tablespoons of the chocolate chips, reserving the rest for topping. Don’t overmix; we’re keeping it tender.
- Split and cocoa-fy. Eyeball the dough and divide it roughly in half. To one half, add the cocoa powder and 1 teaspoon milk or water. Stir to form a slightly looser, fudgier “brownie” half. If it’s still stiff, add up to 1 more teaspoon liquid.
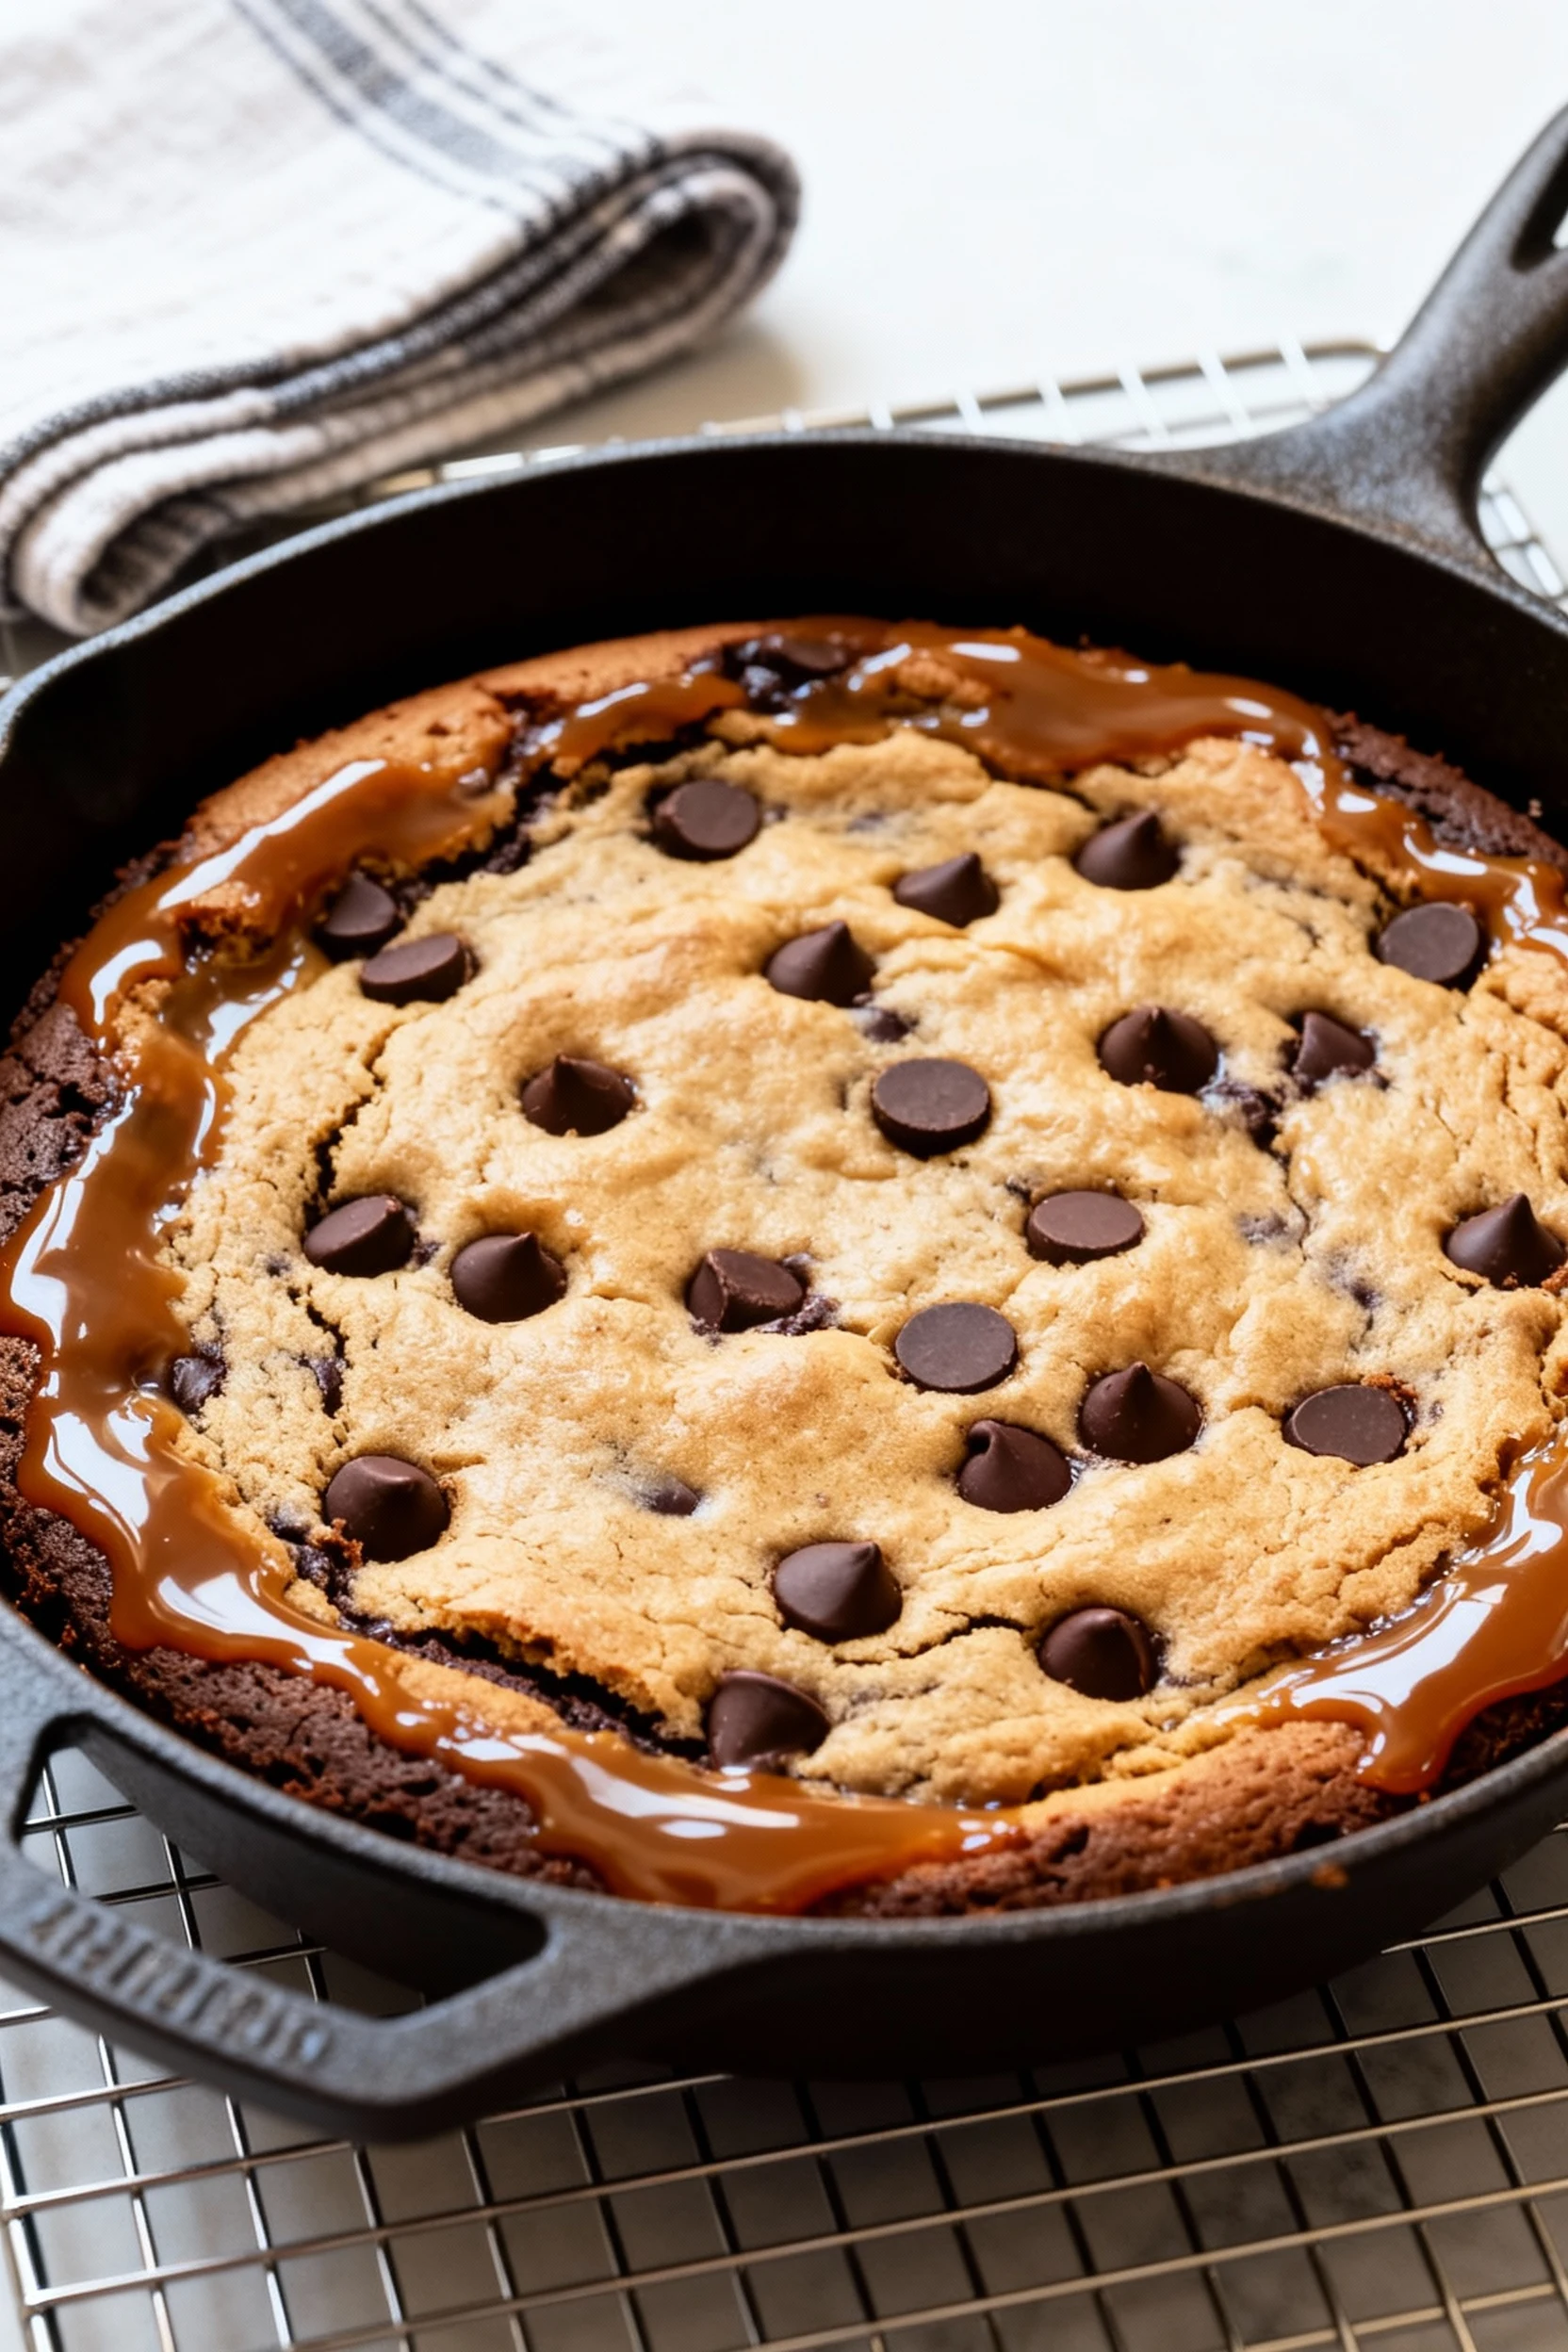
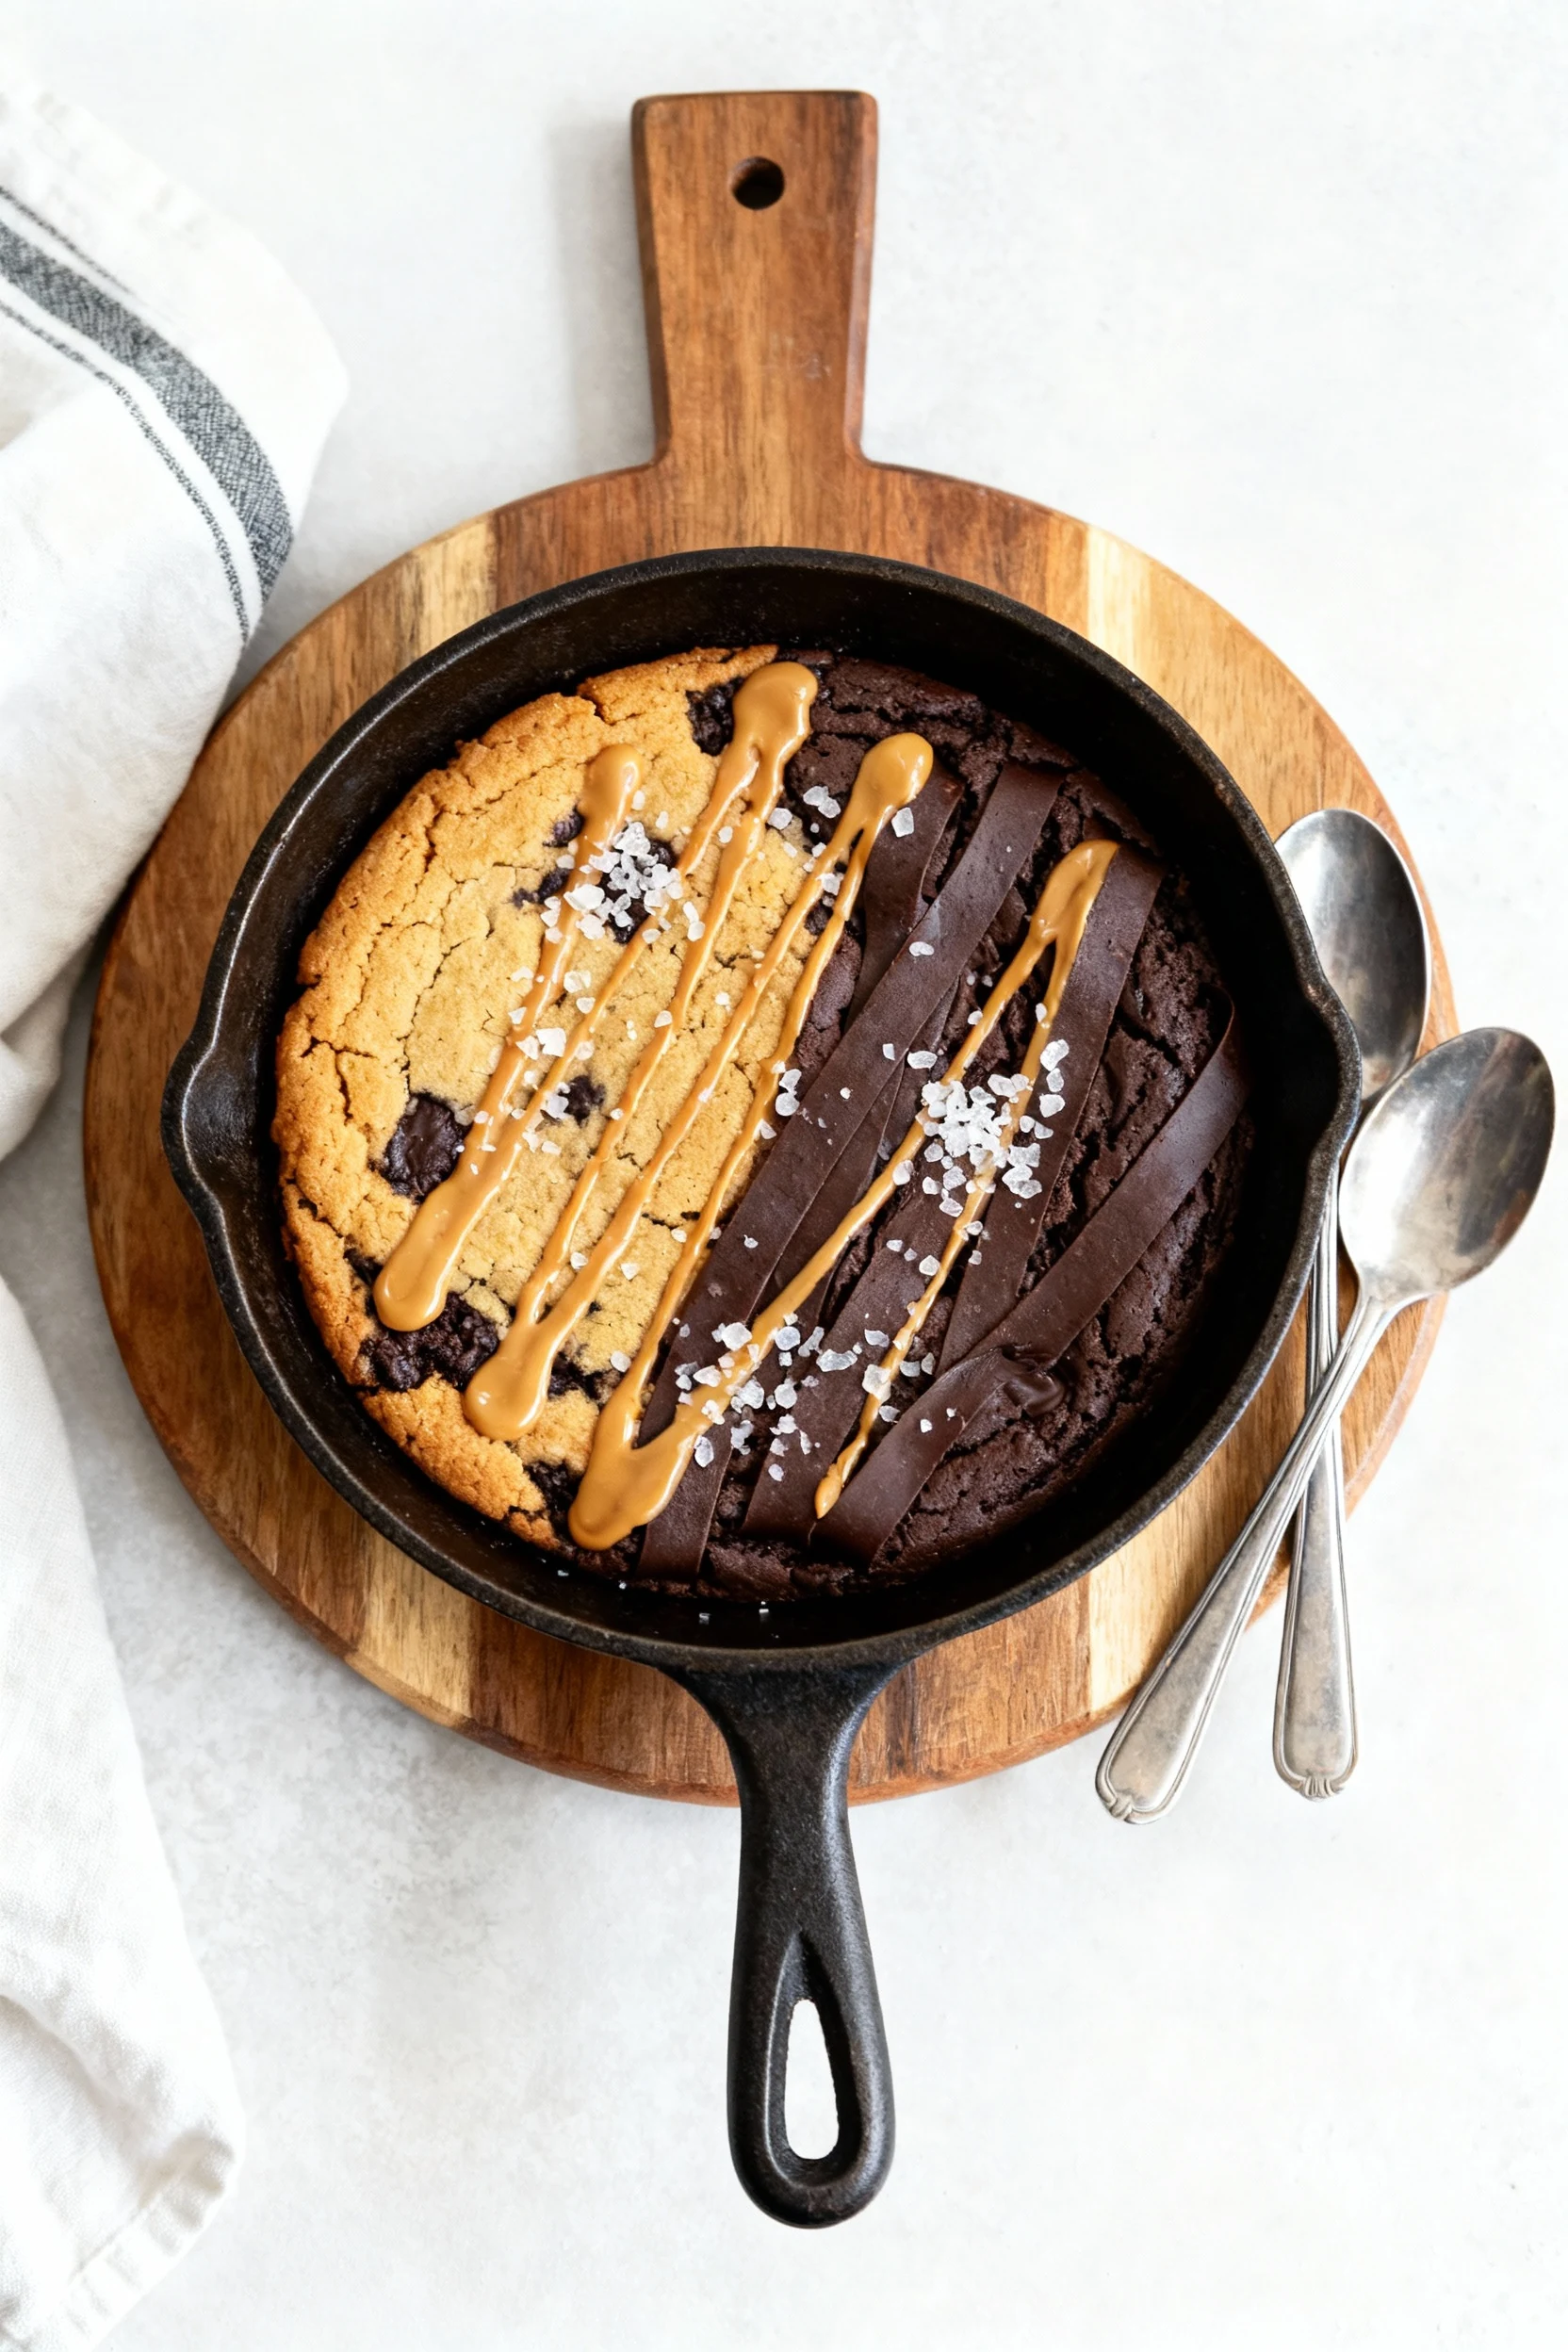
- Pan it. Dollop alternating scoops of the cookie and brownie halves into the prepared skillet. Use a spoon to lightly marble the top—two or three gentle swirls are enough. Over-swirling turns it into one color… and where’s the drama in that?
- Top it off. Press the remaining chocolate on top for extra pockets of melt. If you’re a sweet-salty person, wait to sprinkle flaky salt until after baking.
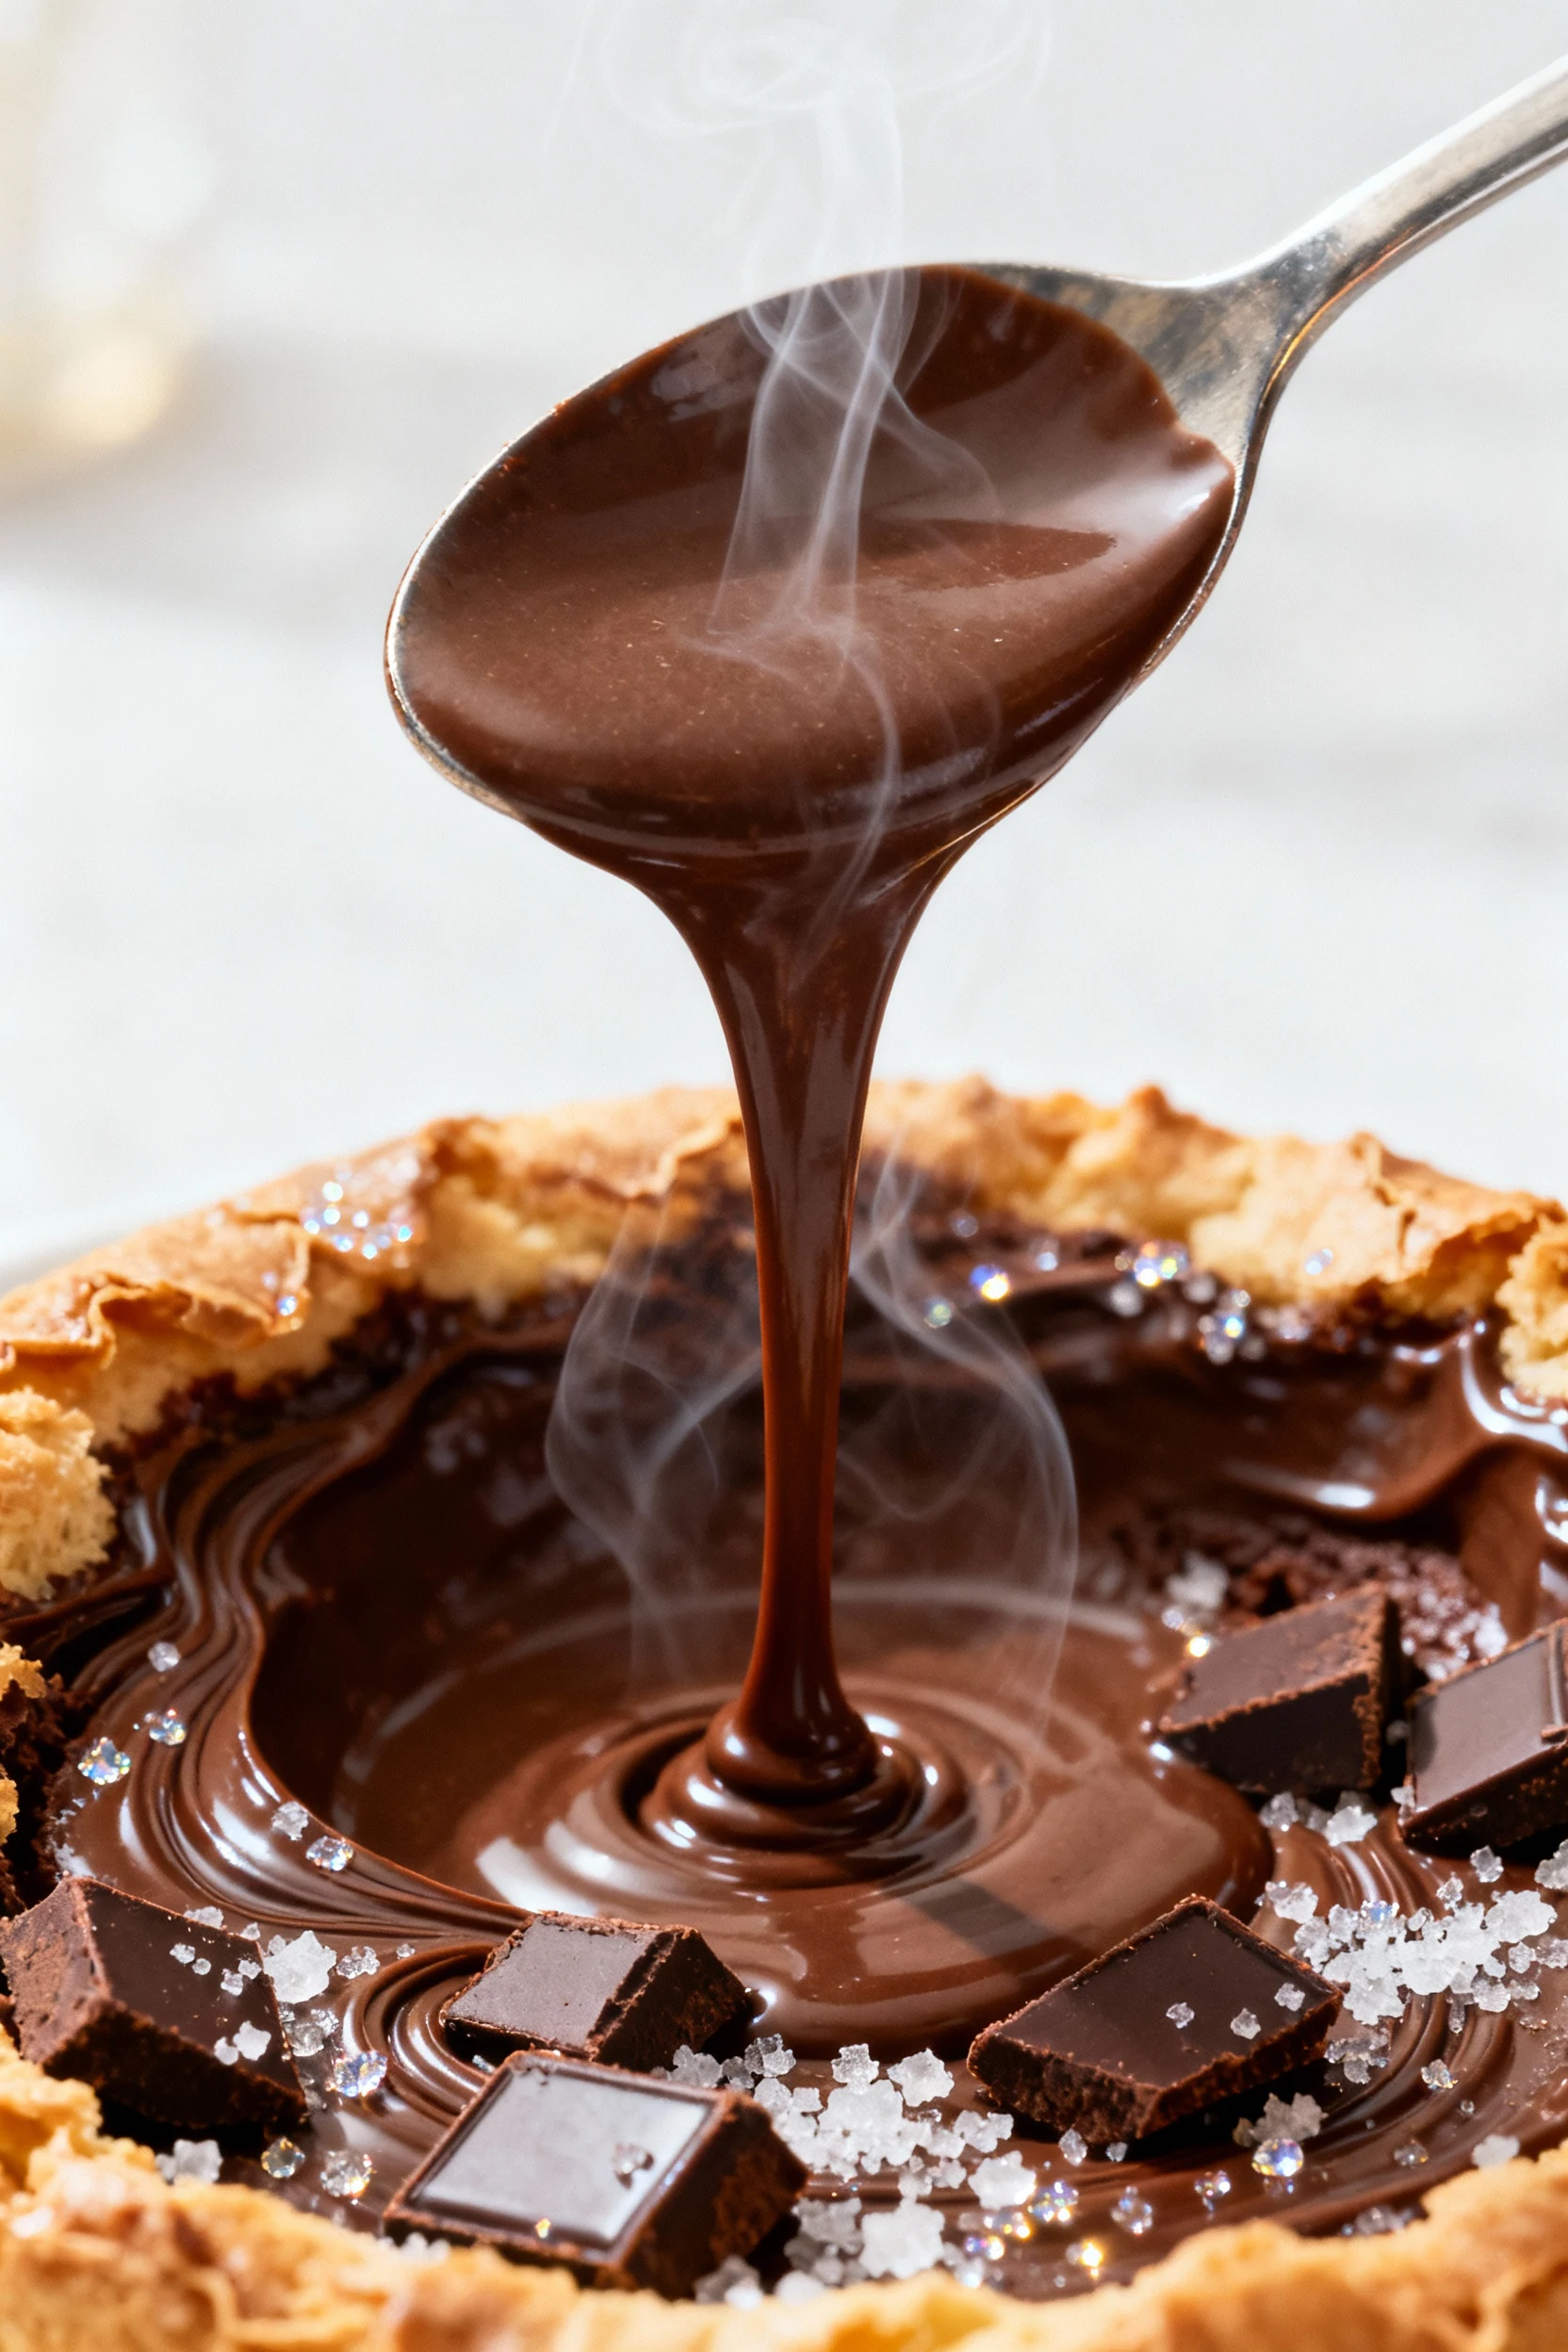
- Bake. Set the skillet on the center rack and bake for 9–12 minutes. The edges should look set and golden, and the center should be puffed yet a little glossy. For a very molten middle, start checking at 9 minutes; for a slightly more set center, go to 12–13 minutes.
- Rest briefly. Remove from the oven and let it stand for 5 minutes. The carryover heat finishes the middle without overcooking it.
- Finish and serve. Sprinkle with flaky salt if you like. Grab two spoons and serve straight from the skillet. No dishes? That’s the dream.
Gooey-center pro tip: If your skillet is very dark or runs hot, shave 1–2 minutes off the bake time. You can always add time, but you can’t un-bake dry crumbs, IMO.
Storage Tips
- Room temperature: Cover the cooled brookie in the skillet or transfer to an airtight container. It stays tasty for up to 1 day, though the center will firm up.
- Refrigerator: Store leftovers for 3 days. Rewarm in a 300°F (150°C) oven for 6–8 minutes or microwave 15–20 seconds to revive the gooey vibe.
- Freeze unbaked: Freeze dollops of the cookie and brownie halves separately on a plate until solid, then bag for up to 2 months. Bake from frozen at 325°F (163°C) for 12–15 minutes.
- Freeze baked: Cool completely, cut into chunks, and freeze up to 1 month. Rewarm gently in the oven. FYI, freshly baked is best for peak molten glory.
What’s Great About This
- Small-batch sanity: Enough for two, not a dozen. No leftovers whispering your name.
- Fast: About 20 minutes start to finish, with minimal cleanup.
- One bowl, one skillet: No mixer, no special pans, zero stress.
- Texture goals: Crisp edges, crackly top, and a gooey center that stays molten for minutes.
- Flexible: Swap chips, add nuts, change cocoa styles—make it yours.
- Pantry-friendly: Uses standard baking staples you probably already have.
Pitfalls to Watch Out For
- Overbaking: The center should look a touch glossy when you pull it. If the whole top looks dry, the gooey-ness left the chat.
- Hot butter + egg yolk: If the butter is too hot, you’ll scramble the yolk. Let it cool until it feels warm, not hot.
- Too much flour: Spoon and level it. Heavy-handed scoops lead to cakey, dry results.
- Overswirling: Marble lightly. Overworking blends the batters into a single, muddier color and dulls the swirl effect.
- Wrong pan size: A 10-inch skillet makes a thin, overcooked pancake. Stick to 5–6 inches or use a 2-cup oven-safe dish.
- Skipping the rest: Those 5 minutes out of the oven matter. The center sets just enough while staying molten.
- Grease overload: Over-buttering the skillet can fry the edges. A light coating is plenty.
Variations You Can Try
- Peanut Butter Swirl: Warm 1 tablespoon peanut butter and drizzle it over the top before baking; swirl once.
- S’mores: Fold in a few mini marshmallows and crushed graham crackers; add extra chocolate on top.
- Salted Caramel Core: Hide 2 soft caramels in the center and sprinkle flaky salt after baking.
- Double Chocolate: Use dark chocolate chunks and add 1 extra teaspoon cocoa to the brownie half.
- Nutty Crunch: Stir in 2 tablespoons toasted pecans or walnuts to the cookie half.
- Dairy-Free: Use plant butter and dairy-free chips; add 1 extra teaspoon milk to the brownie half if needed.
- Gluten-Free: Swap a quality 1:1 GF flour. Let the batter rest 5 minutes before baking to hydrate.
- Espresso Boost: Add 1/4 teaspoon espresso powder to the brownie half for coffee-shop vibes.
FAQ
Can I make this without a cast-iron skillet?
Yes. Use any 5–6 inch oven-safe skillet, a 2-cup ramekin, or a small baking dish. If your pan is glass or very light-colored, you may need an extra minute or two because it doesn’t hold heat like cast iron.
How do I keep the center gooey without undercooking it?
Watch for visual cues: set, golden edges and a center that’s puffed but still a bit glossy. Pull at 9–10 minutes and let it rest 5 minutes. Carryover heat finishes it safely while preserving that molten pocket. TBH, timing beats temperature probes here because the batch is tiny.
Can I use a whole egg instead of just the yolk?
I don’t recommend it. A whole egg adds too much liquid and can make the small batch rubbery. If you must, use 2 tablespoons beaten egg (not the whole thing) and add 1–2 teaspoons extra flour to the base to balance.
What kind of cocoa powder works best?
Natural cocoa keeps the brownie half bright and classic; Dutch-process gives deeper color and smoother chocolate flavor. Both work. If you use Dutch, consider a pinch more baking soda (a literal pinch) to help lift.
How do I scale this up?
For four servings, double everything and bake in an 8-inch skillet for 12–16 minutes. Same visual cues apply: set edges, glossy center. For a party, you probably want a full pan recipe—this one is built for speed and small size.
Can I make it egg-free?
Use 1 tablespoon aquafaba (chickpea liquid) or 1 tablespoon plain yogurt in place of the yolk. Expect a slightly different crumb—still delicious. Keep the bake time on the shorter side for extra gooeyness.
What chocolate should I use?
Use a mix: chips for structure and chopped bar chocolate for melty puddles. Semisweet is crowd-pleasing; dark (60–70%) brings that grown-up vibe. Toss in a few milk chocolate chunks if you want extra creamy bites.
Can I microwave it instead of baking?
You can, but it’s not the same. Microwave on 50–60% power for 60–90 seconds until the top looks set. The edges won’t crisp like the oven version, but the center will still be gooey. Consider it an emergency-only move, FYI.
Why split the dough instead of making two separate batters?
Speed, simplicity, and fewer dishes. This method mimics cookie and brownie textures with one base, then transforms half with cocoa and a splash of liquid. The swirl looks impressive and eats like a true brookie without extra bowls.
Is flaky salt on top really necessary?
Not necessary, but it’s a cheat code. A light sprinkle makes the chocolate pop and balances sweetness. If you love sweet-salty desserts, don’t skip it.
Wrapping Up
When you want dessert that feels special but takes less time than scrolling a delivery app, this mini skillet brookie is your move. Crisp edges, molten middle, and two spoons—no leftovers, no fuss. Keep the ingredients on hand and you can whip it up any night you need a win. Next time, try a swirl of peanut butter or a caramel core and pretend you planned it all along. Your future self (and your dessert buddy) will thank you.
Printable Recipe Card
Want just the essential recipe details without scrolling through the article? Get our printable recipe card with just the ingredients and instructions.