Nutella Recipes—quick Wins for Easy Craveworthy Desserts
From 10-minute sweets to make-ahead treats, get simple, budget-friendly chocolate-hazelnut bakes and snacks that wow without a mess.
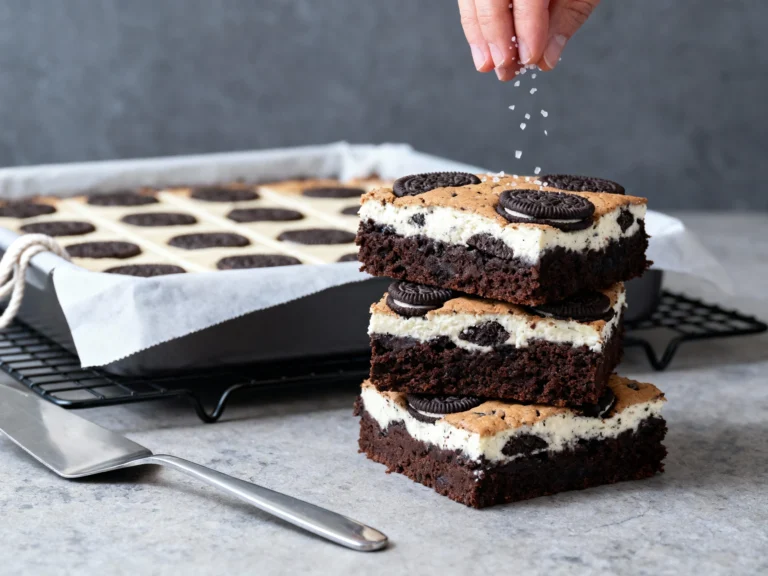
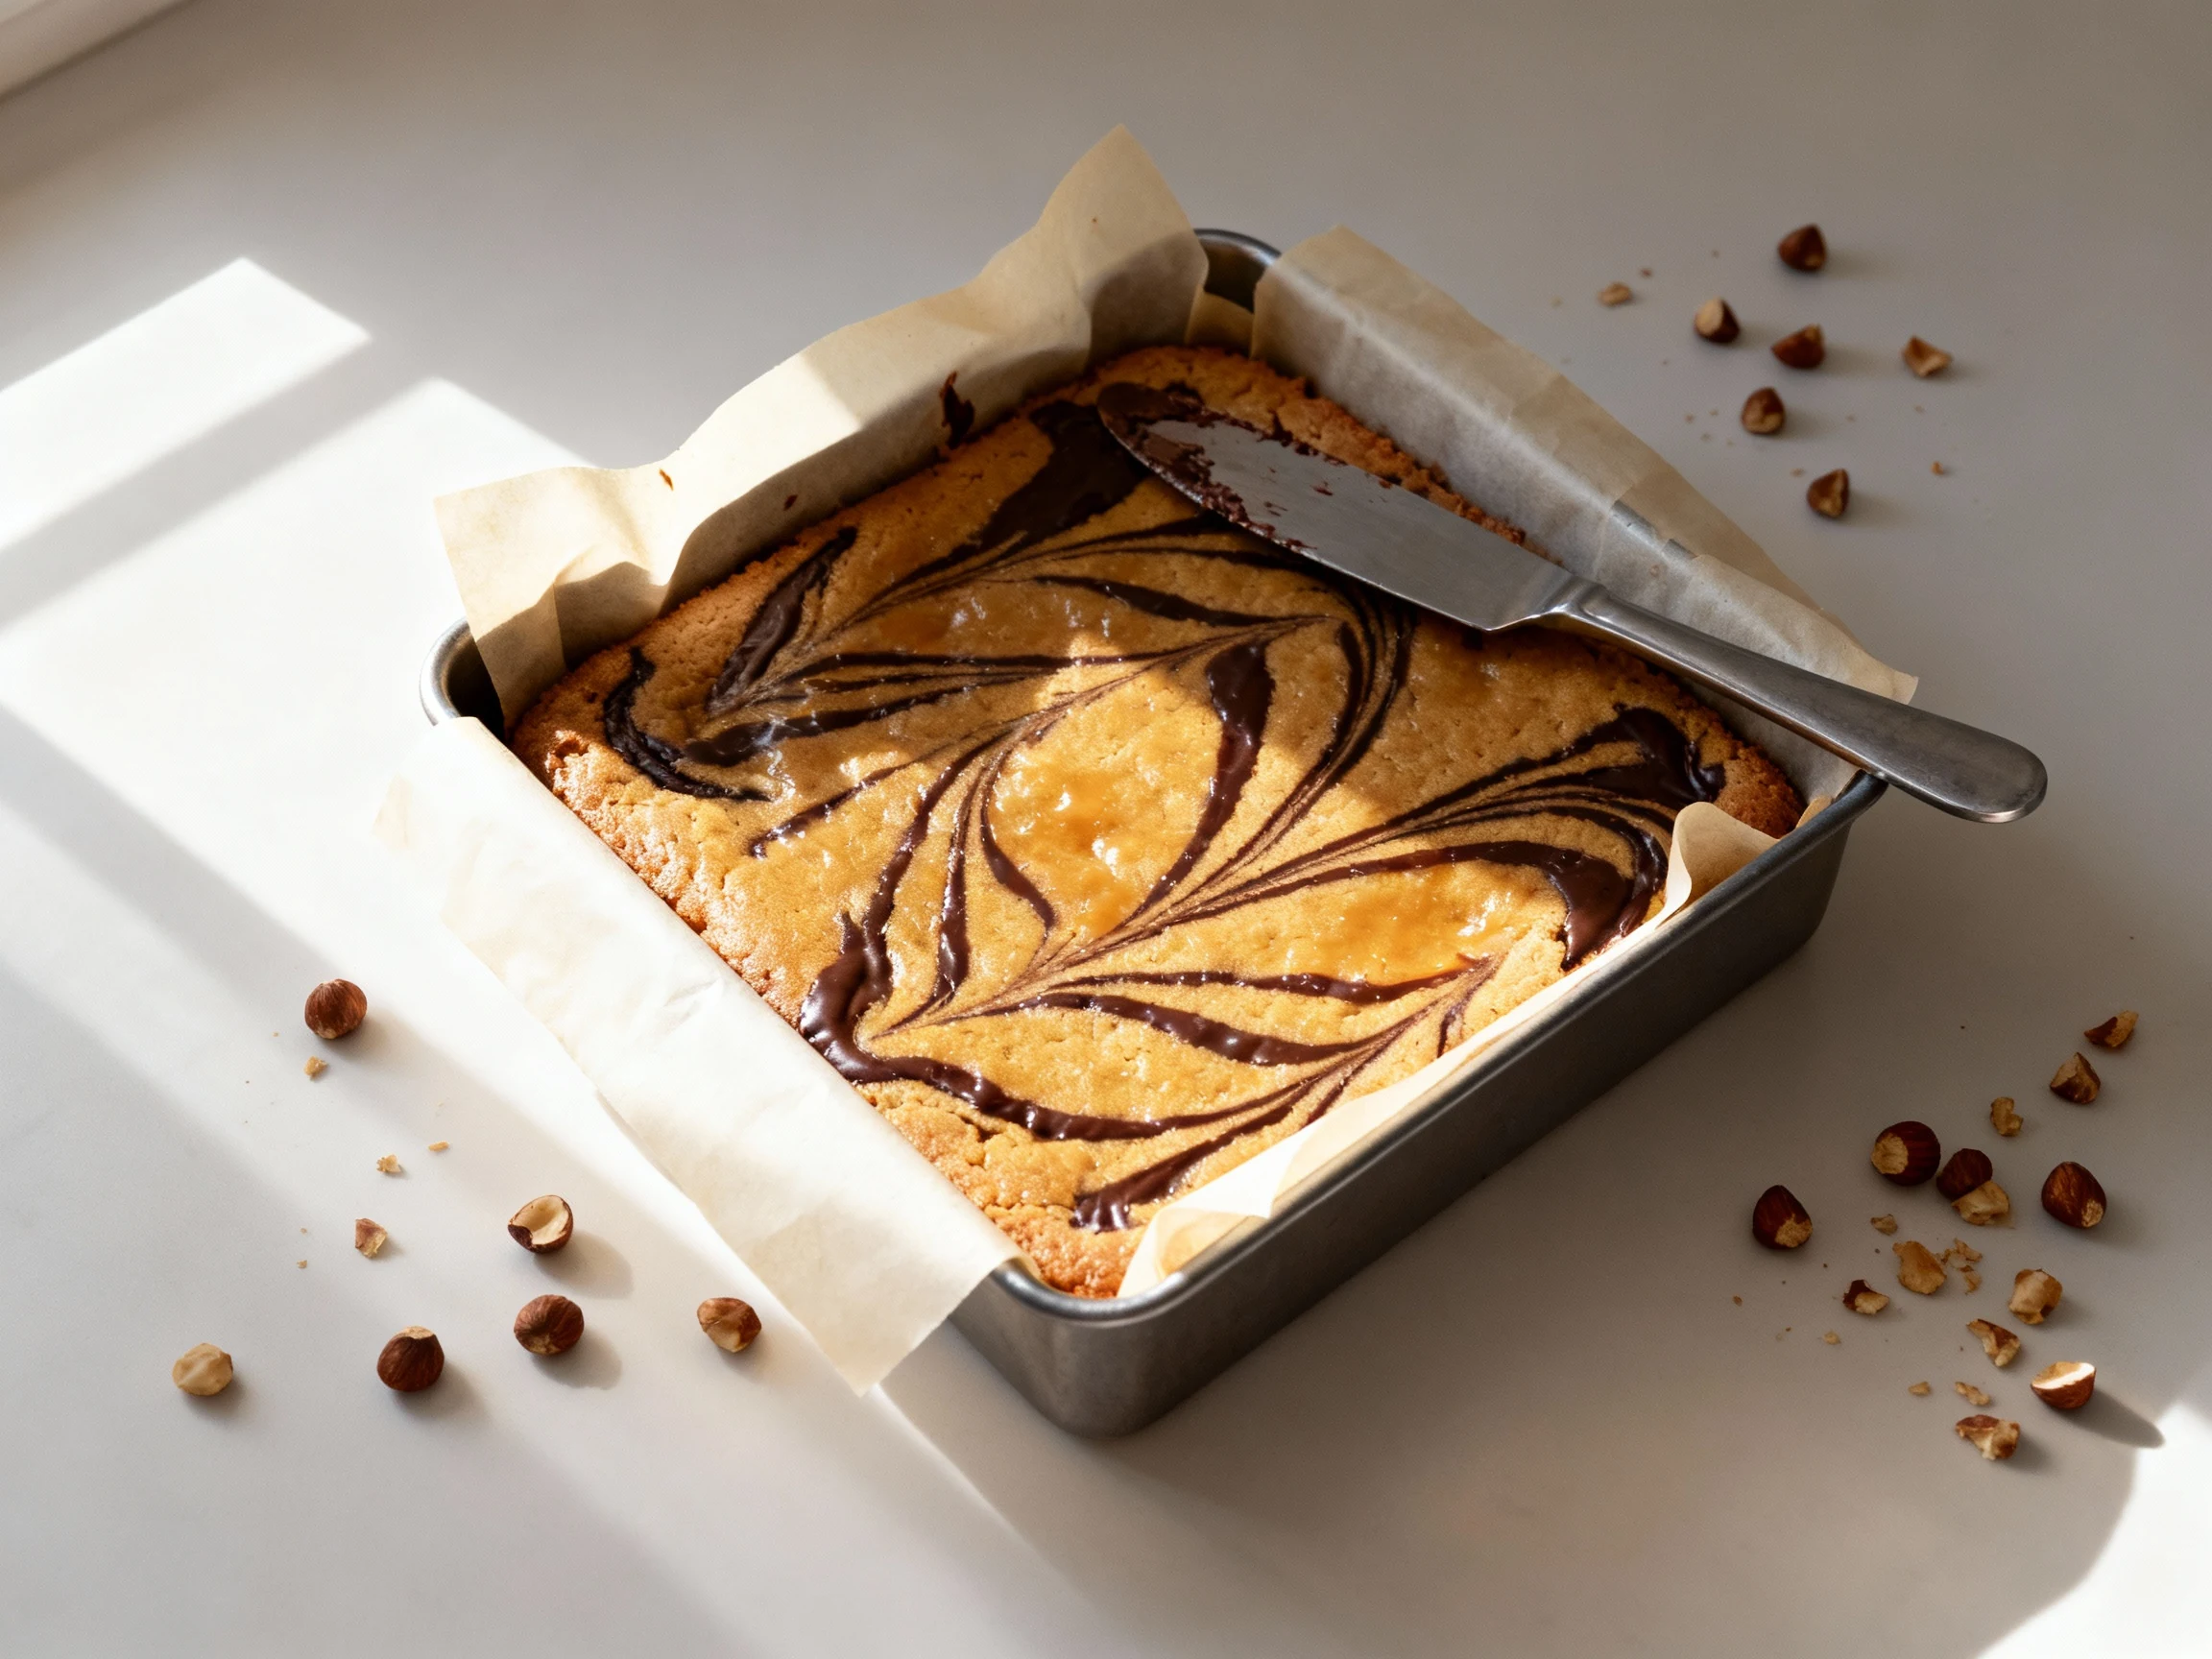
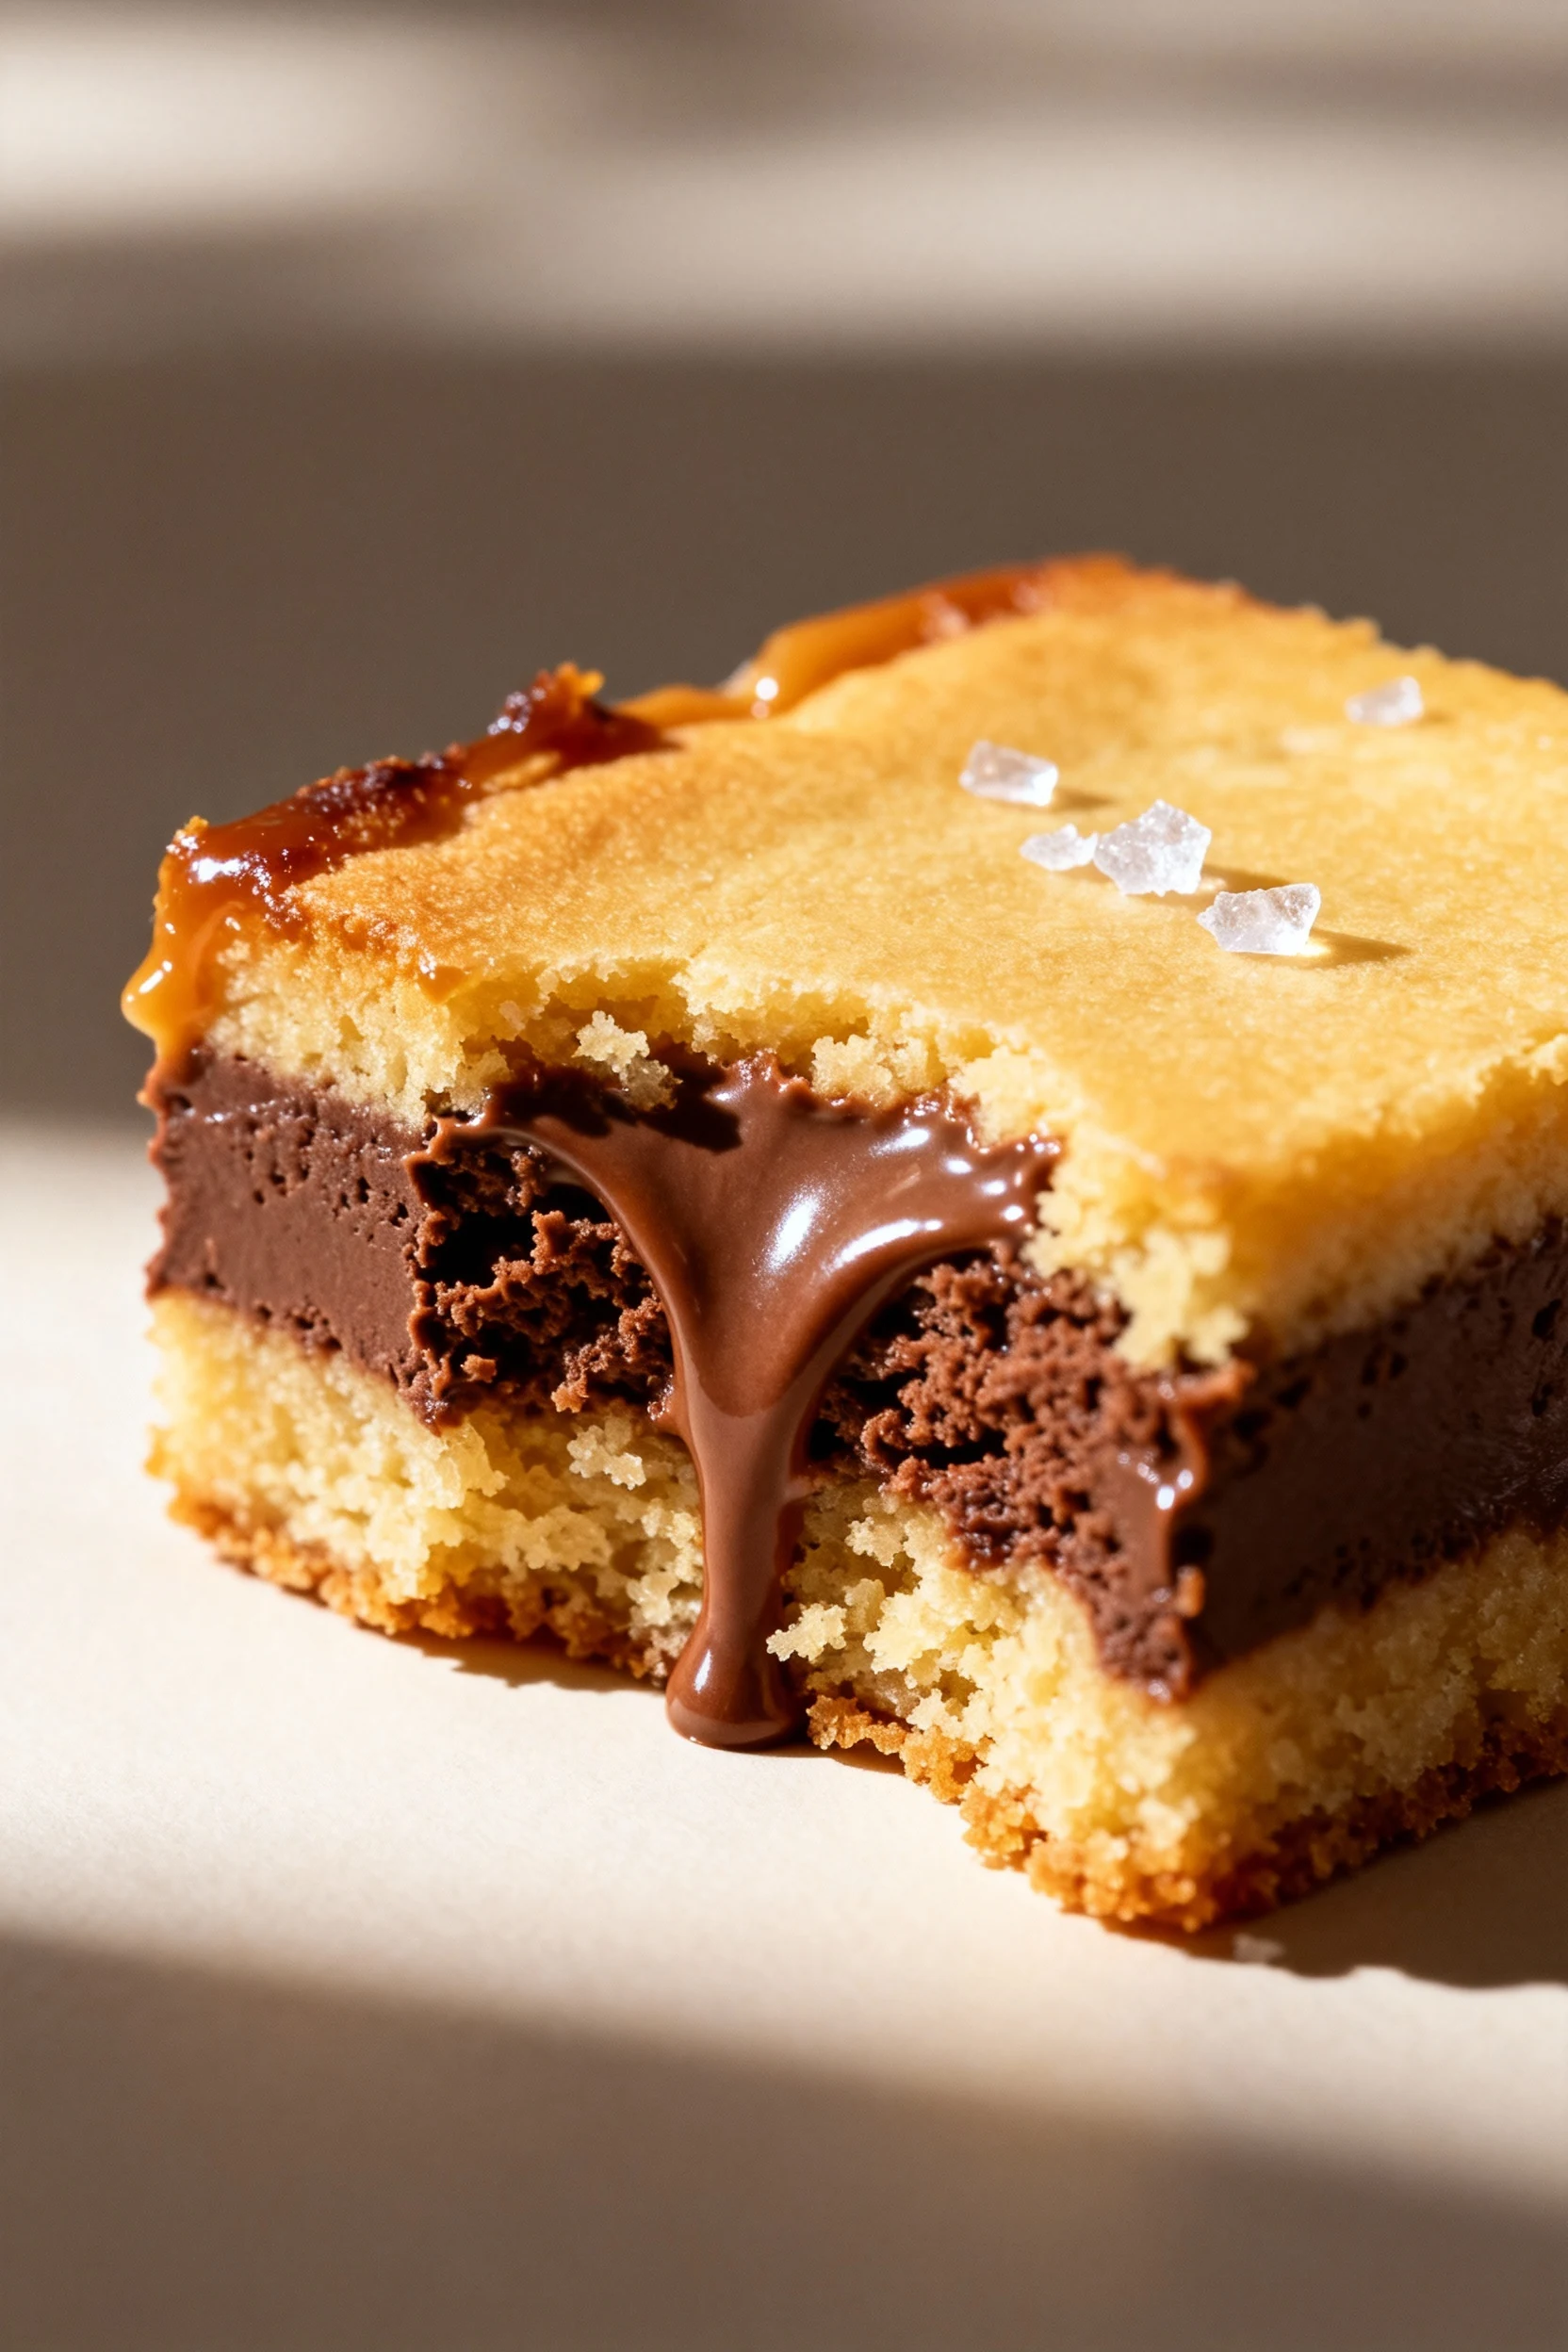
You want maximum dessert payoff with minimum effort. Great, because this one-pan Nutella swirl blondie hits that ratio hard: 1 bowl, 30 minutes, superstar results. No specialty tools, no culinary diploma, just gooey squares that taste like the bakery upcharged you twice. Try it once and watch your household magically appear in the kitchen every time they smell butter and hazelnut.
Think of this as your cheat code for parties, potlucks, late-night cravings, and “I forgot dessert” emergencies. You get crisp edges, fudgy centers, and molten Nutella ribbons that look pro but require zero piping skills. It’s affordable, reliable, and ridiculously photogenic. Spoiler: people will ask for the recipe, and yes, you’ll become “that dessert person” in the best way.
The Secret Behind This Recipe
Blondies are the chewy cousin of brownies—no cocoa base, just brown sugar and butter delivering caramel notes and a soft chew. The magic here is contrast: rich butterscotch batter meets glossy Nutella, so every slice has sweet spots and melty hazelnut streaks. Swirling isn’t about perfection; it’s about controlled chaos that looks gorgeous and tastes even better.
We use melted butter (not creamed) for fast prep and dense, fudgy texture. Brown sugar adds moisture and that caramelly depth you can’t fake. A pinch of salt makes the nutty chocolate pop. And the swirl? Dollop, drag, and stop early—too much and you lose definition. FYI, this batter is intentionally thick so the Nutella sits on top instead of sinking.
What Goes Into This Recipe – Ingredients
- 1/2 cup (113 g) unsalted butter, melted and slightly cooled
- 3/4 cup (150 g) packed light brown sugar
- 1/4 cup (50 g) granulated sugar
- 1 large egg, room temperature
- 1 teaspoon vanilla extract
- 1 cup (125 g) all-purpose flour
- 1/2 teaspoon baking powder
- 1/4 teaspoon fine sea salt (use 1/2 tsp if your butter is unsalted and you like a sweet-salty vibe)
- 1/3 to 1/2 cup Nutella (go generous if you’re a swirl fanatic)
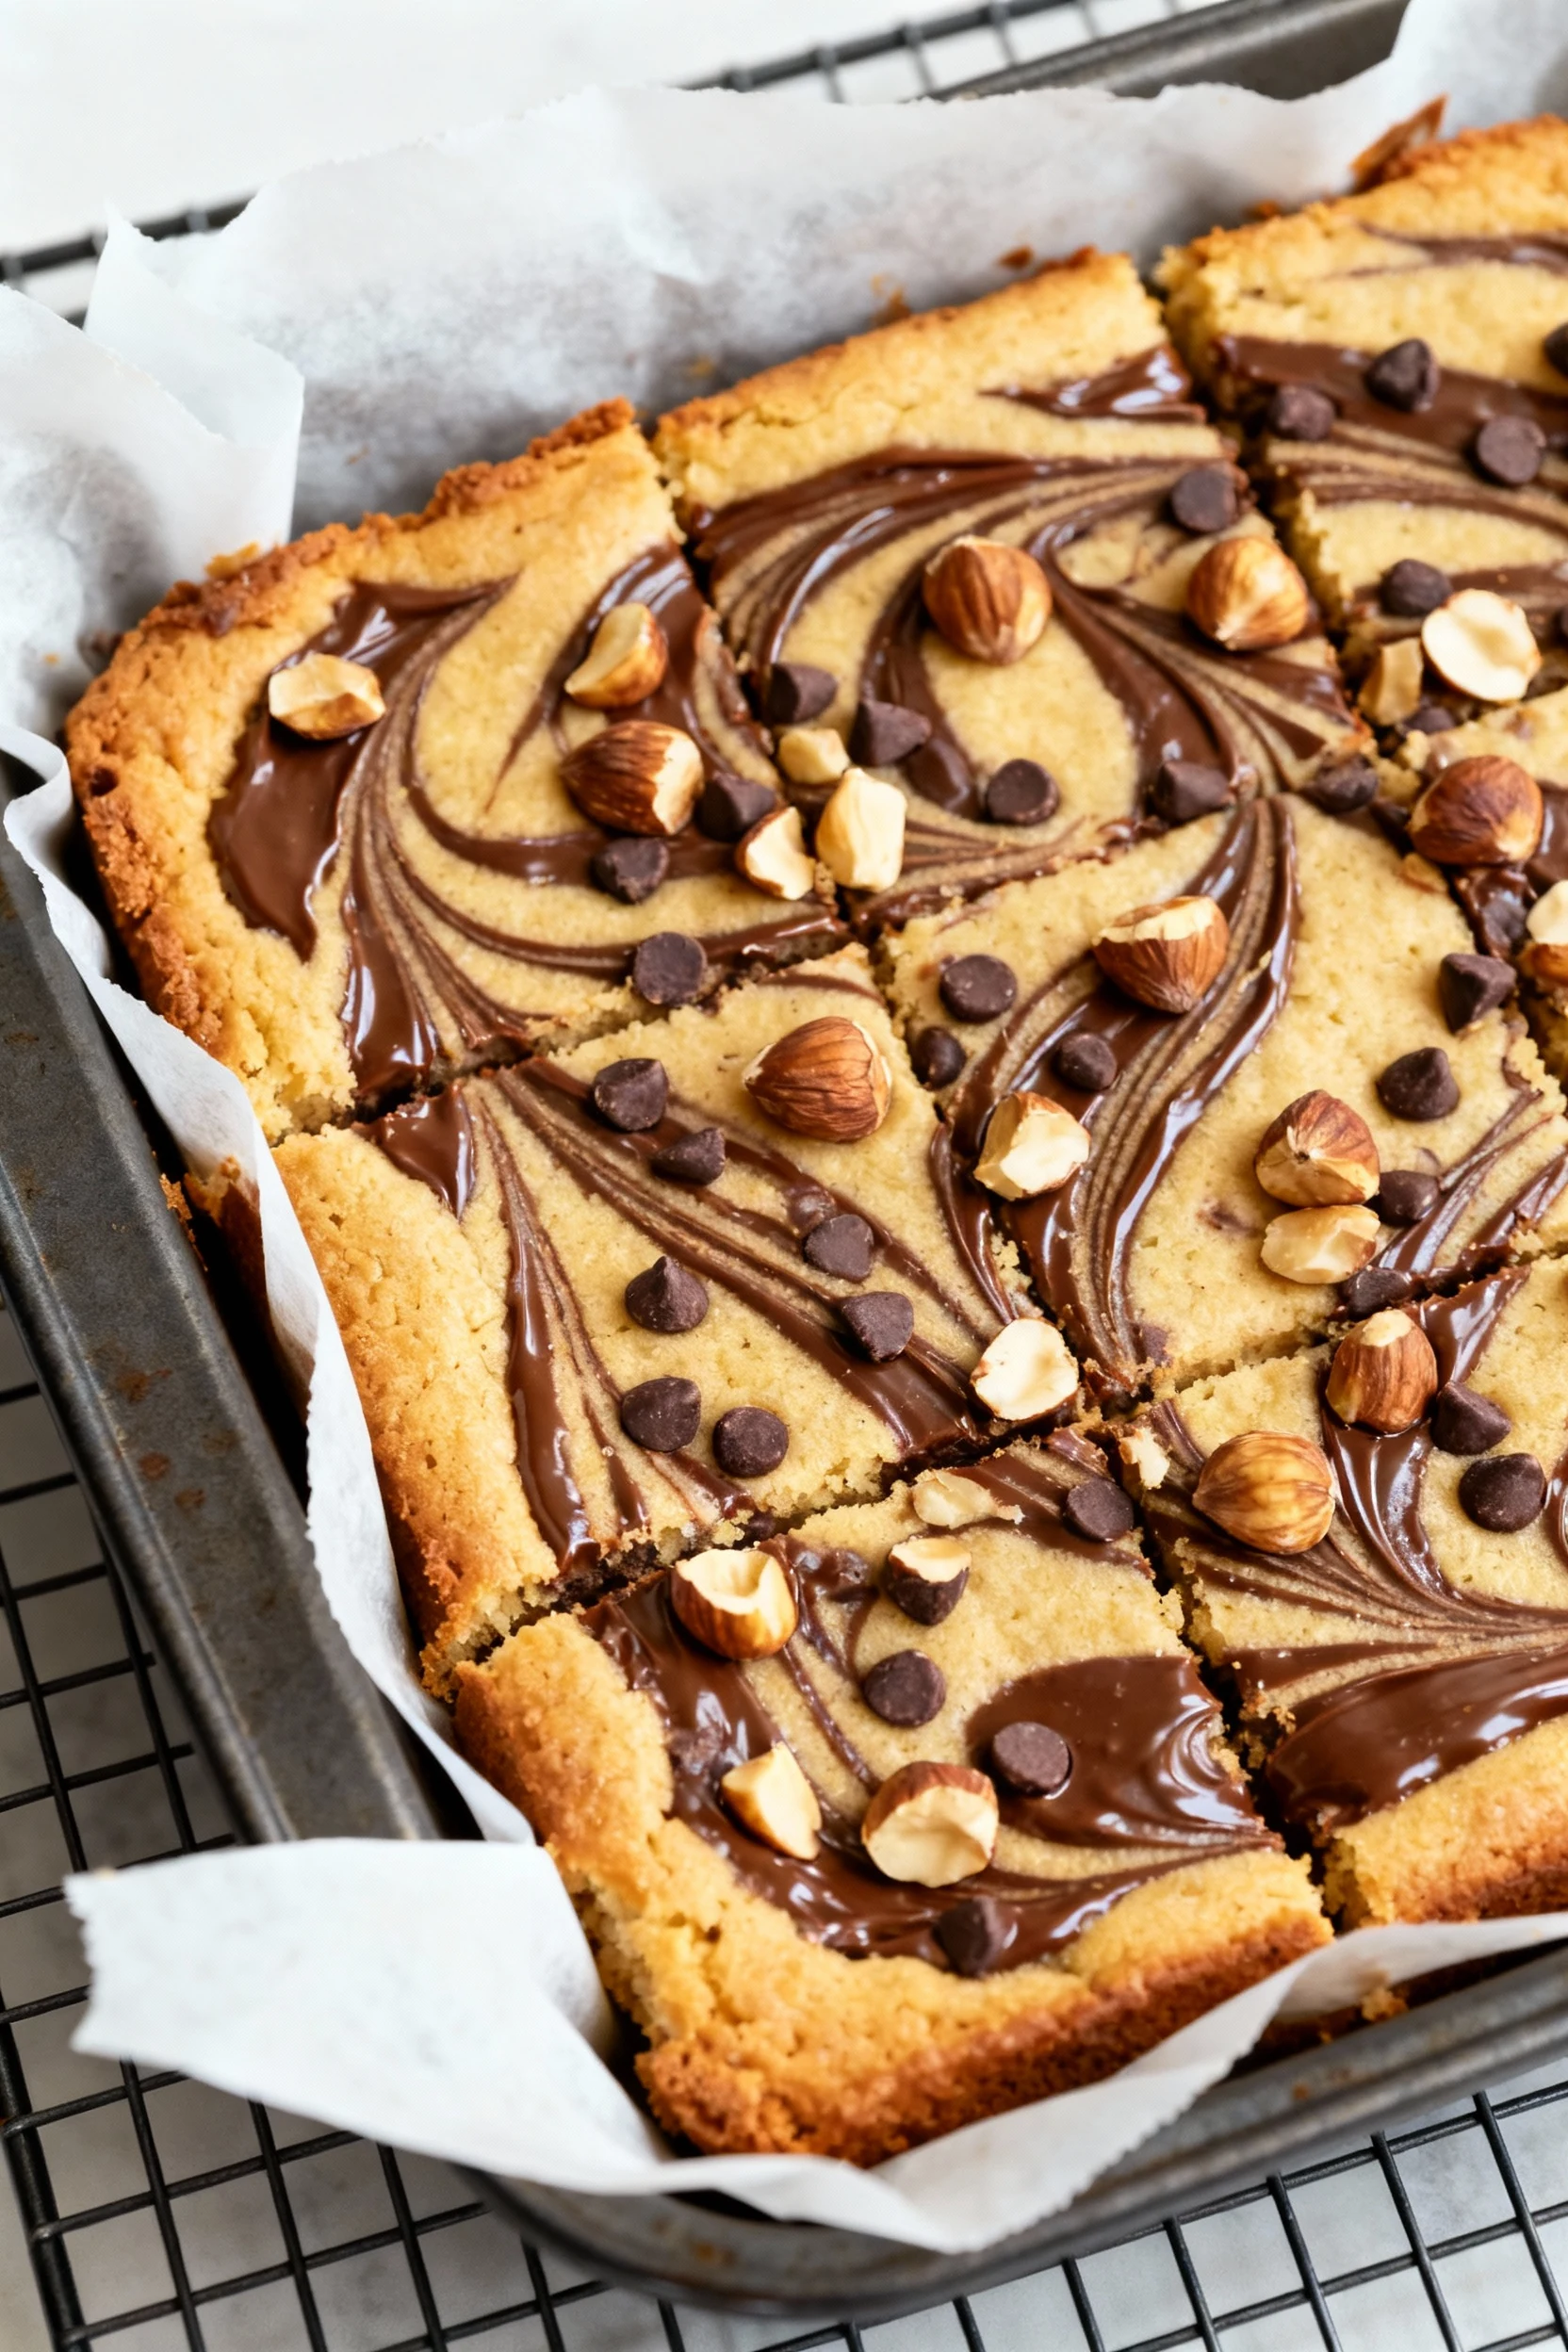
- 2 tablespoons chopped roasted hazelnuts (optional, for crunch)
- 2 tablespoons mini chocolate chips (optional, for extra pockets of chocolate)
Yield: 12 squares in an 8-inch pan. Total time: ~30 minutes (10 minutes prep, 18–22 minutes bake).
Instructions
- Preheat oven to 350°F (175°C). Line an 8-inch square pan with parchment, leaving a 1-inch overhang. Lightly grease the sides.
- Melt butter until fully liquid and just starting to foam. Let it cool for 2–3 minutes so it doesn’t scramble the egg.
- Whisk melted butter with brown sugar and granulated sugar until glossy and well combined (about 30 seconds).
- Add the egg and vanilla. Whisk until the mixture looks smooth and slightly lighter—no sugar clumps.
- In a bowl, stir together flour, baking powder, and salt. Add dry ingredients to the wet mixture.
- Switch to a spatula and fold gently just until no dry pockets remain. Don’t overmix; you’re building chew, not bread.
- Spread batter into the pan and smooth the top. Batter will be thick—press it into the corners.
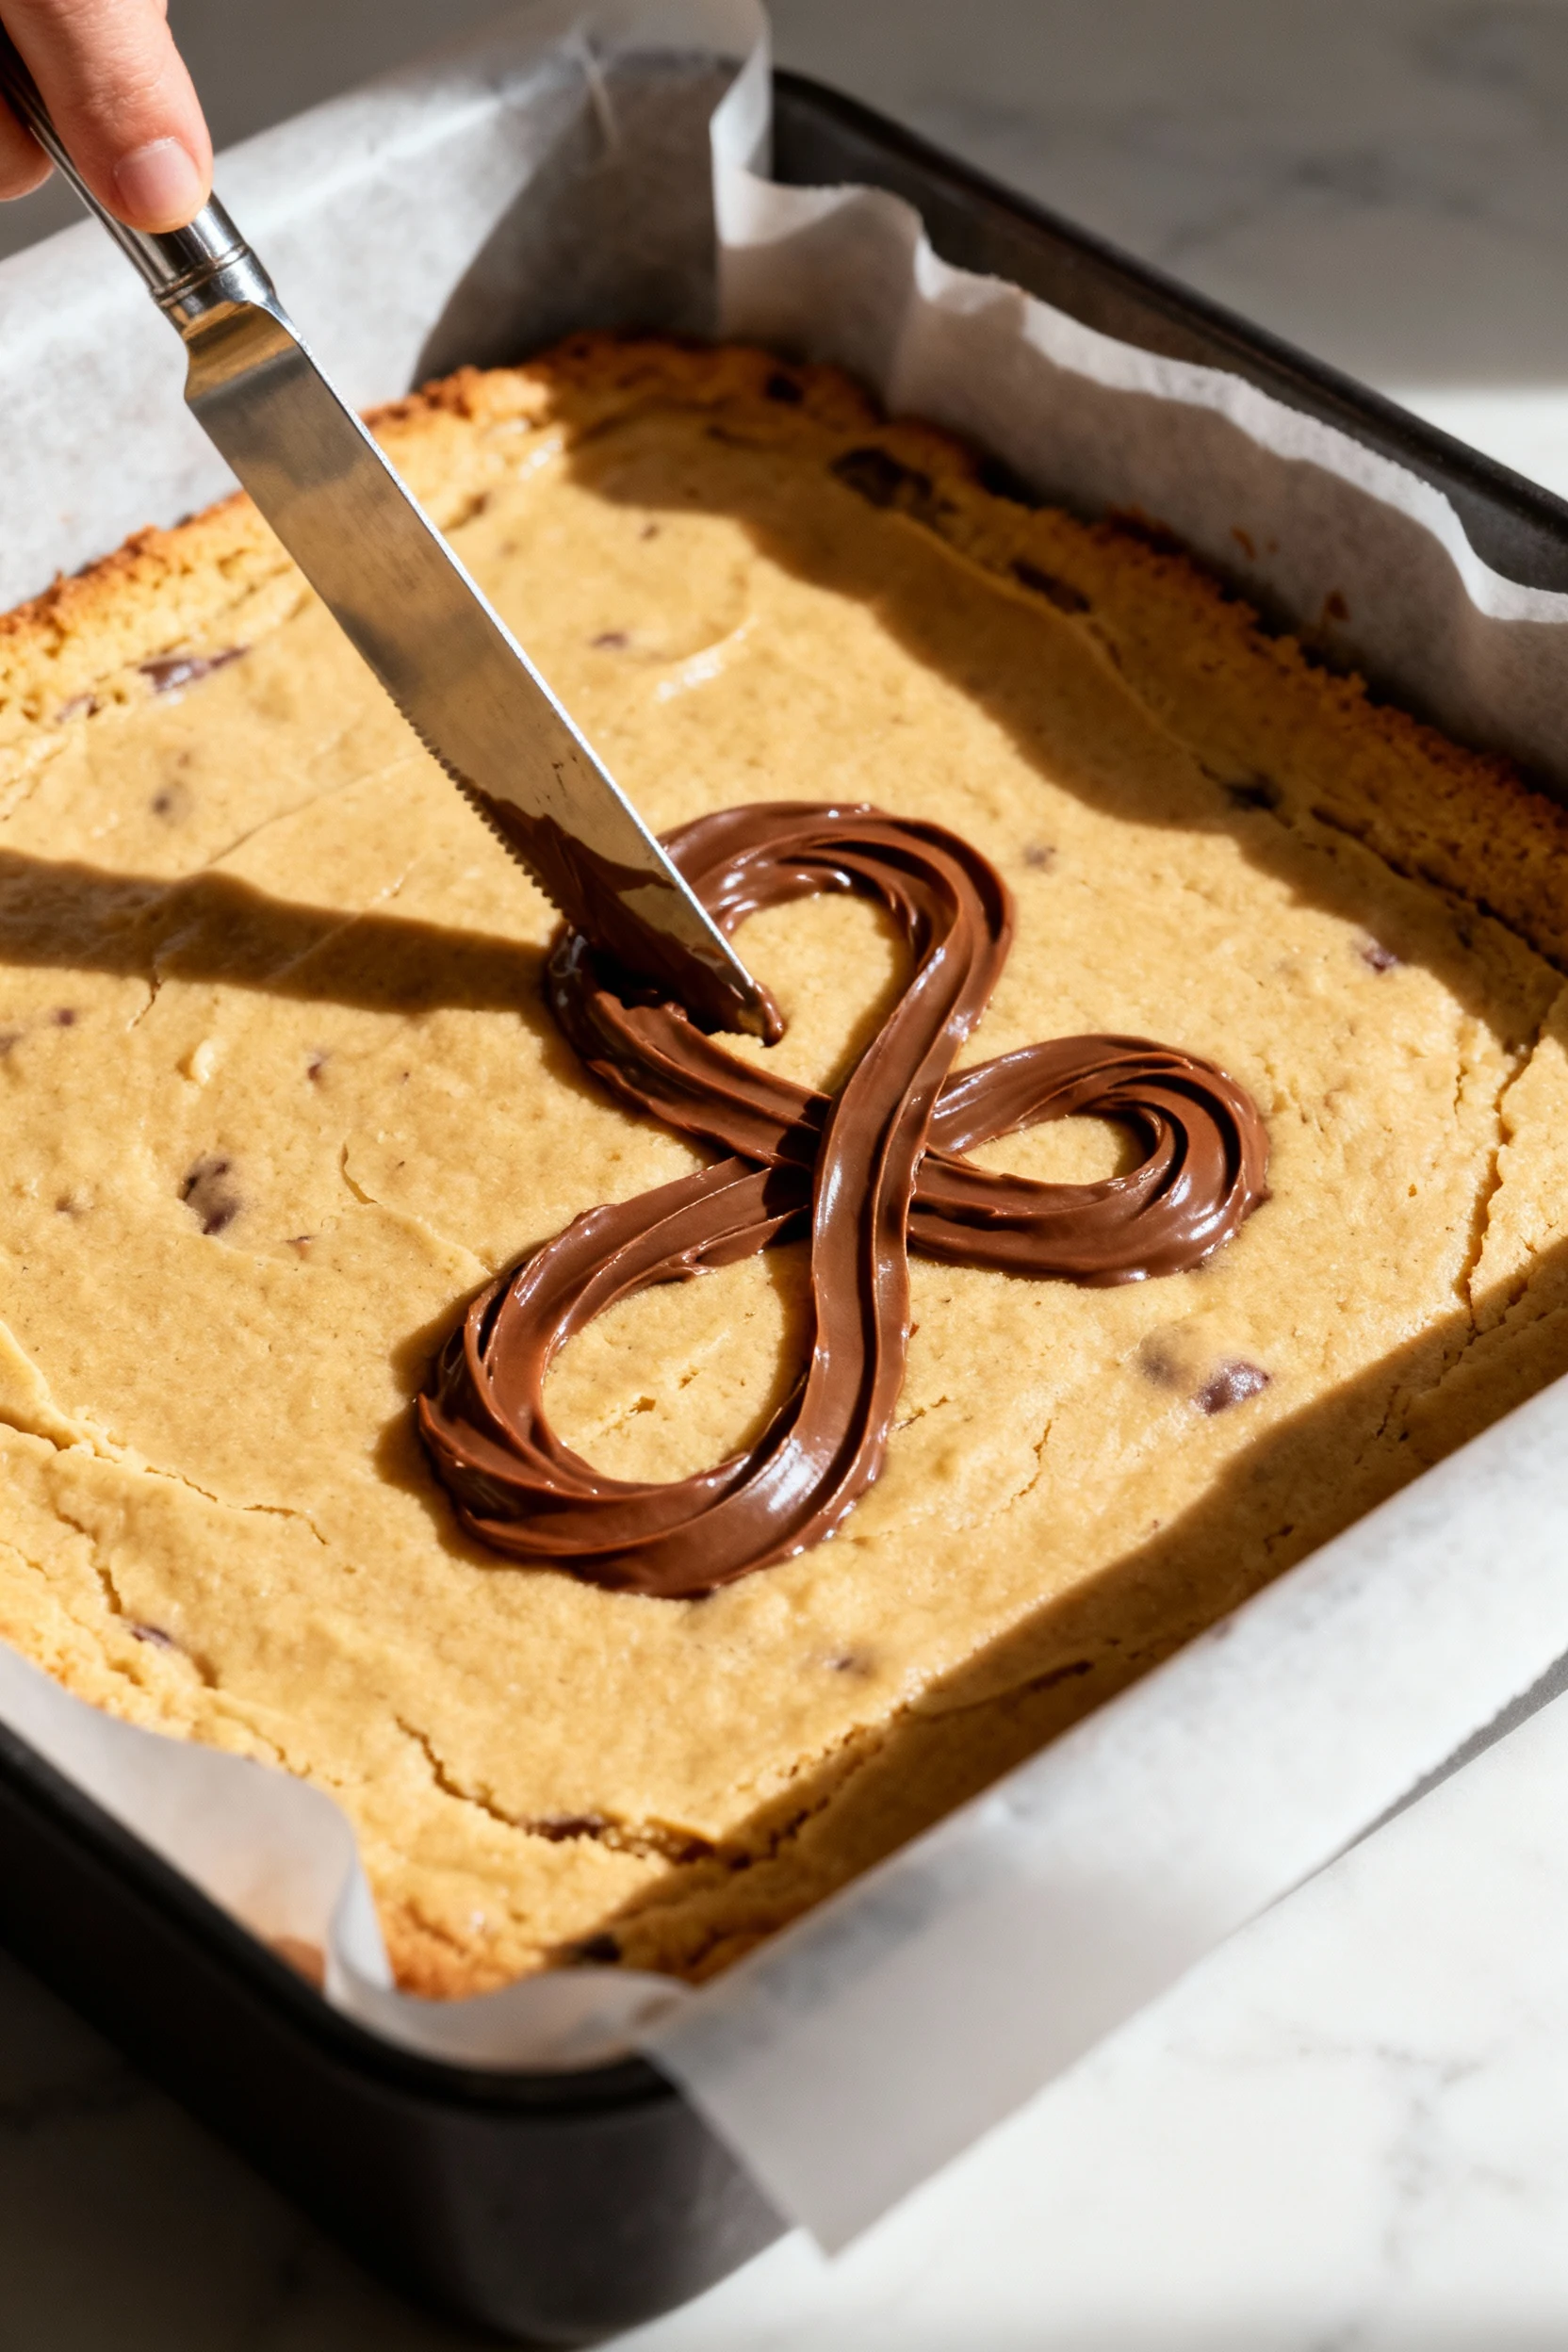
- Warm the Nutella 10–15 seconds in the microwave so it’s scoopable. Dollop 8–10 teaspoons evenly over the batter.
- Use a butter knife to drag figure-8s through the dollops. Stop when you see clear ribbons; over-swirling blurs the pattern.
- Sprinkle hazelnuts and mini chips on top, if using.
- Bake 18–22 minutes until the edges look set and the center is slightly puffed but still soft. A toothpick should come out with a few moist crumbs (not wet batter).
- Cool in the pan for 20–30 minutes, then lift using parchment and slice into squares. Enjoy warm or at room temp.
Preservation Guide
Room temperature: Store squares in an airtight container for 3–4 days. Layer with parchment to keep swirls pristine.
Freezer: Wrap each square tightly and freeze up to 2 months. Thaw at room temp for 30 minutes or reheat 10–15 seconds in the microwave for a gooey center.
Reheat like a pro: 300°F (150°C) oven for 5–7 minutes restores edges without drying. Microwave works, but go short bursts to protect texture.
Make-ahead: Mix dry ingredients in advance and stash in a labeled bag. When ready, add wet ingredients and bake. IMO, this is the fastest way to “host like a wizard.”
Nutella care: Close the jar firmly and keep it in a cool, dry spot. Do not refrigerate; it thickens and makes swirling annoying.
Health Benefits
We’re not selling this as a kale salad, but there’s balance. Hazelnuts bring monounsaturated fats and vitamin E, which support heart health. Eggs add protein that helps curb sugar spikes when you’re smart with portions.
Use dark chocolate chips for more antioxidants and richer flavor. Swap 1/4 cup flour for almond flour to boost healthy fats and lower refined carbs slightly. Portion control matters; a warm square can feel indulgent without turning into a sugar avalanche.
Want a lighter take? Cut the sugar by 2 tablespoons and drop an extra pinch of salt to keep flavor high. TBH, you’ll barely notice the difference, and your future self might thank you.
Pitfalls to Watch Out For
- Overmixing: Stir just until combined. Extra mixing = tough bars.
- Hot butter + egg: If the butter’s blazing, you’ll get scrambled bits. Cool 2–3 minutes first.
- Over-swirling: Stop when ribbons form. Too many passes = muddy top and less wow factor.
- Wrong pan: Use an 8-inch square. A 9-inch pan makes thin, overbaked bars.
- Overbaking: Pull them when edges set and the center looks slightly underdone. They firm as they cool.
- Skipping salt: Salt hits the hazelnut-chocolate notes. Without it, the flavor falls flat.
- Cold egg: It can seize the butter. Room temp blends better and keeps the batter smooth.
- Imprecise measuring: Spoon and level flour. Packing flour leads to dry, cakey bars.
Mix It Up
- Salted Espresso Swirl: Add 1 teaspoon instant espresso to the batter and finish with flaky salt after baking. Coffee amplifies chocolate like a hype man.
- Banana Bread Blondies: Mash 1 small ripe banana and reduce brown sugar by 2 tablespoons. Banana + hazelnut is a crowd-pleaser.
- Peanut Crunch: Fold in 1/3 cup chopped peanuts and swirl Nutella plus 2 tablespoons peanut butter. It’s basically a candy bar in bar form.
- Raspberry Ripple: Dot 1/4 cup seedless raspberry jam with the Nutella and swirl together. Sweet-tart contrast = chef’s kiss.
- Brown Butter Upgrade: Brown the butter for 3–4 minutes until nutty before mixing. Deeper flavor, same easy process.
- Quick Mug Hack: For a 2-minute treat: 3 tablespoons flour, 2 tablespoons brown sugar, 1 tablespoon butter, splash milk, pinch salt, mix in a mug, dollop Nutella, microwave 60–90 seconds. Emergency solved.
- Breakfast Vibes: Spread Nutella on warm toast, top with sliced strawberries and a sprinkle of granola. Zero effort, maximal payoff.
- Frozen Fudge Bites: Stir Nutella with a splash of milk and crushed hazelnuts, spoon into mini liners, freeze 1 hour. No-bake, no drama.
FAQ
Can I use a 9×13-inch pan for a party batch?
Yes—double the recipe and bake in a 9×13-inch pan for 22–26 minutes. Watch the edges and pull when the center looks slightly underdone. If you like thicker bars, stick to the 8-inch pan and bake two batches for better control.
What if I only have white sugar?
You can replace brown sugar with white sugar, but expect less moisture and caramel depth. Add 1 tablespoon of honey or maple syrup to fake some of that stickiness. The bars will still be good, just not as chewy.
How do I get those perfect swirls without mixing too much?
Dollop Nutella in small spoonfuls across the batter, then drag a butter knife in figure-8 patterns 3–4 times. Stop early when you see clear ribbons. If the Nutella seems stiff, warm it 10–15 seconds for easier control.
Can I make this gluten-free?
Yes—use a 1:1 gluten-free baking blend with xanthan gum. Expect a slightly more delicate crumb, so let the pan cool fully before slicing. Almond flour alone won’t give the right structure here.
Is there a way to cut the sweetness?
Reduce granulated sugar by 2–3 tablespoons and add an extra pinch of salt. Swap mini chips for dark chocolate chunks to keep flavor bold. You’ll lose a tiny bit of chew, but most people won’t notice.
What’s the best way to store these for a picnic or road trip?
Cool completely, then pack in a rigid container lined with parchment. Keep them out of direct sun and avoid stacking too high so the swirl stays sharp. A small ice pack in your tote helps if it’s blazing hot.
Can I add cocoa powder to make them more chocolatey?
Absolutely—add 2 tablespoons of Dutch-process cocoa and reduce flour by 2 tablespoons. You’ll get a hybrid brownie-blondie with deeper chocolate notes. Keep the Nutella swirl; it’s the star.
I don’t have hazelnuts—what’s a good substitute?
Use toasted almonds, pecans, or walnuts for crunch. Sunflower seeds also work if you need a nut-free option. The swirl gives most of the hazelnut vibe, so you won’t miss much.
Final Thoughts
You don’t need a bakery or a blowout budget to serve dessert that stops conversations. This blondie delivers warm, gooey squares with slick Nutella ribbons in the time it takes to clean the kitchen. Keep the pantry basics on hand and you’re always minutes away from a win.
Experiment with one tweak at a time, keep an eye on the edges, and protect those swirls like they’re your signature. Share a pan, stash a few squares, and let your oven turn simple ingredients into a flex. If your friends start texting you for “the hazelnut bars,” that’s your cue: you nailed it.
Printable Recipe Card
Want just the essential recipe details without scrolling through the article? Get our printable recipe card with just the ingredients and instructions.