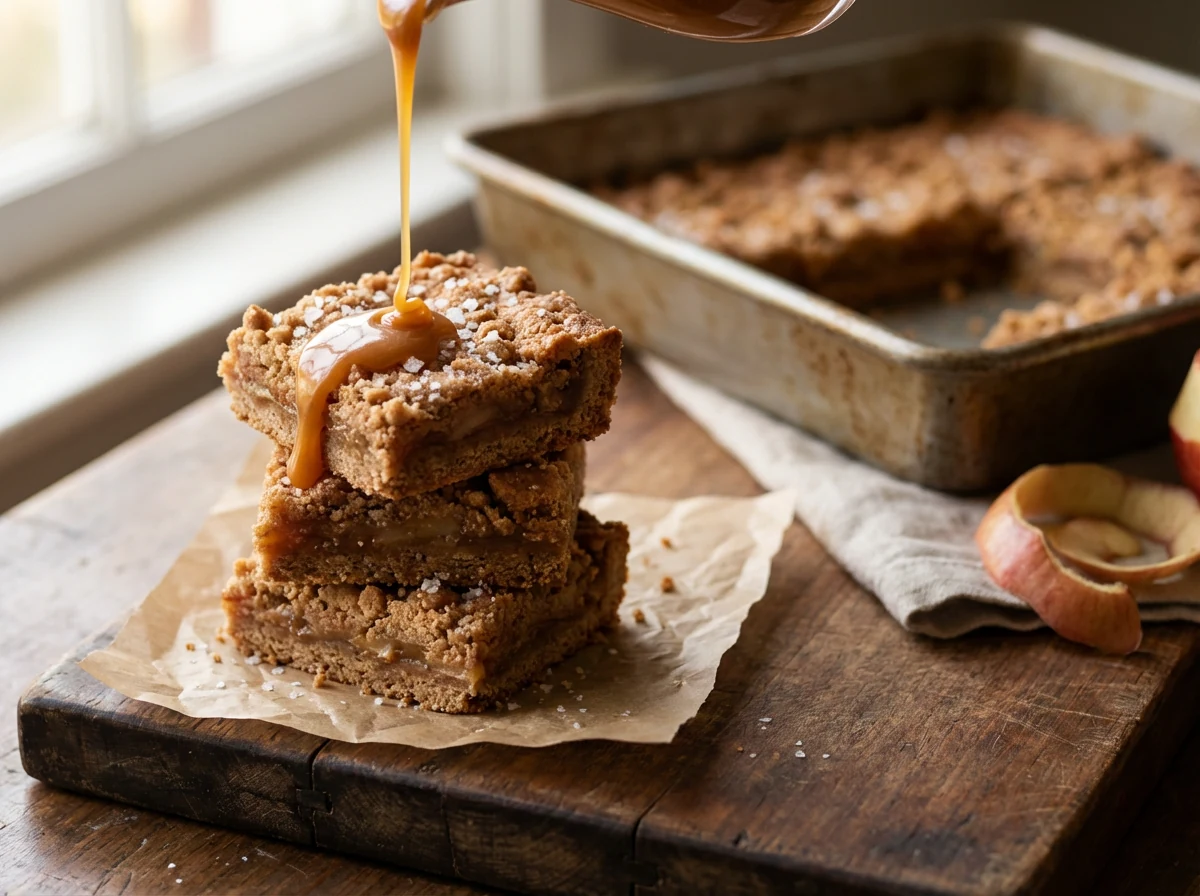
Fall Dessert Recipes — Salted Caramel Apple Bars That Wow
Bake a crowd-pleasing pan tonight: buttery crumble, juicy apples, and silky cheesecake collide for an easy weeknight showstopper.
You don’t need a bakery to make people gasp—you need a 9×13 pan and a plan. These bars stack crisp shortbread, cinnamon apples, a generous caramel drizzle, and a golden oat crumble into one outrageous bite. It’s the kind of dessert that makes “just one more” feel like a polite suggestion, not a rule. If your fall calendar is packed, good news: this recipe scales fast, slices clean, and feeds a small army. And yes, we added flaky salt, because sweet needs a wingman. Grab the apples; let’s make something that tastes like an October hug with entrepreneurial ROI.
What Makes This Recipe So Good

- All the fall vibes: cinnamon apples, toasty oats, and salted caramel in one slice. Cozy meets irresistible.
- Texture trifecta: buttery shortbread base + juicy fruit layer + crunchy crumble. Every bite hits differently—in the best way.
- High reward, low drama: simple steps, everyday ingredients, and no fancy equipment. Your whisk can stay humble.
- Make-ahead friendly: bake, chill, slice tomorrow. The flavors deepen, the slices sharpen, and you look like a planning genius.
- Party-proof: a 9×13 pan feeds a crowd, travels well, and doesn’t demand plate-and-fork formality.
- Flexible: swap apples for pears, tweak spices, go gluten-free or dairy-free. The template holds up.
What You’ll Need (Ingredients)
- For the Shortbread Crust:
- 1 cup unsalted butter, melted
- 1/2 cup granulated sugar
- 1 teaspoon vanilla extract
- 2 cups all-purpose flour
- 1/2 teaspoon fine sea salt
- For the Apple Layer:
- 5 cups peeled, chopped apples (Granny Smith + Honeycrisp recommended)
- 1/3 cup light brown sugar
- 1 tablespoon lemon juice
- 1 1/2 teaspoons ground cinnamon
- 1/4 teaspoon ground nutmeg
- 2 teaspoons cornstarch (or 1 tablespoon flour)
- Pinch of salt
- For the Crumble Topping:
- 1 cup old-fashioned rolled oats
- 3/4 cup all-purpose flour
- 1/2 cup light brown sugar
- 1/2 cup chopped pecans (optional but delightful)
- 1/2 teaspoon ground cinnamon
- 1/4 teaspoon salt
- 1/2 cup unsalted butter, melted
- For the Caramel:
- 1 cup salted caramel sauce (store-bought or homemade)
- Finishing Touches:
- Flaky sea salt, for sprinkling
- Vanilla ice cream, for serving (optional, but come on)
Step-by-Step Instructions

- Preheat and prep the pan: Set the oven to 350°F (175°C). Line a 9×13-inch pan with parchment, leaving an overhang for easy lifting. Lightly grease the sides so nothing sticks.
- Make the shortbread crust: Stir together melted butter, granulated sugar, vanilla, and salt. Add flour and mix until a soft dough forms. Press evenly into the pan. Dock with a fork a few times so it bakes flat.
- Par-bake the crust: Bake for 12–14 minutes until set and just starting to turn pale golden. This prevents soggy-bottom syndrome.
- Toss the apples: In a large bowl, combine chopped apples, brown sugar, lemon juice, cinnamon, nutmeg, cornstarch, and a pinch of salt. Toss until every piece looks glossy and evenly coated.
- Mix the crumble: In another bowl, combine oats, flour, brown sugar, pecans (if using), cinnamon, and salt. Stir in melted butter until clumps form. You want pebble-sized clusters—no sand vibes.
- Layer like a pro: Spread the apple mixture over the warm crust. Drizzle about 1/2 cup of the caramel on top of the apples.
- Add the crumble: Sprinkle the oat topping evenly over the apples. Don’t pack it down—loose crumbs crisp up beautifully.
- Bake: Return the pan to the oven and bake for 35–40 minutes, until the topping is golden and the apples are tender and bubbling around the edges.
- Cool and finish: Let the bars cool on a rack for 30 minutes. Drizzle the remaining caramel over the top and sprinkle with flaky sea salt.
- Chill for clean slices: Refrigerate for 1–2 hours. Slice into bars using a sharp knife. Wipe between cuts if you’re going for that bakery-perfect look.
- Serve: Enjoy at room temp or slightly warm. Ice cream is optional—but, realistically, inevitable.
- Optional homemade caramel (if you’re feeling chef-y): Cook 1 cup sugar over medium heat until amber, whisk in 6 tablespoons butter, then 1/2 cup heavy cream, finish with 1 teaspoon vanilla and 1 teaspoon flaky salt. Cool slightly before drizzling.
Storage Tips
- Room temp: Keep tightly covered for up to 24 hours if your kitchen isn’t a sauna. The crumble stays crisp.
- Fridge: Store in an airtight container for 4–5 days. They slice cleaner cold and taste even better on day two.
- Freezer: Freeze bars (already sliced) for up to 2 months. Wrap individually and thaw overnight in the fridge.
- Reheat smart: Warm slices in a 300°F oven for 8–10 minutes to revive the crumble. Microwave works, but you’ll trade crunch for convenience, FYI.

Nutritional Perks
- Apple power: Fiber and vitamin C show up to the party disguised as dessert.
- Oats: They bring whole-grain goodness and a bit of heart-healthy beta-glucan.
- Nuts: Pecans add satisfying crunch plus healthy fats. If you’re nut-free, skip them—no flavor penalty.
- Spices: Cinnamon and nutmeg deliver antioxidants and cozy flavor without extra sugar.
- Reality check: This is dessert. Balance your day: pair a slice with protein, and don’t pretend caramel is a vegetable.

What Not to Do
- Don’t skip par-baking: A raw crust turns soggy under juicy apples. Give it that head start.
- Don’t slice right away: Warm bars will crumble and smear. Chill for clean edges and confident bragging rights.
- Don’t use quick oats: They melt into mush. Old-fashioned rolled oats deliver structure and crunch.
- Don’t forget the thickener: Cornstarch (or flour) keeps the apple layer jammy, not watery. Science wins.
- Don’t shy away from salt: A pinch in each layer + flaky salt on top makes the sweet pop. Bland is a choice—decline it.
- Don’t crowd the pan with apple slabs: Chop into small pieces for even baking. Big chunks = uneven texture and rogue bites.
- Don’t skip parchment: Lifting the whole slab out is easier than digging corners like a dessert archaeologist.
Alternatives
- Gluten-free: Use a 1:1 gluten-free flour for crust and crumble. Oats should be certified GF.
- Dairy-free: Swap butter for coconut oil or vegan butter; use dairy-free caramel. Still excellent, IMO.
- Nut-free: Omit pecans and add extra oats or a handful of pumpkin seeds for crunch.
- Pear edition: Sub pears for apples and add a whisper of cardamom. Elegant and unexpected.
- Maple caramel: Warm up 1/2 cup pure maple syrup with a splash of cream and pinch of salt. Drizzle for a lighter vibe.
- Cran-apple: Fold in 1 cup fresh cranberries for tart pops that cut through the sweetness.
- Spice swap: Try apple pie spice or add ginger for a little zing.
FAQ
What apples work best for these bars?
Use a mix for balance: Granny Smith for tartness and structure, plus Honeycrisp or Braeburn for sweetness and juiciness. Combining varieties gives complex flavor and keeps the texture on point.
Can I make this a day ahead?
Absolutely. Bake, cool, drizzle caramel, and refrigerate overnight. Slice the next day for the crispest edges and the most developed flavor. It’s a meal-prep miracle, dessert edition.
How do I keep the crust from getting soggy?
Par-bake the crust until set, thicken the apple mixture with cornstarch, and let the bars cool so the filling can firm up. Also, don’t overload with fruit—stick to the 5-cup guideline for balance.
Is store-bought caramel okay?
Yes. Look for a thicker sauce so it doesn’t vanish into the bars. If it’s thin, reduce it gently on the stove for a few minutes until it coats the back of a spoon.
Can I bake this in a smaller pan?
If using an 8×8-inch pan, halve the recipe and add a few extra minutes to bake time as needed. Watch for bubbling edges and a golden crumble—those are your green lights.
How do I prevent the crumble from overbrowning?
Tent the pan with foil in the last 10 minutes if the top gets too dark. Keep the foil loose so steam can escape and the crumble stays crisp.
Do these freeze well?
They freeze like champs. Wrap slices tightly, store for up to 2 months, and thaw overnight in the fridge. Warm in a low oven to revive the texture before serving.
In Conclusion
These salted caramel apple bars deliver a big, cozy payoff with minimal hassle—exactly what busy fall nights require. You get layers of flavor, a crowd-pleasing format, and flexibility for every dietary twist. Bake once, slice clean, and accept compliments with a humble nod you absolutely didn’t earn. Ready to make a pan that disappears faster than you can say “save me one”? Cool—get those apples, and let the oven do the heavy lifting.
Printable Recipe Card
Want just the essential recipe details without scrolling through the article? Get our printable recipe card with just the ingredients and instructions.