Edamame Recipes to Upgrade Weeknights and Wow Your Crew
Fast, flavor-packed ideas for busy weeknights that deliver protein, crunch, and spice—simple steps, big payoff, zero pantry drama.
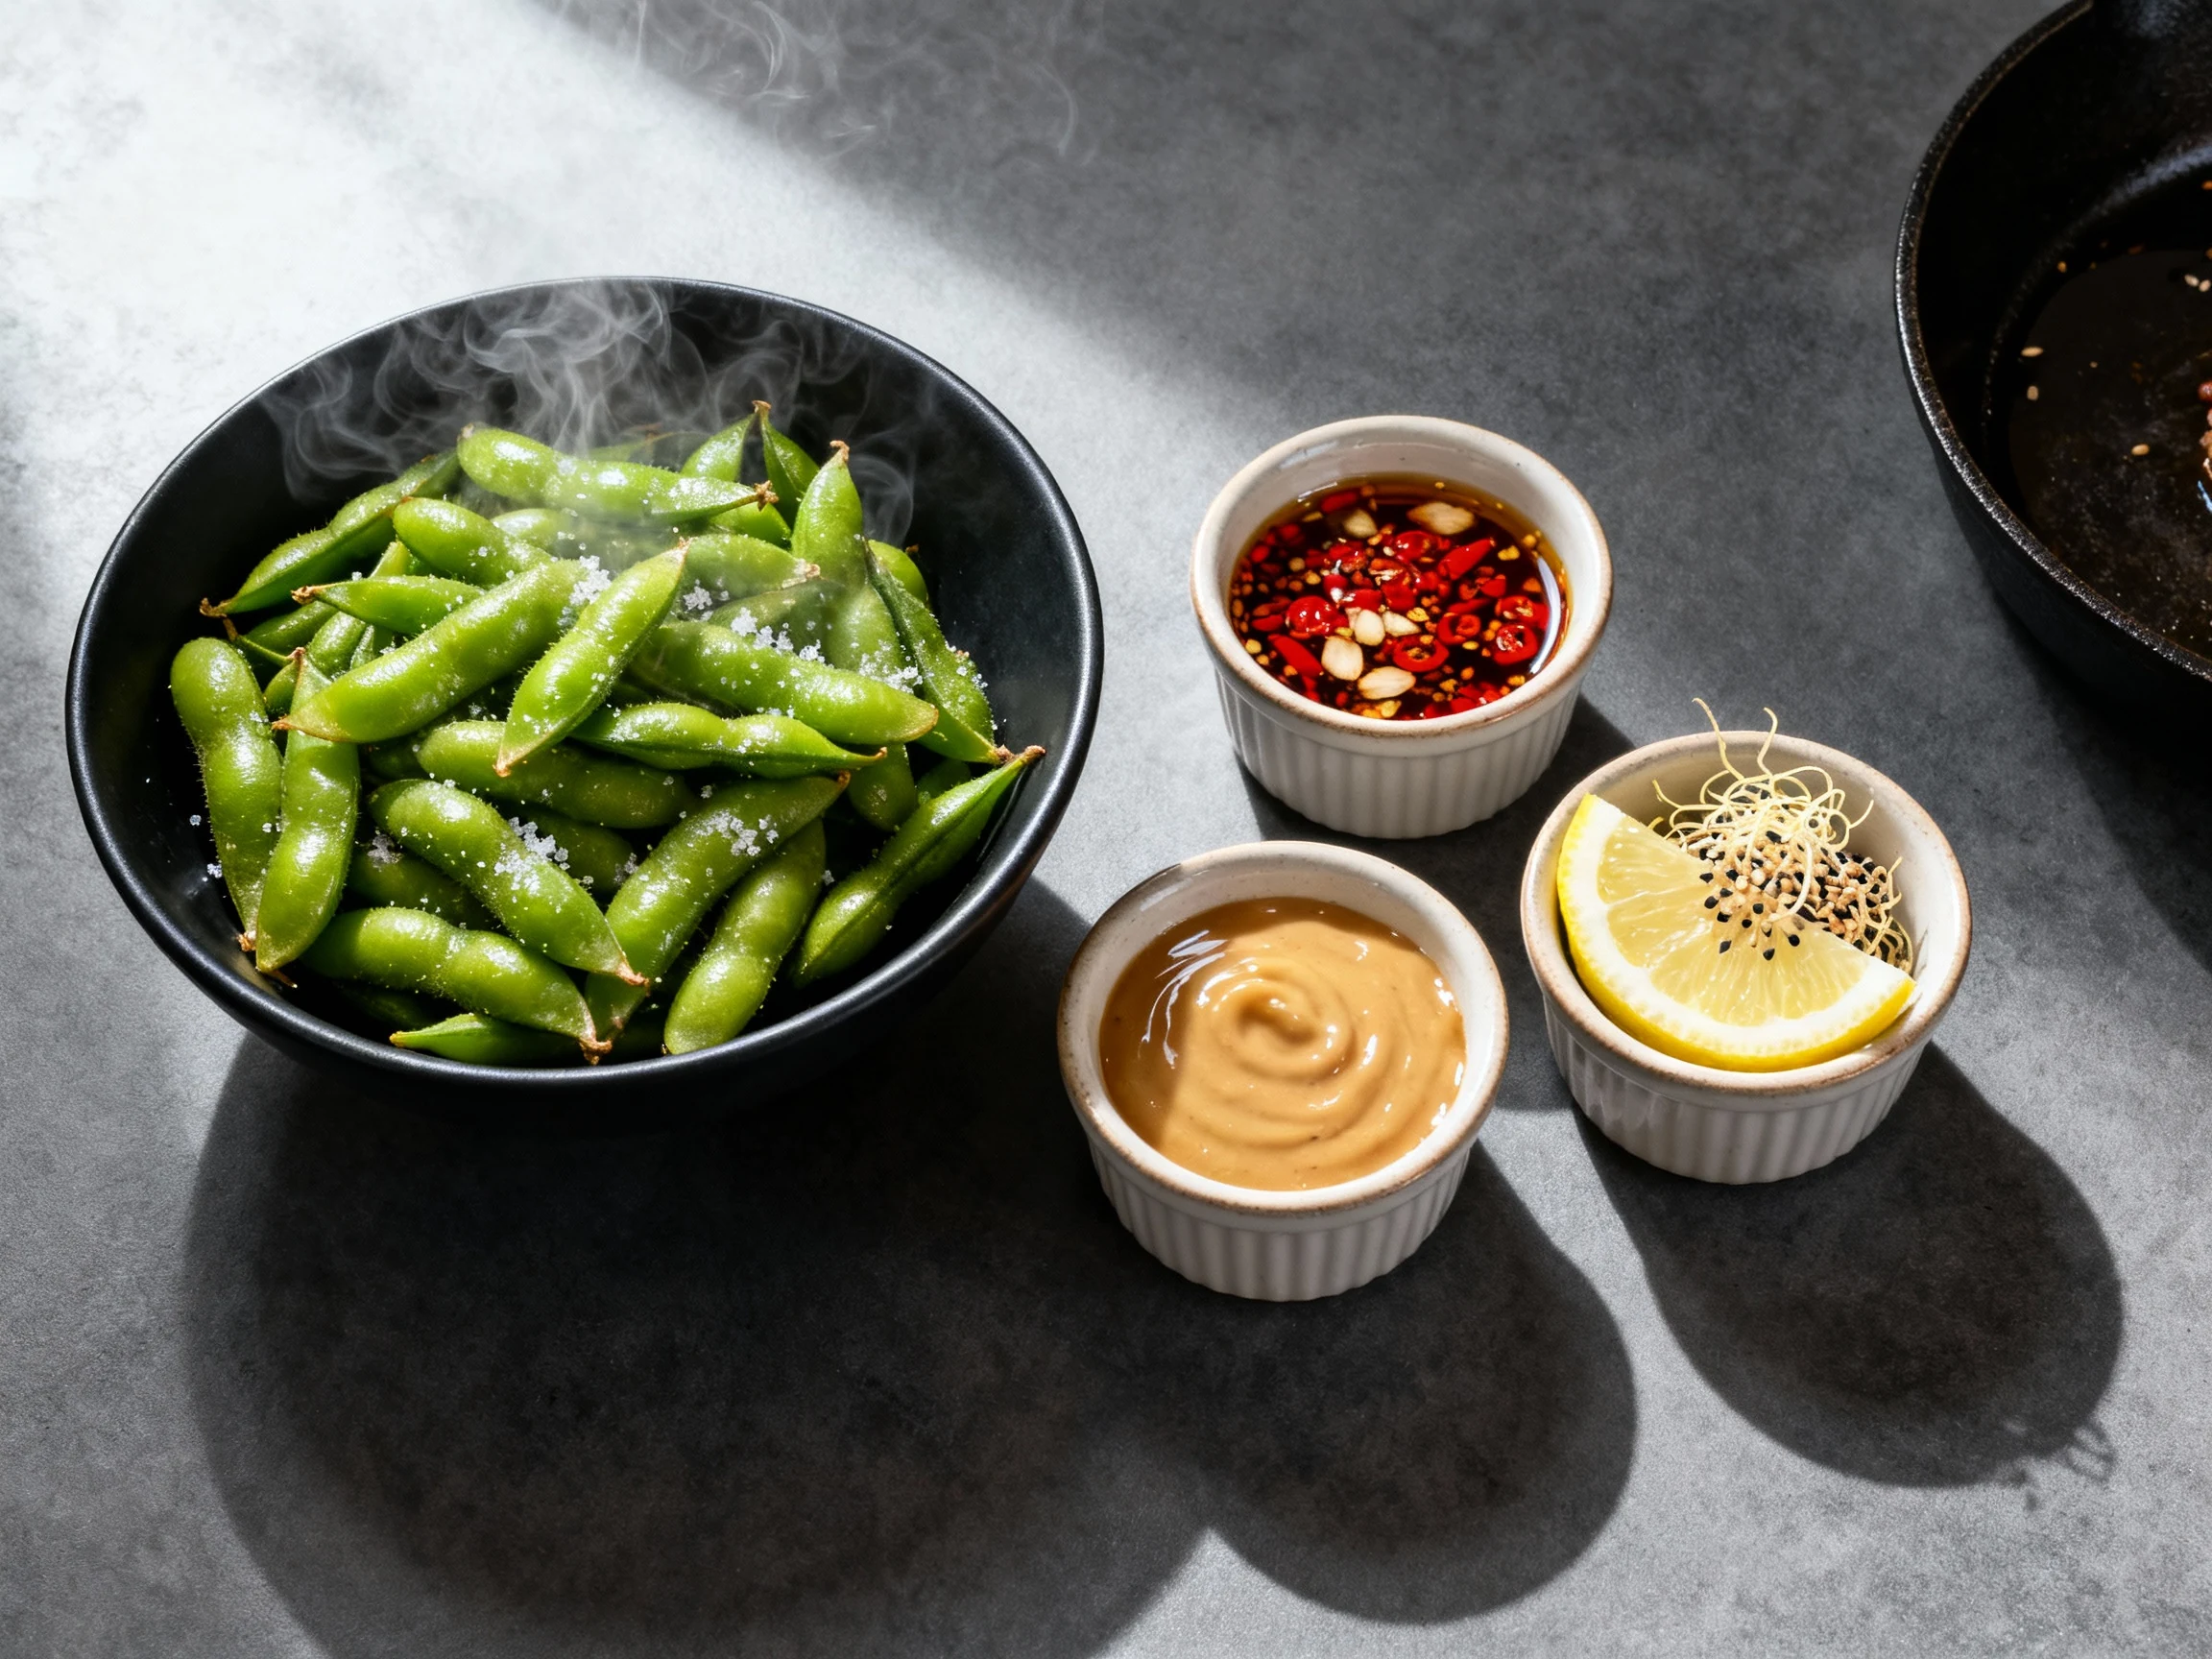
Here’s the truth: a bag of frozen soybeans can beat your favorite bar snack, crush your salt cravings, and still keep your macros tidy. You’ll get the same addictive, finger-licking energy as wings—without needing an hour or a gallon of oil. The play? Hit edamame with heat, acid, umami, and a tiny kiss of sweetness. Ten minutes later, you’ve got a snack or side that tastes like you raided a chef’s pantry. No chef hat required, just a pan and a plan.
What Makes This Recipe Awesome
Think of this as your go-to spicy-garlic-sesame edamame—built for speed and flavor, tailored to whatever you’ve got on hand.
- Ready in 10–15 minutes: You’ll barely have time to set the table before the pan sings.
- Protein-packed: Edamame brings serious plant protein, so you feel full, not foggy.
- Minimal dishes: One pot to boil, one skillet to sauce. That’s it.
- Custom heat: Make it mild for kids or crank the spice when the group chat needs impressing.
- Restaurant-level flavor: Soy, sesame, garlic, and chili do the heavy lifting—no fancy gear needed.
- Diet-flexible: Use tamari to keep it gluten-free; swap maple for honey to keep it vegan.
Yield: 4 snack servings • Total Time: ~15 minutes
Ingredients Breakdown
- Edamame in pods (1 lb / ~450 g): Frozen works perfectly; no need to thaw.
- Garlic (3–4 cloves), minced: The soul of the sauce. Fresh beats jarred.
- Soy sauce or tamari (2 tablespoons): Tamari keeps it gluten-free.
- Rice vinegar (1 tablespoon): Adds brightness and balance.
- Toasted sesame oil (1 tablespoon): Brings nutty aroma. Don’t skip.
- Chili paste (1–2 teaspoons): Sambal, gochujang, or sriracha—your call. Use flakes if that’s what you’ve got.
- Honey or maple syrup (1 teaspoon): Optional, but clutch for rounding out the heat and salt.
- Neutral oil (1 tablespoon): Avocado or canola for sautéing the pods.
- Sesame seeds (1 tablespoon): For crunch and finish.
- Scallions (2), thinly sliced: Fresh bite and color.
- Lime or lemon (1), cut into wedges: A squeeze at the end wakes everything up.
- Kosher salt & black pepper: Season to taste after saucing.
- Optional boosters: Grated ginger (1 teaspoon), white miso (1 teaspoon), or furikake (1 tablespoon) for extra umami.
The Method – Instructions
- Boil the edamame: Bring a large pot of salted water to a rolling boil. Add edamame pods and cook until bright green and just tender, about 4–5 minutes.
- Drain and dry: Drain well, then spread the pods on a towel and pat dry. Dry pods sear better and don’t dilute your sauce—water is the enemy of flavor here.
- Make the sauce: In a small bowl, stir together soy/tamari, rice vinegar, toasted sesame oil, chili paste, honey/maple, and minced garlic. Add ginger or miso if using. Taste and adjust—aim for salty, spicy, tangy, slightly sweet.
- Sear the pods: Heat the neutral oil in a large skillet over medium-high. When it shimmers, add edamame and cook, tossing occasionally, until the pods blister in spots, about 2–3 minutes.
- Sauce it up: Pour in the sauce and toss constantly until the garlic is fragrant and the glaze clings to the pods, 30–60 seconds. Don’t overcook—garlic burns fast and bitterness isn’t invited.
- Finish: Sprinkle with sesame seeds and scallions. Hit it with a generous squeeze of lime/lemon. Season with pepper and more salt if needed.
- Serve: Pile into a bowl and encourage everyone to pull the pods through their teeth to get the good stuff. Discard shells (please). Pair with chilled drinks and watch them disappear.
- Shelled variation: Use shelled edamame, sauté the beans, then toss with the sauce. Fold into warm rice, quinoa, or noodles for a quick bowl.
Keeping It Fresh
Store leftovers in an airtight container in the fridge for 3–4 days. Reheat in a hot skillet for 1–2 minutes to revive the glaze; a microwave works but sacrifices a little texture.
If you plan ahead, keep the sauce separate and toss it on warm edamame right before serving for maximum shine. If freezing, go with shelled edamame—pods turn soggy after a freeze/thaw cycle.
Got a party? Make the sauce in advance and boil edamame just before guests arrive. Quick sear, toss, garnish—instant hero.
What’s Great About This
- Macro-friendly: High protein, solid fiber, and smart fats from sesame oil. Your snack finally earns its keep.
- Budget win: A bag of frozen edamame is cheap, fast, and way more satisfying than chips.
- Scales easily: Double the sauce, cook in batches, and you’re set for a crowd.
- Diet-inclusive: Gluten-free with tamari; vegan with maple syrup. IMO, flexibility is king.
- Flavor-first: Layers of umami, heat, acid, and crunch—because boring snacks are a crime.
Common Mistakes to Avoid
- Skipping the dry-off: Wet pods kill sear and water down your glaze. FYI, steam isn’t your friend here.
- Overcooking the garlic: It goes from fragrant to bitter in seconds. Add it with the sauce, finish fast.
- Using too much soy: Salt creep is real. Taste the sauce and adjust; the pods are already salted from boiling.
- Low heat sear: Medium-high heat blisters pods. If the pan isn’t hot, you’ll get limp, sad beans.
- Wrong oil choice: Toasted sesame oil is for flavor, not frying. Use a neutral oil to sear.
- Eating the shells: Tempting? Sure. Smart? No. They’re fibrous and not meant to be swallowed—save your jaw.
Alternatives
Want options? Build a whole rotation and never get bored. BTW, each one is a 10–15 minute play.
- Miso-Butter Edamame: Melt 1 tablespoon butter with 1 teaspoon white miso, toss with hot pods, finish with scallions and sesame.
- Lemon-Pepper Pop: Sear pods, add 1 tablespoon olive oil, lots of black pepper, zest of 1 lemon, and a squeeze of juice. Bright and punchy.
- Everything Bagel Crunch: Toss warm pods with 1 tablespoon sesame oil and 1–2 tablespoons everything bagel seasoning. Instant snack magic.
- Roasted Edamame: Use shelled beans. Mix with olive oil, salt, smoked paprika, and garlic powder. Roast at 425°F (220°C) for 15–20 minutes until crisp.
- Edamame Hummus: Blend shelled beans with tahini, garlic, lemon, olive oil, salt, and a splash of water. Creamy, green, and perfect for pita.
- Gochujang Glaze: Whisk gochujang, soy, rice vinegar, honey. Sear pods, toss, and top with roasted seaweed flakes for a spicy Korean-inspired twist.
- Sesame-Ginger Salad Topper: Toss shelled edamame with shredded cabbage, carrots, cilantro, and a quick dressing (soy, rice vinegar, sesame oil, ginger).
- Garlic-Parmesan: Not classic, but delicious. Sear pods, add minced garlic, toss with grated Parmesan, and finish with lemon. Salty and savory.
FAQ
Can I use fresh edamame instead of frozen?
Yes. Fresh edamame cooks even faster—taste for tenderness at 3–4 minutes. Frozen is more accessible and consistent, so most folks stick with it.
Is it safe to eat the shells?
No. The shells are tough and fibrous. Pull the pod through your teeth to extract the beans and discard the shells. Your stomach will thank you.
How do I make it less spicy?
Cut the chili paste to ½ teaspoon or skip it entirely. Add a bit more honey/maple and lime for flavor balance without heat. Sesame seeds and scallions still bring pop.
How much protein is in a serving?
About 8–10 grams per ½ cup of shelled beans, depending on brand. A hearty bowl can easily deliver 15–20 grams—solid for a snack or side.
Can I cook edamame without boiling?
Yep. Steam for 5–6 minutes until tender, or microwave with a splash of water for 3–4 minutes. Then sear and sauce as directed. Boiling is just the most foolproof route.
What if I only have soy sauce?
Use it. If it tastes too salty, add a splash of water and a bit more vinegar or lime to balance. Tamari is great for gluten-free, but regular soy works perfectly.
Can I air-fry edamame?
For shelled beans, toss with a little oil and air-fry at 400°F (205°C) for 10–12 minutes, shaking halfway. Then toss in the sauce. Pods don’t crisp as well in an air fryer.
Is this suitable for meal prep?
Absolutely. Make the sauce and boil the beans ahead. Keep them separate and combine right before eating for the best texture. Add to bowls, salads, or noodle stir-fries.
My Take
Snack time should be simple, loud, and satisfying—and this delivers. You get the kind of bold, punchy flavor that makes you reach for “just one more” while still keeping things light. Rotate a few variations and you’ve got a weeknight side, a game-day nibble, and a desk lunch booster—all from the same humble bean. If a 10-minute pan routine can do all that, I’m in—and you probably will be too.
Printable Recipe Card
Want just the essential recipe details without scrolling through the article? Get our printable recipe card with just the ingredients and instructions.