Cheesecake Cake Recipes — Layered Bliss You Can Master
From birthdays to brunch, master a layered cheesecake + cake method that saves time, reduces mess, and tastes like a bakery treat.
You know that dessert people whisper about on the drive home? This is that dessert. It stacks the creamy tang of cheesecake with the fluffy comfort of classic cake into one outrageous slice. No pastry degree required, just a game plan that hits maximum wow with minimum chaos. Bake it once, flex it everywhere, and watch your “I don’t bake” friends ask for the recipe. Ready to turn your oven into a brag machine?
What Makes This Recipe So Good
- Two-for-one payoff: You get the lush, velvety bite of cheesecake plus the airy lift of sponge cake in one dessert. It’s the hybrid nobody regrets.
- Foolproof structure: A chilled cheesecake layer sandwiched between two cake rounds means clean slices and stackable stability.
- Bakery-level finish: Cream cheese frosting and graham-cracker “crumb coat” telegraph cheesecake vibes with a pro look.
- Flexible flavor base: Vanilla cake + classic cheesecake gives you a canvas for any add-ins—berries, chocolate, citrus, you name it.
- Make-ahead friendly: Cheesecake loves the fridge. Bake components in advance, assemble day-of, and look suspiciously calm at party time.
Ingredients Breakdown
For the Cake Layers (two 9-inch rounds)
- 2 cups (260g) all-purpose flour
- 1 ½ teaspoons baking powder
- ½ teaspoon fine sea salt
- 1 cup (200g) granulated sugar
- ½ cup (113g) unsalted butter, softened
- 2 large eggs, room temperature
- 1 cup (240ml) buttermilk, room temperature
- 2 teaspoons pure vanilla extract
For the Cheesecake Layer (one 9-inch round)
- 24 ounces (680g) cream cheese, room temperature
- ¾ cup (150g) granulated sugar
- 2 large eggs, room temperature
- ½ cup (120g) sour cream
- 1 teaspoon pure vanilla extract
- 1 tablespoon cornstarch
- Pinch fine sea salt
- Optional: zest of 1 lemon for brightness
For the Frosting & Finish
- 8 ounces (226g) cream cheese, room temperature
- ½ cup (113g) unsalted butter, room temperature
- 2 cups (240g) powdered sugar, sifted
- 1–3 tablespoons heavy cream (as needed)
- 1 teaspoon pure vanilla extract
- Pinch salt
- Optional décor: 1 cup graham cracker crumbs, fresh berries, lemon zest curls, or chocolate shavings
How to Make It – Instructions
- Prep pans and oven: Line a 9-inch springform pan with parchment, grease the sides. Preheat to 325°F/165°C for cheesecake. Place a pan of hot water on the lower rack (gentle steam helps prevent cracks).
- Make cheesecake batter: Beat cream cheese until smooth. Add sugar, salt, and cornstarch; mix until creamy. Add eggs one at a time. Blend in sour cream, vanilla, and optional lemon zest. Avoid overmixing to keep air bubbles low.
- Bake cheesecake: Pour into the pan, smooth the top, and bake 40–50 minutes until edges set and the center jiggles slightly. Cool 10 minutes, run a knife around the edge, then chill on a rack. Cover and refrigerate at least 4 hours (overnight is elite).
- Switch to cake mode: Preheat oven to 350°F/175°C. Grease and line two 9-inch cake pans with parchment.
- Mix cake batter: Cream butter and sugar until pale and fluffy, 2–3 minutes. Beat in eggs and vanilla. Whisk flour, baking powder, and salt; add in thirds, alternating with buttermilk. Mix until just combined.
- Bake cake layers: Divide batter evenly. Bake 20–25 minutes until a toothpick comes out clean. Cool 10 minutes in pans; turn out onto racks and cool completely.
- Make frosting: Beat cream cheese and butter until smooth. Add powdered sugar, vanilla, and salt. Splash in heavy cream until spreadable. Taste. Smile. It’s good.
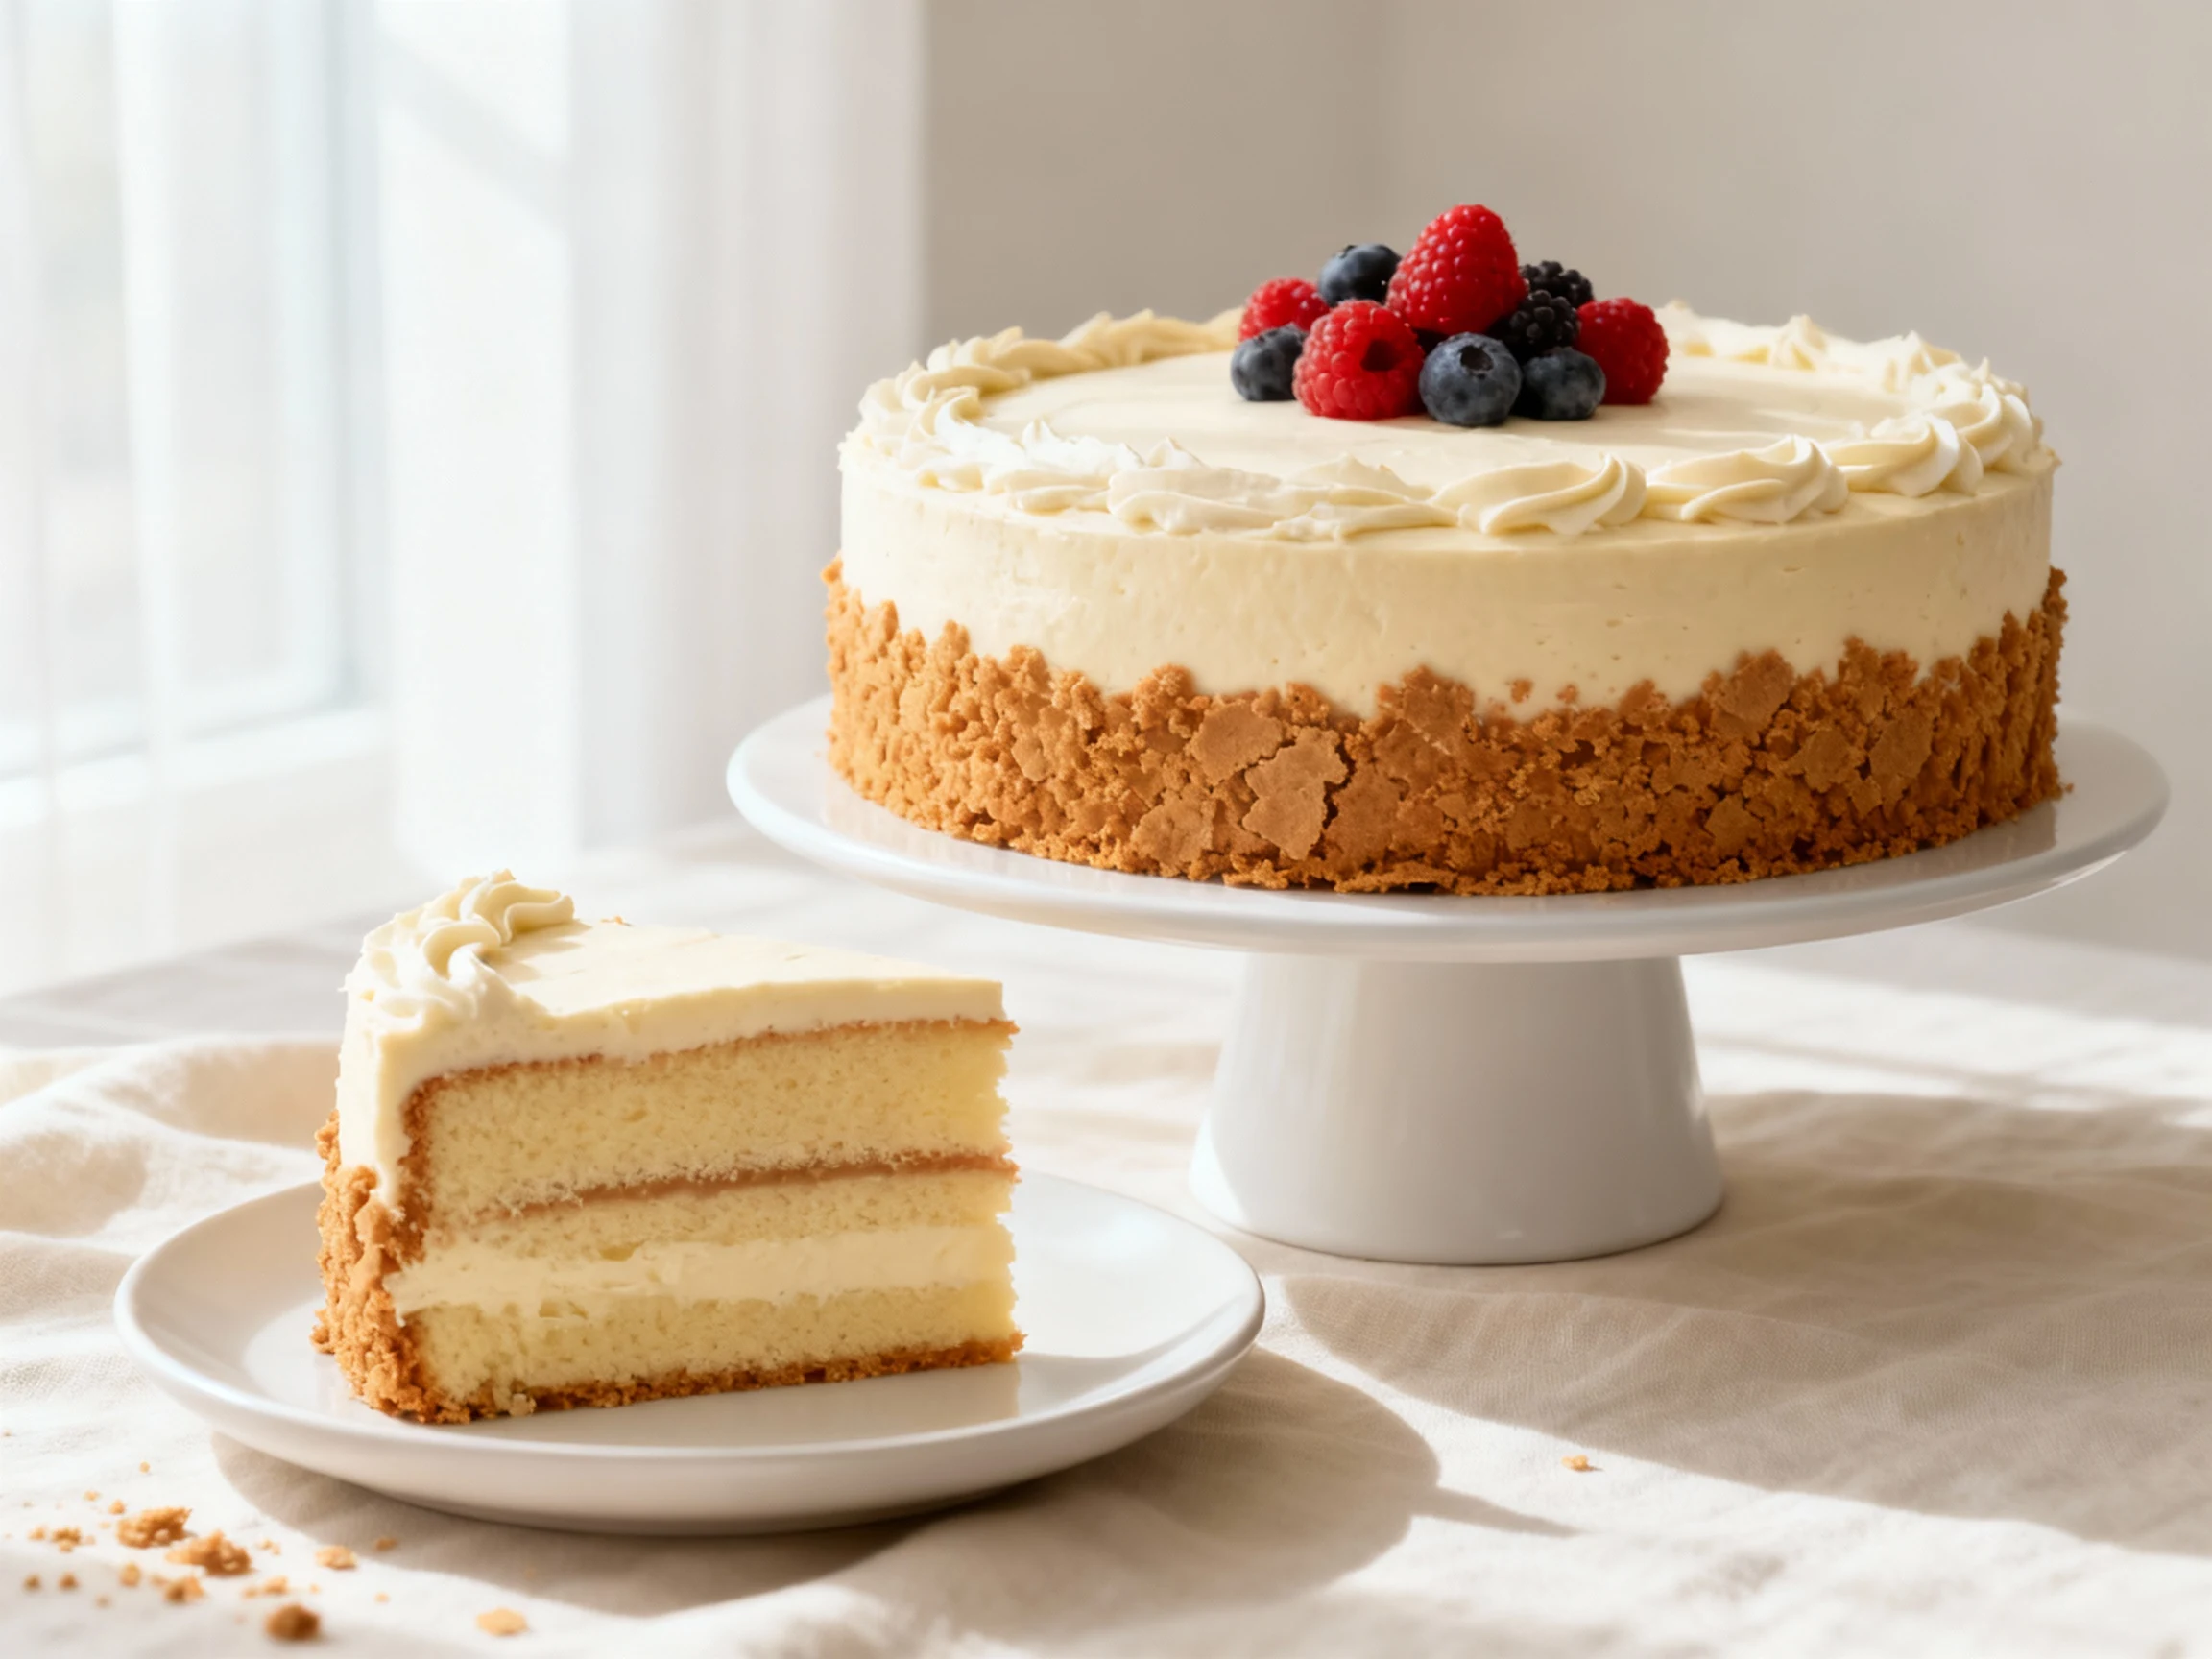
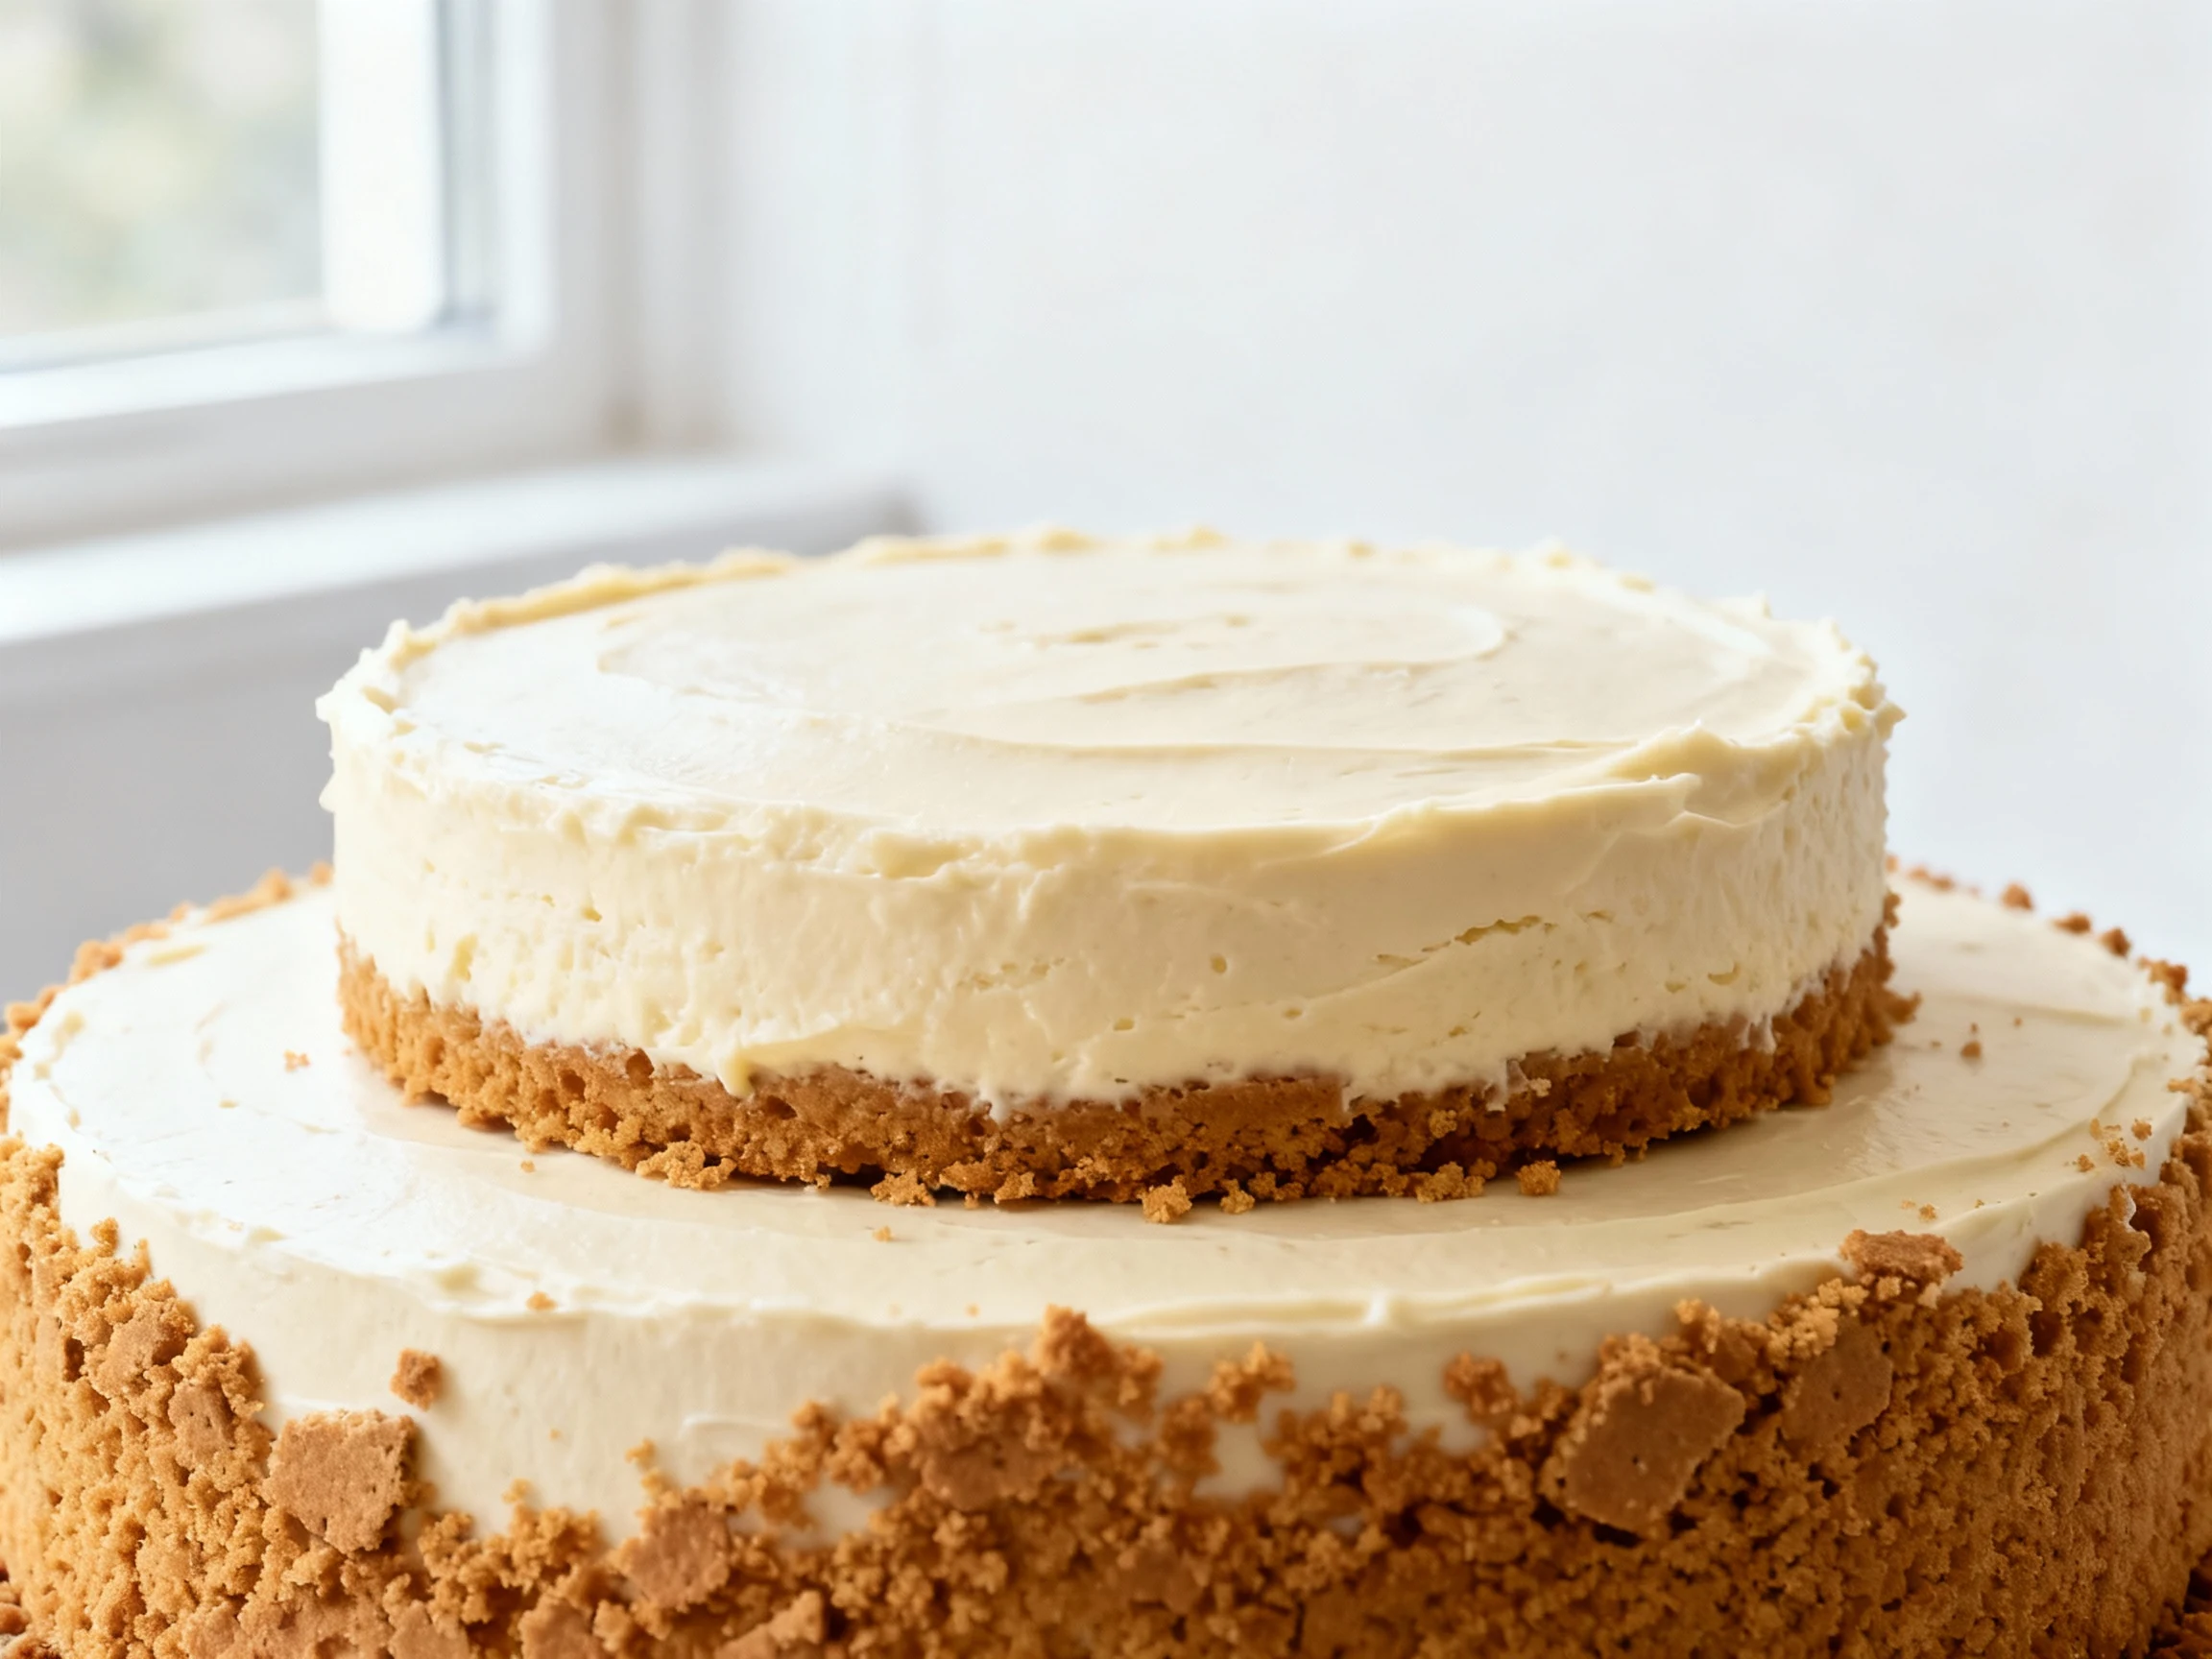
- Level and stage: If needed, level cake tops with a serrated knife. Unmold chilled cheesecake. Place one cake layer on your serving board and add a thin layer of frosting on top.
- Stack the cheesecake: Center the cheesecake layer over the frosted cake. Add a thin frosting layer on top of the cheesecake.
- Cap and crumb coat: Top with the second cake round. Apply a thin “crumb coat” of frosting to seal in loose crumbs. Chill 20–30 minutes to set.
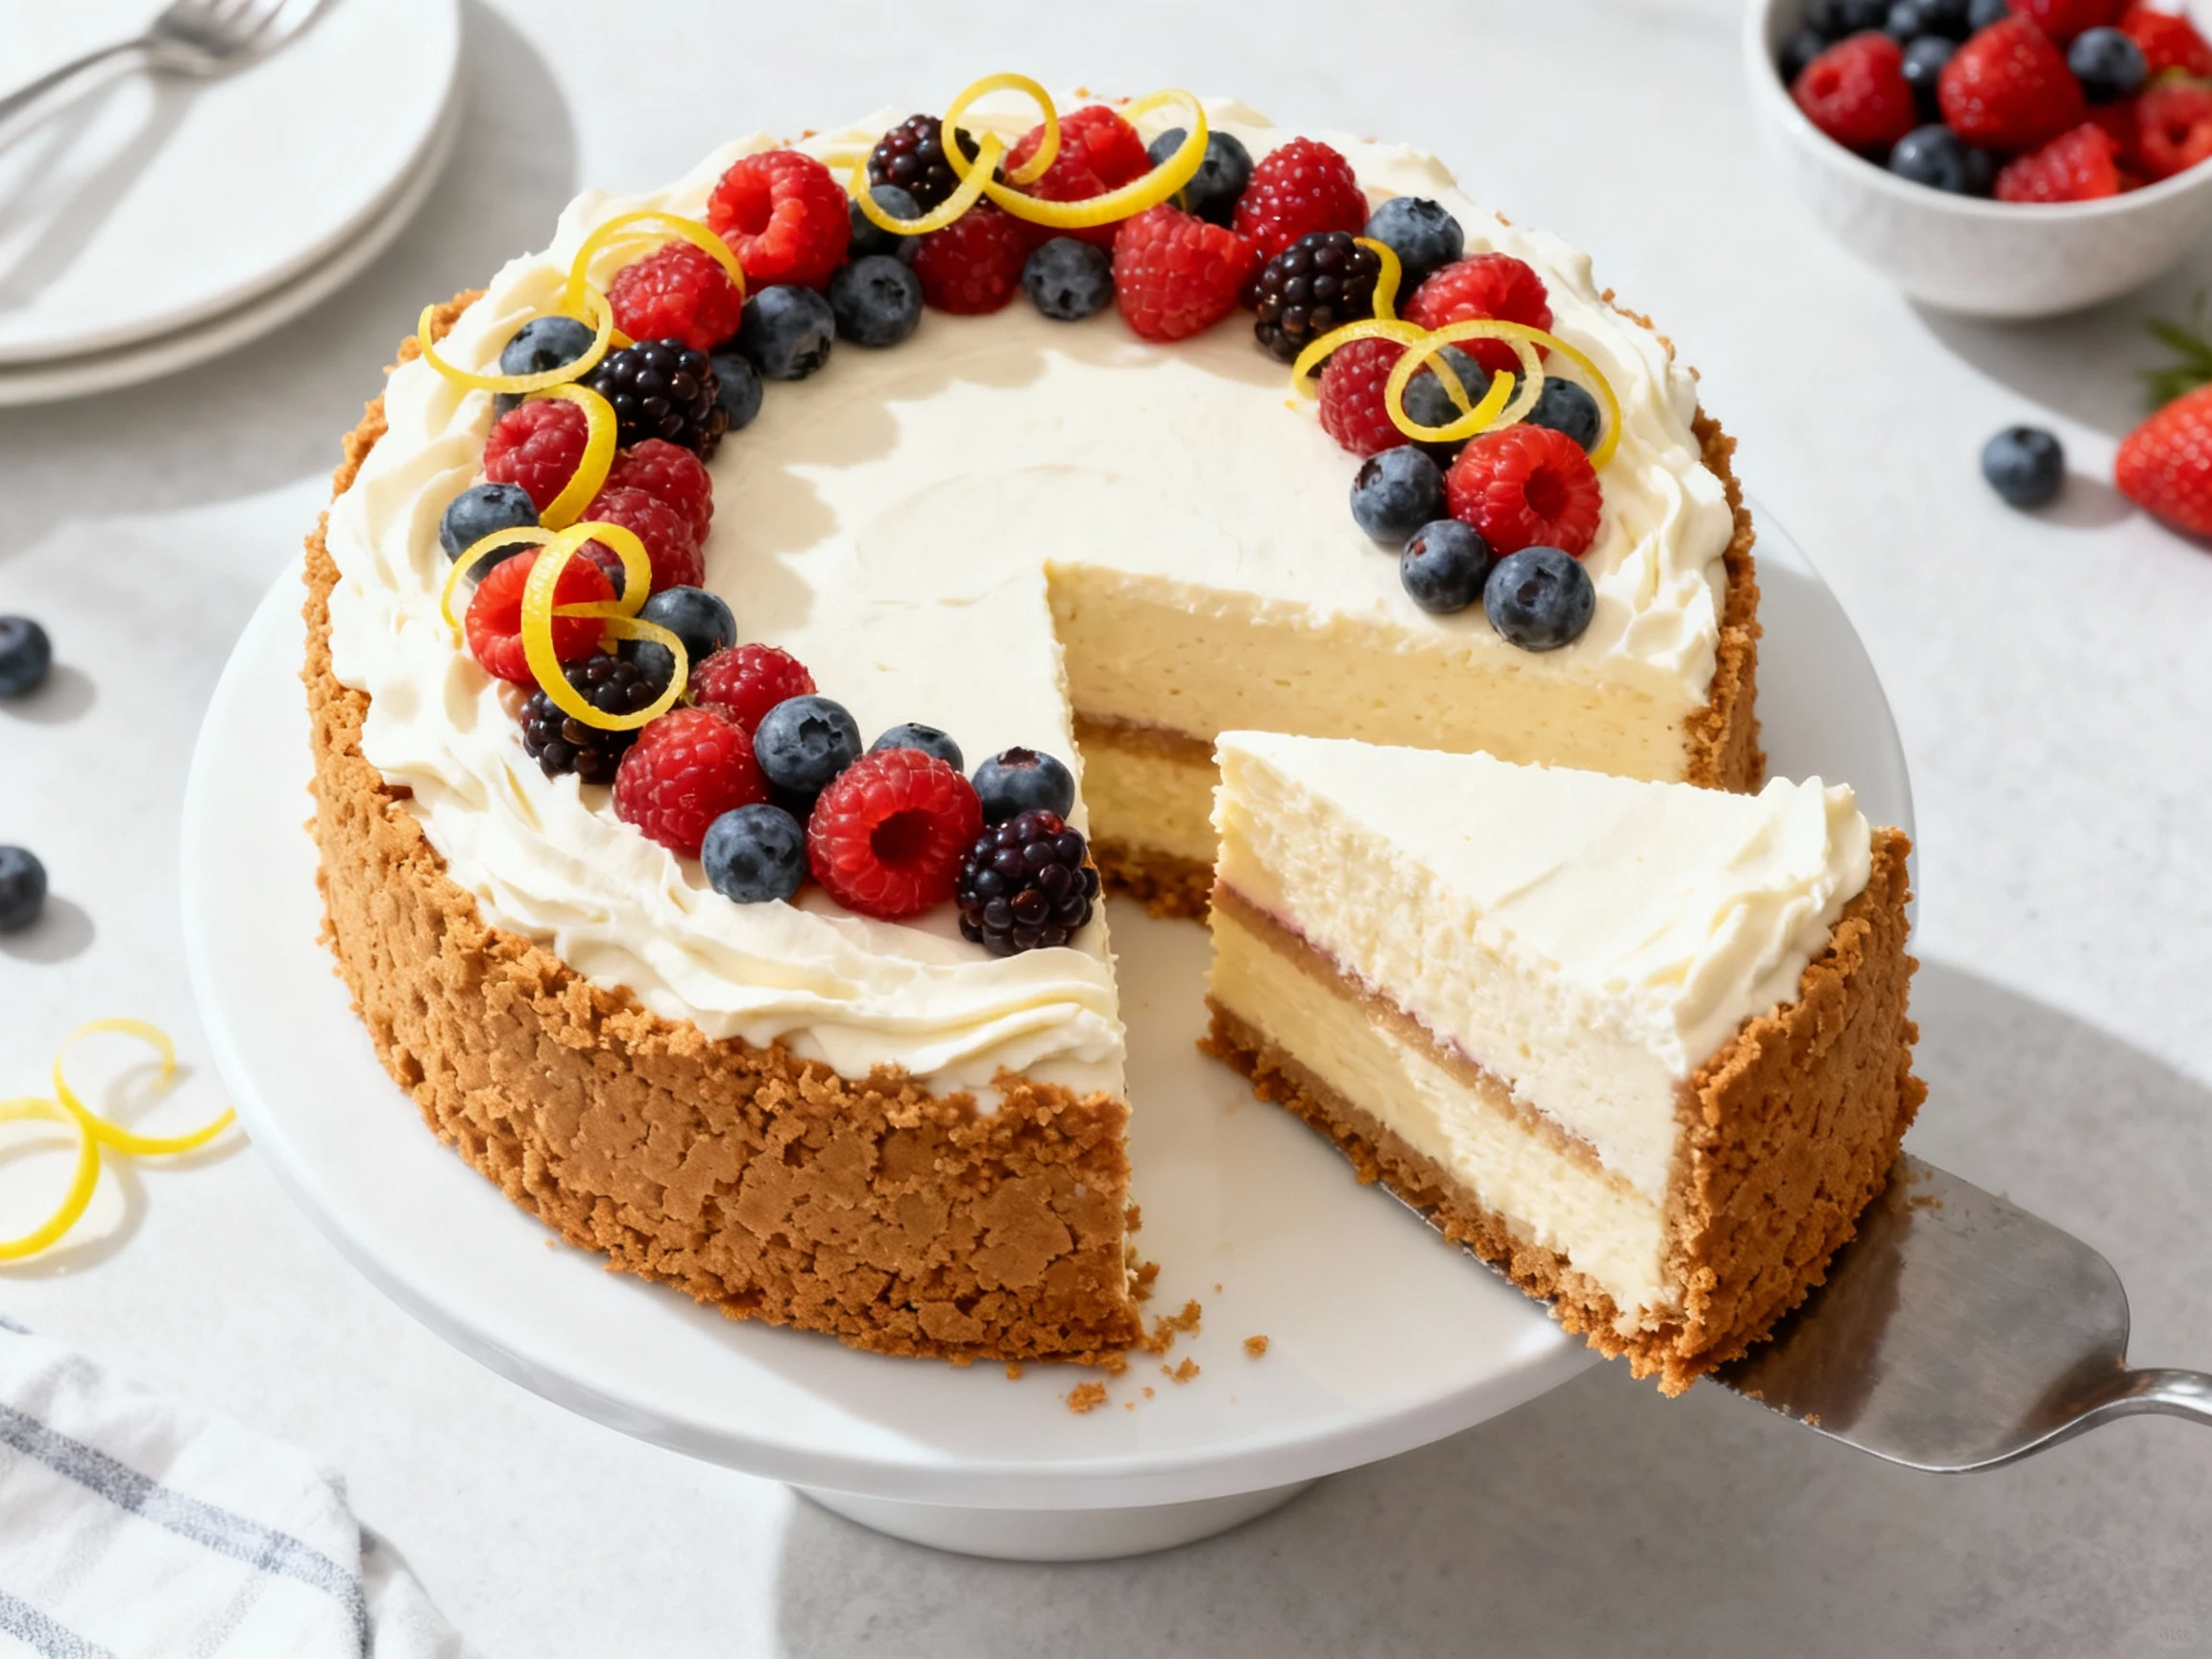
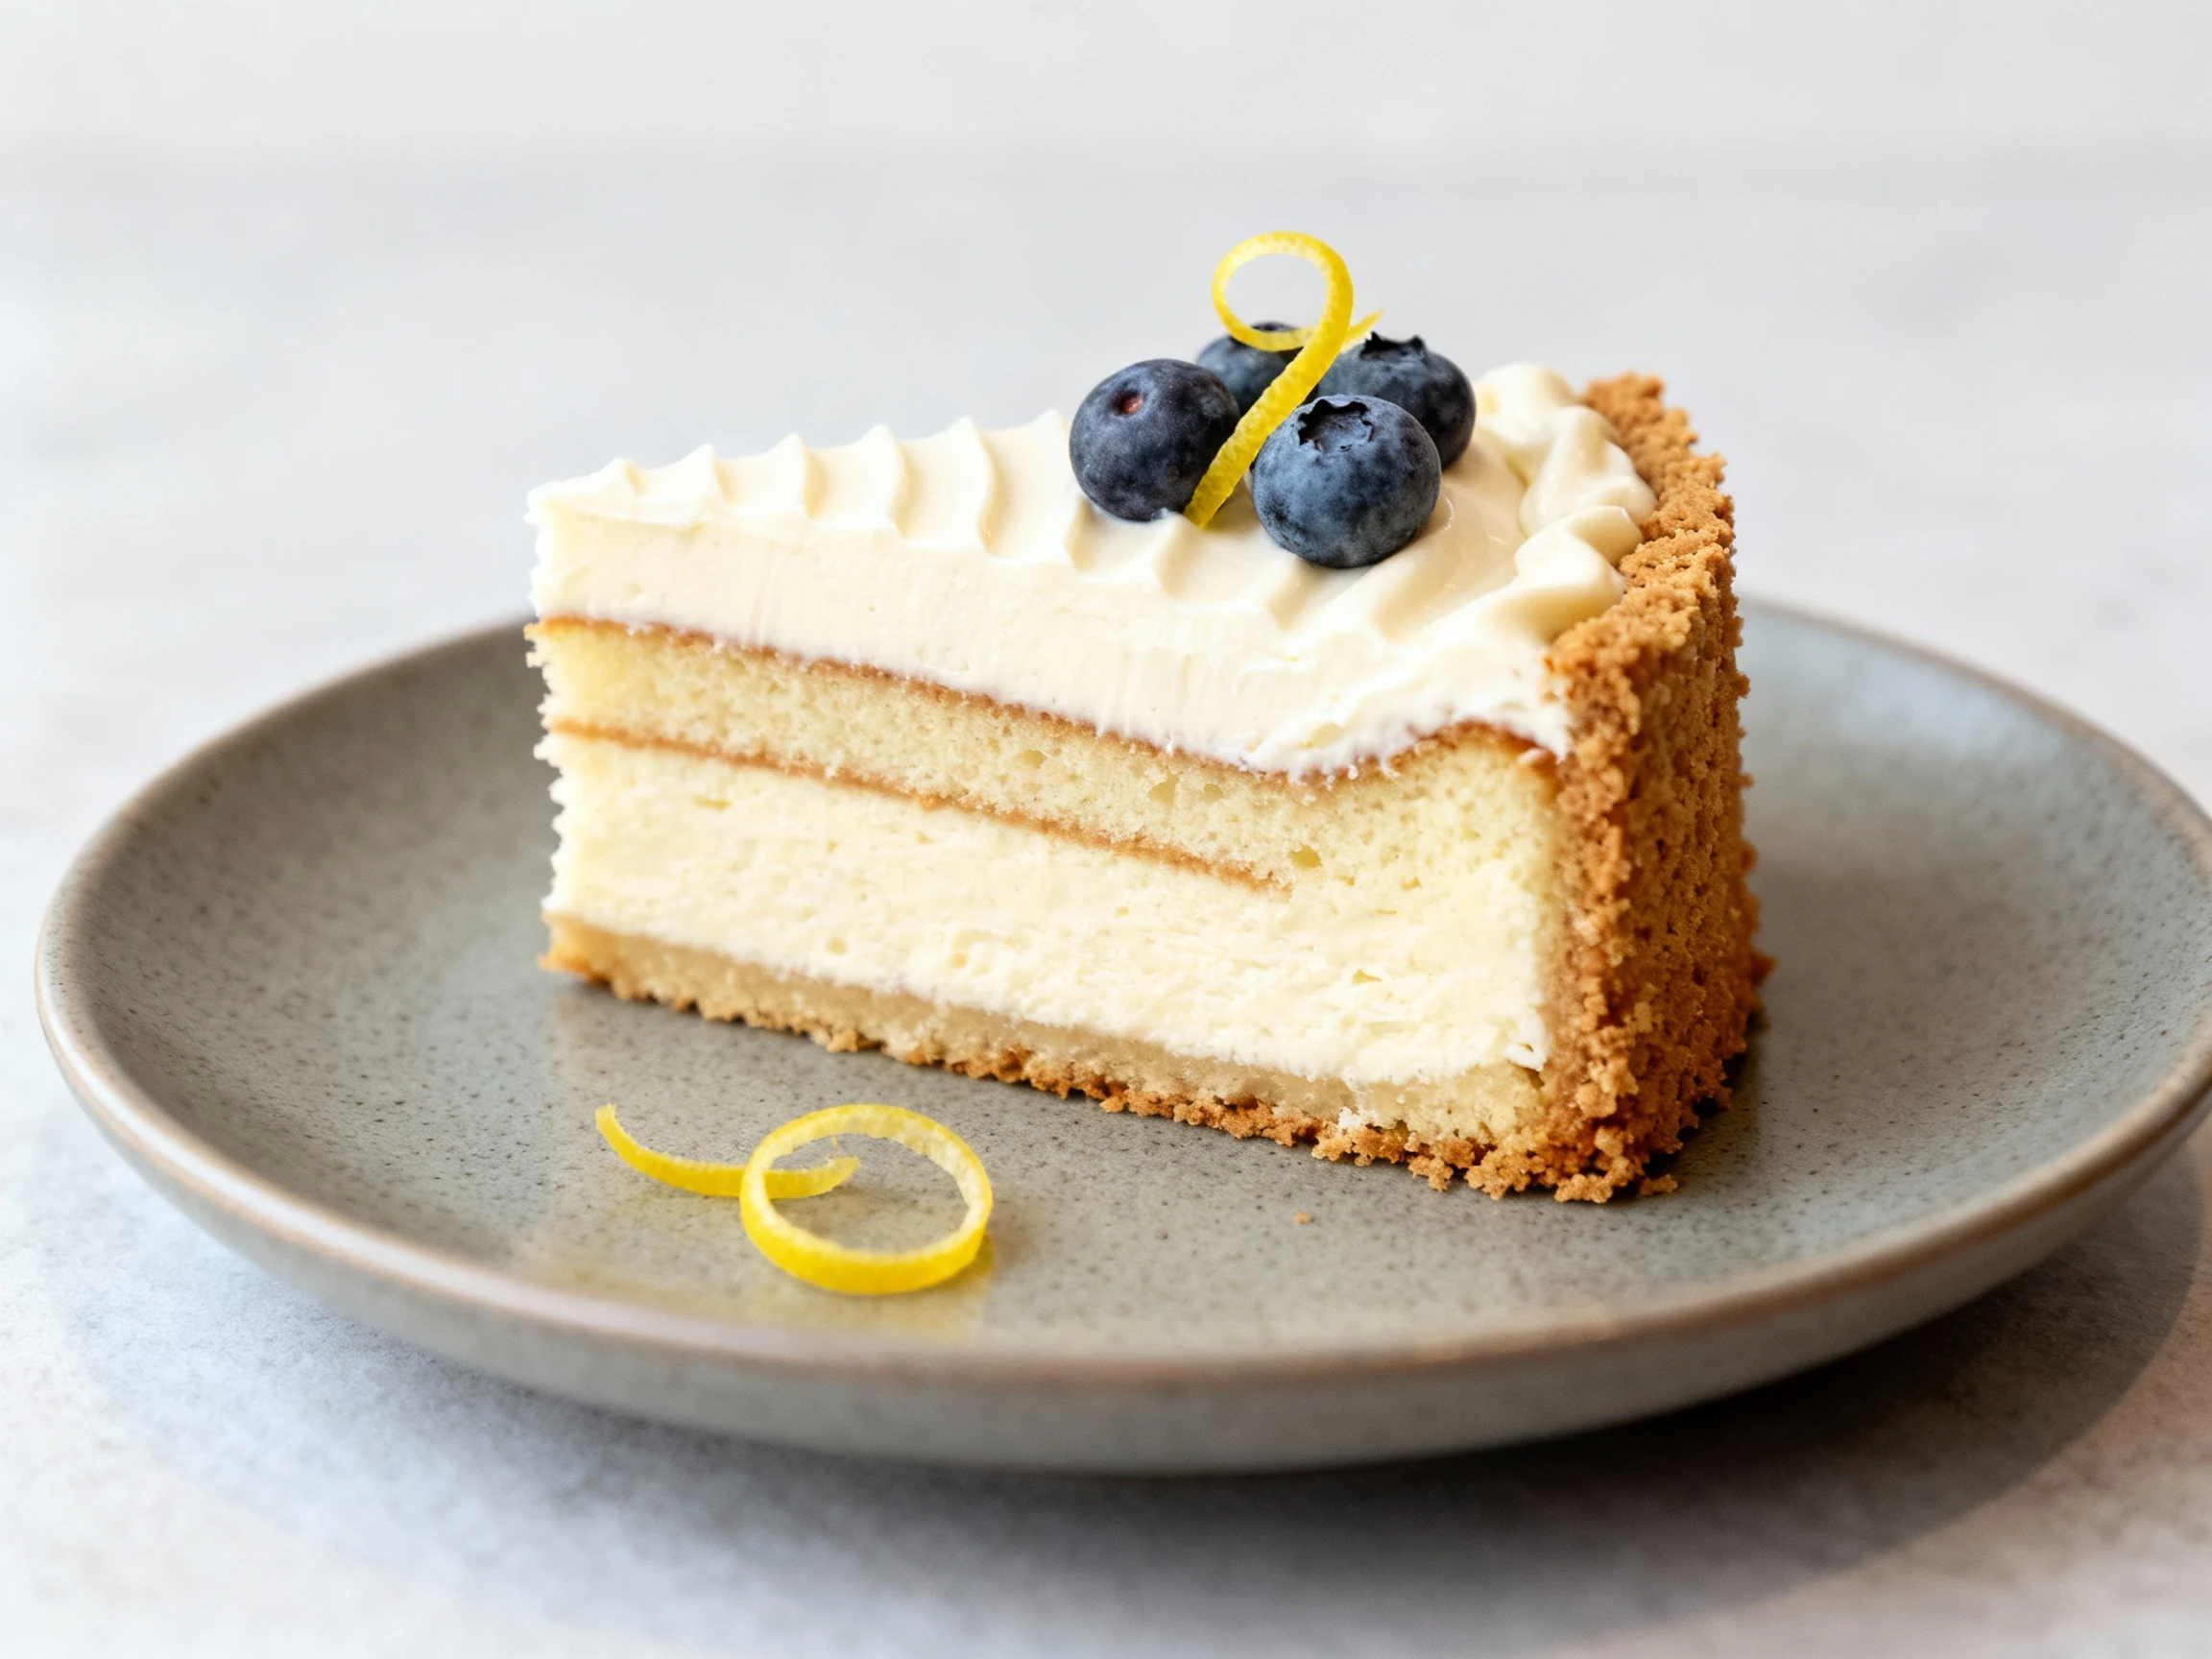
- Final frost and finish: Add the final frosting layer. Press graham cracker crumbs onto the sides for signature cheesecake flair. Garnish with berries, zest, or chocolate.
- Slice like a pro: Use a hot, dry knife (dip in hot water, wipe). Cut clean wedges. Yield: 12–14 slices, depending on how generous you feel.
Preservation Guide
Short-term: Keep the assembled cake covered and refrigerated for up to 4 days. The flavors chill and mingle, which somehow makes day two even better.
Freezing: Freeze individual slices tightly wrapped in plastic and foil for up to 2 months. Thaw overnight in the fridge. FYI, frosting texture stays happier than whipped cream.
Make-ahead: Bake the cheesecake layer 1–2 days in advance. Bake cake layers the day before, wrap and refrigerate. Assemble the morning of serving for peak freshness.
Travel: Chill well, place on a cold base, and use a cake carrier. Avoid hot cars—this cake is fearless, not immortal.
Health Benefits
Protein and calcium: Dairy-based cheesecake adds protein and calcium, supporting bones and satiety. No, it’s not a gym bro snack, but it’s not empty either.
Mindful indulgence: A rich cake guides portion control. One solid slice satisfies, so you’re less likely to chase more sweets. TBH, satisfaction beats deprivation.
Fruit add-ons: Topping with berries or citrus brings antioxidants, fiber, and fresh brightness. Your taste buds get the party; your body gets a few nutrients, too.
Stress relief: Celebratory desserts can boost mood and connection. Consider it a social multivitamin—minus the chalky aftertaste.
Common Mistakes to Avoid
- Skipping chill time: The cheesecake layer needs 4+ hours in the fridge. Warm cheesecake will sag and slip. Patience pays.
- Overmixing batter: Too much air in cheesecake or cake creates tunnels and cracks. Mix just until smooth.
- Ignoring pan prep: Parchment and proper greasing prevent heartbreak. Don’t test your luck on a party day.
- Baking too hot: Cheesecake prefers 325°F. Blast it at 375°F and you’ll get cracks, dryness, and regret.
- Uneven stacking: Skip leveling and you’ll build the Leaning Tower of Dessert. Take 60 seconds to trim tops.
- Frosting too stiff: Add a splash of cream to loosen. Stiff frosting tears cake and ruins the vibe.
- Slicing cold: Use a hot knife for clean cuts. A cold, dull blade bulldozes layers.
Variations You Can Try
- Chocolate-on-chocolate: Swap vanilla cake for cocoa cake; add Oreo cheesecake (fold in crushed Oreos). Drizzle ganache for dramatic flair.
- Lemon blueberry: Add lemon zest + juice to cheesecake; fold fresh blueberries into cake batter. Finish with lemon zest curls.
- Strawberry swirl: Swirl strawberry puree into cheesecake. Layer with vanilla cake and top with fresh berries.
- Red velvet classic: Red velvet cake layers + vanilla cheesecake. Frost with cream cheese and add white chocolate curls.
- Tiramisu twist: Espresso-soaked vanilla cake + mascarpone cheesecake. Dust with cocoa and add a mocha drizzle. IMO, coffee lovers will riot (nicely).
- Brownie base: Use a fudgy brownie round for one layer and a traditional cake for the other. Intensely decadent.
- Gluten-free swap: Use a 1:1 gluten-free flour blend for cake; ensure certified GF crumbs for the sides.
- Lightened frosting: Replace butter with Greek yogurt for tangy frosting and lower fat. Sweetness still wins.
FAQ
Can I make the cheesecake without a water bath?
Yes. Bake at 325°F and place a pan of hot water on the lower rack for steam. It minimizes cracks without the hassle of a full bath.
What if I only have one 9-inch cake pan?
Bake the cake batter in two rounds: half the batter first, cool, then the second. Keep the remaining batter covered at room temp in the meantime.
Do I need a springform pan for the cheesecake?
It helps a lot. A springform makes unmolding easy and keeps edges clean. If you don’t have one, line a regular 9-inch pan with parchment and lift carefully.
How do I prevent the cheesecake from cracking?
Use room-temperature ingredients, avoid overmixing, bake low and slow, and cool gradually. Running a knife around the edge after baking also prevents stress cracks as it shrinks.
Can I use boxed cake mix?
Absolutely. Prepare according to box directions for two 9-inch layers. The cheesecake and frosting will still deliver the “wow.”
What’s the best way to transport the cake?
Chill overnight, place on a sturdy board, and keep in a cake carrier. Add cold packs under the carrier if you’re traveling far. FYI, level cuts and a firm crumb coat make it sturdier.
The Bottom Line
This layered masterpiece delivers cheesecake luxury and cake comfort in one showstopper. It’s strategic baking: a chilled center for structure, tender rounds for fluff, and a frosting that ties it all together.
You can prep components ahead, customize flavors to your crowd, and slice like a pro. Build it once, celebrate loud, and let the compliments do the dishes. Dessert goals: achieved.
Printable Recipe Card
Want just the essential recipe details without scrolling through the article? Get our printable recipe card with just the ingredients and instructions.