Caramel Apple Dessert Recipes That Wow Crowds and Save Time
For fall parties or cozy nights, get bakery-level flavor fast with simple steps, budget-friendly ingredients, and minimal cleanup.
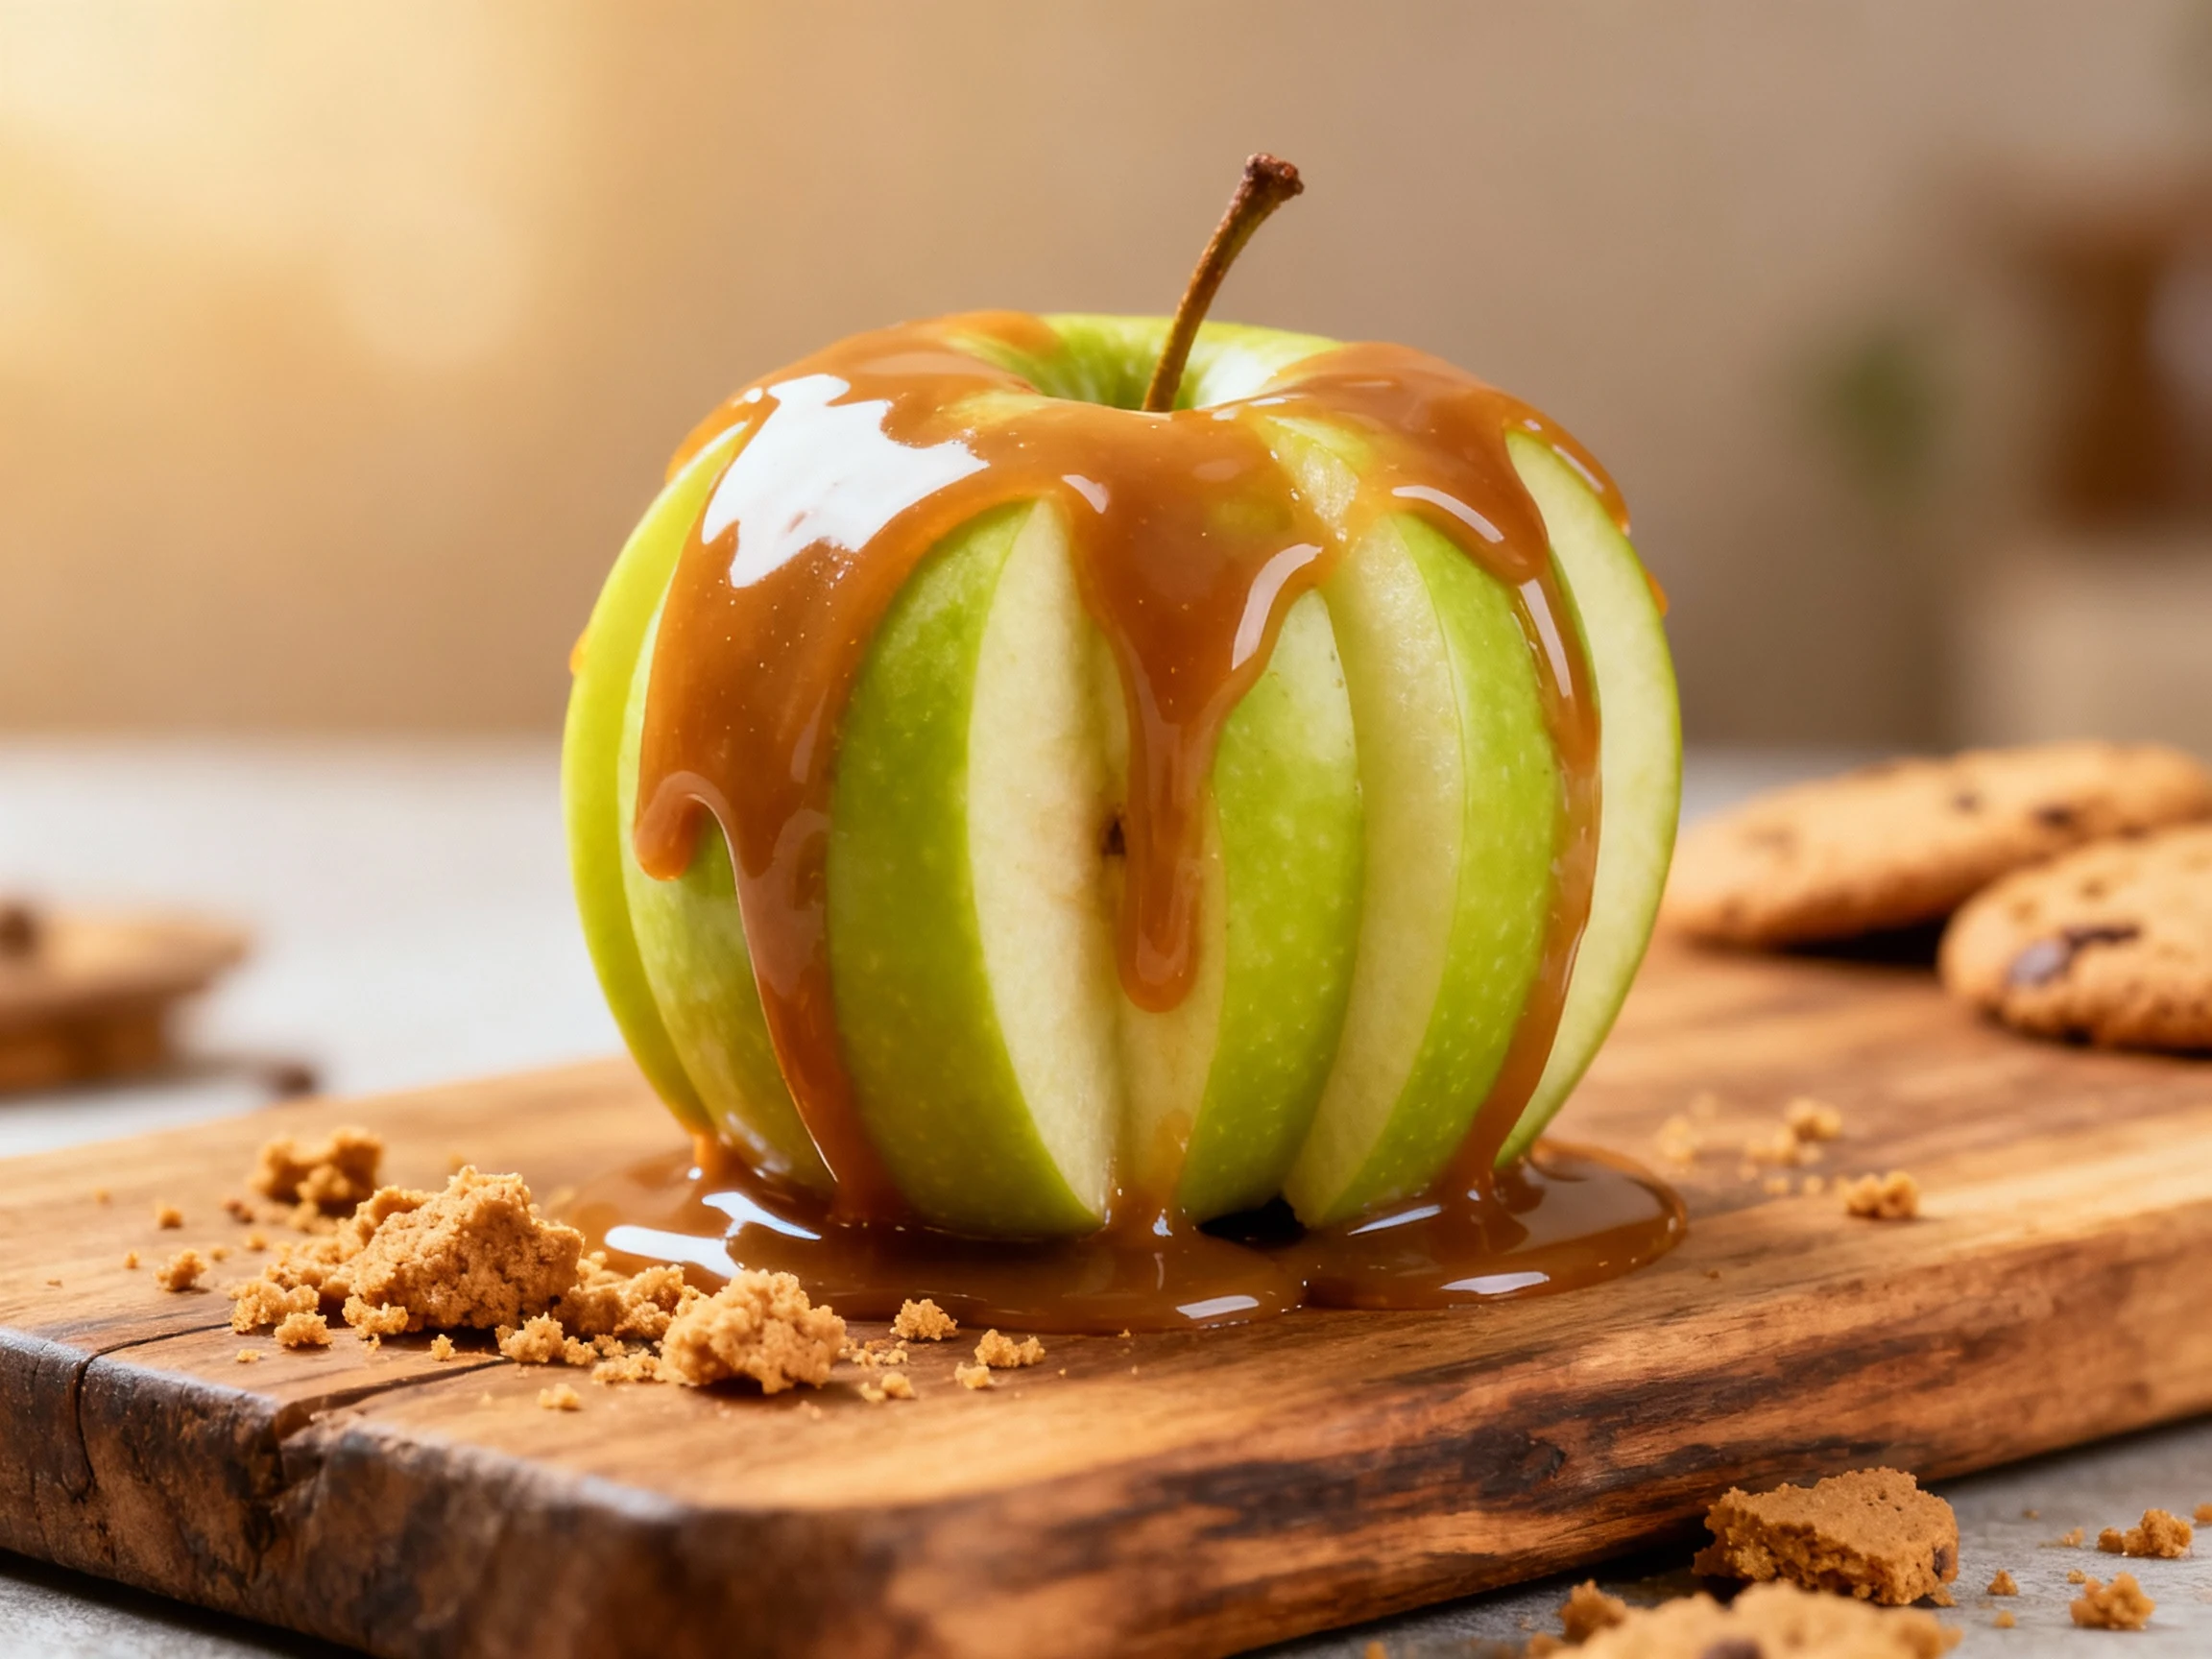
You know those desserts that make people pause mid-sentence, glance at their plate, and say, “Wait… what is this?” This delivers that moment—without a pastry degree or a four-hour cleanup. We’re talking sweet-tart apples, buttery crumble, and a rich caramel drizzle that feels fancy but costs less than a coffee run. Skeptical about the “easy” part? You’ll get a showstopper in under an hour, with zero fiddly techniques. If your goal is maximum impact for minimal effort, consider this your fall cheat code.
What Makes This Recipe So Good
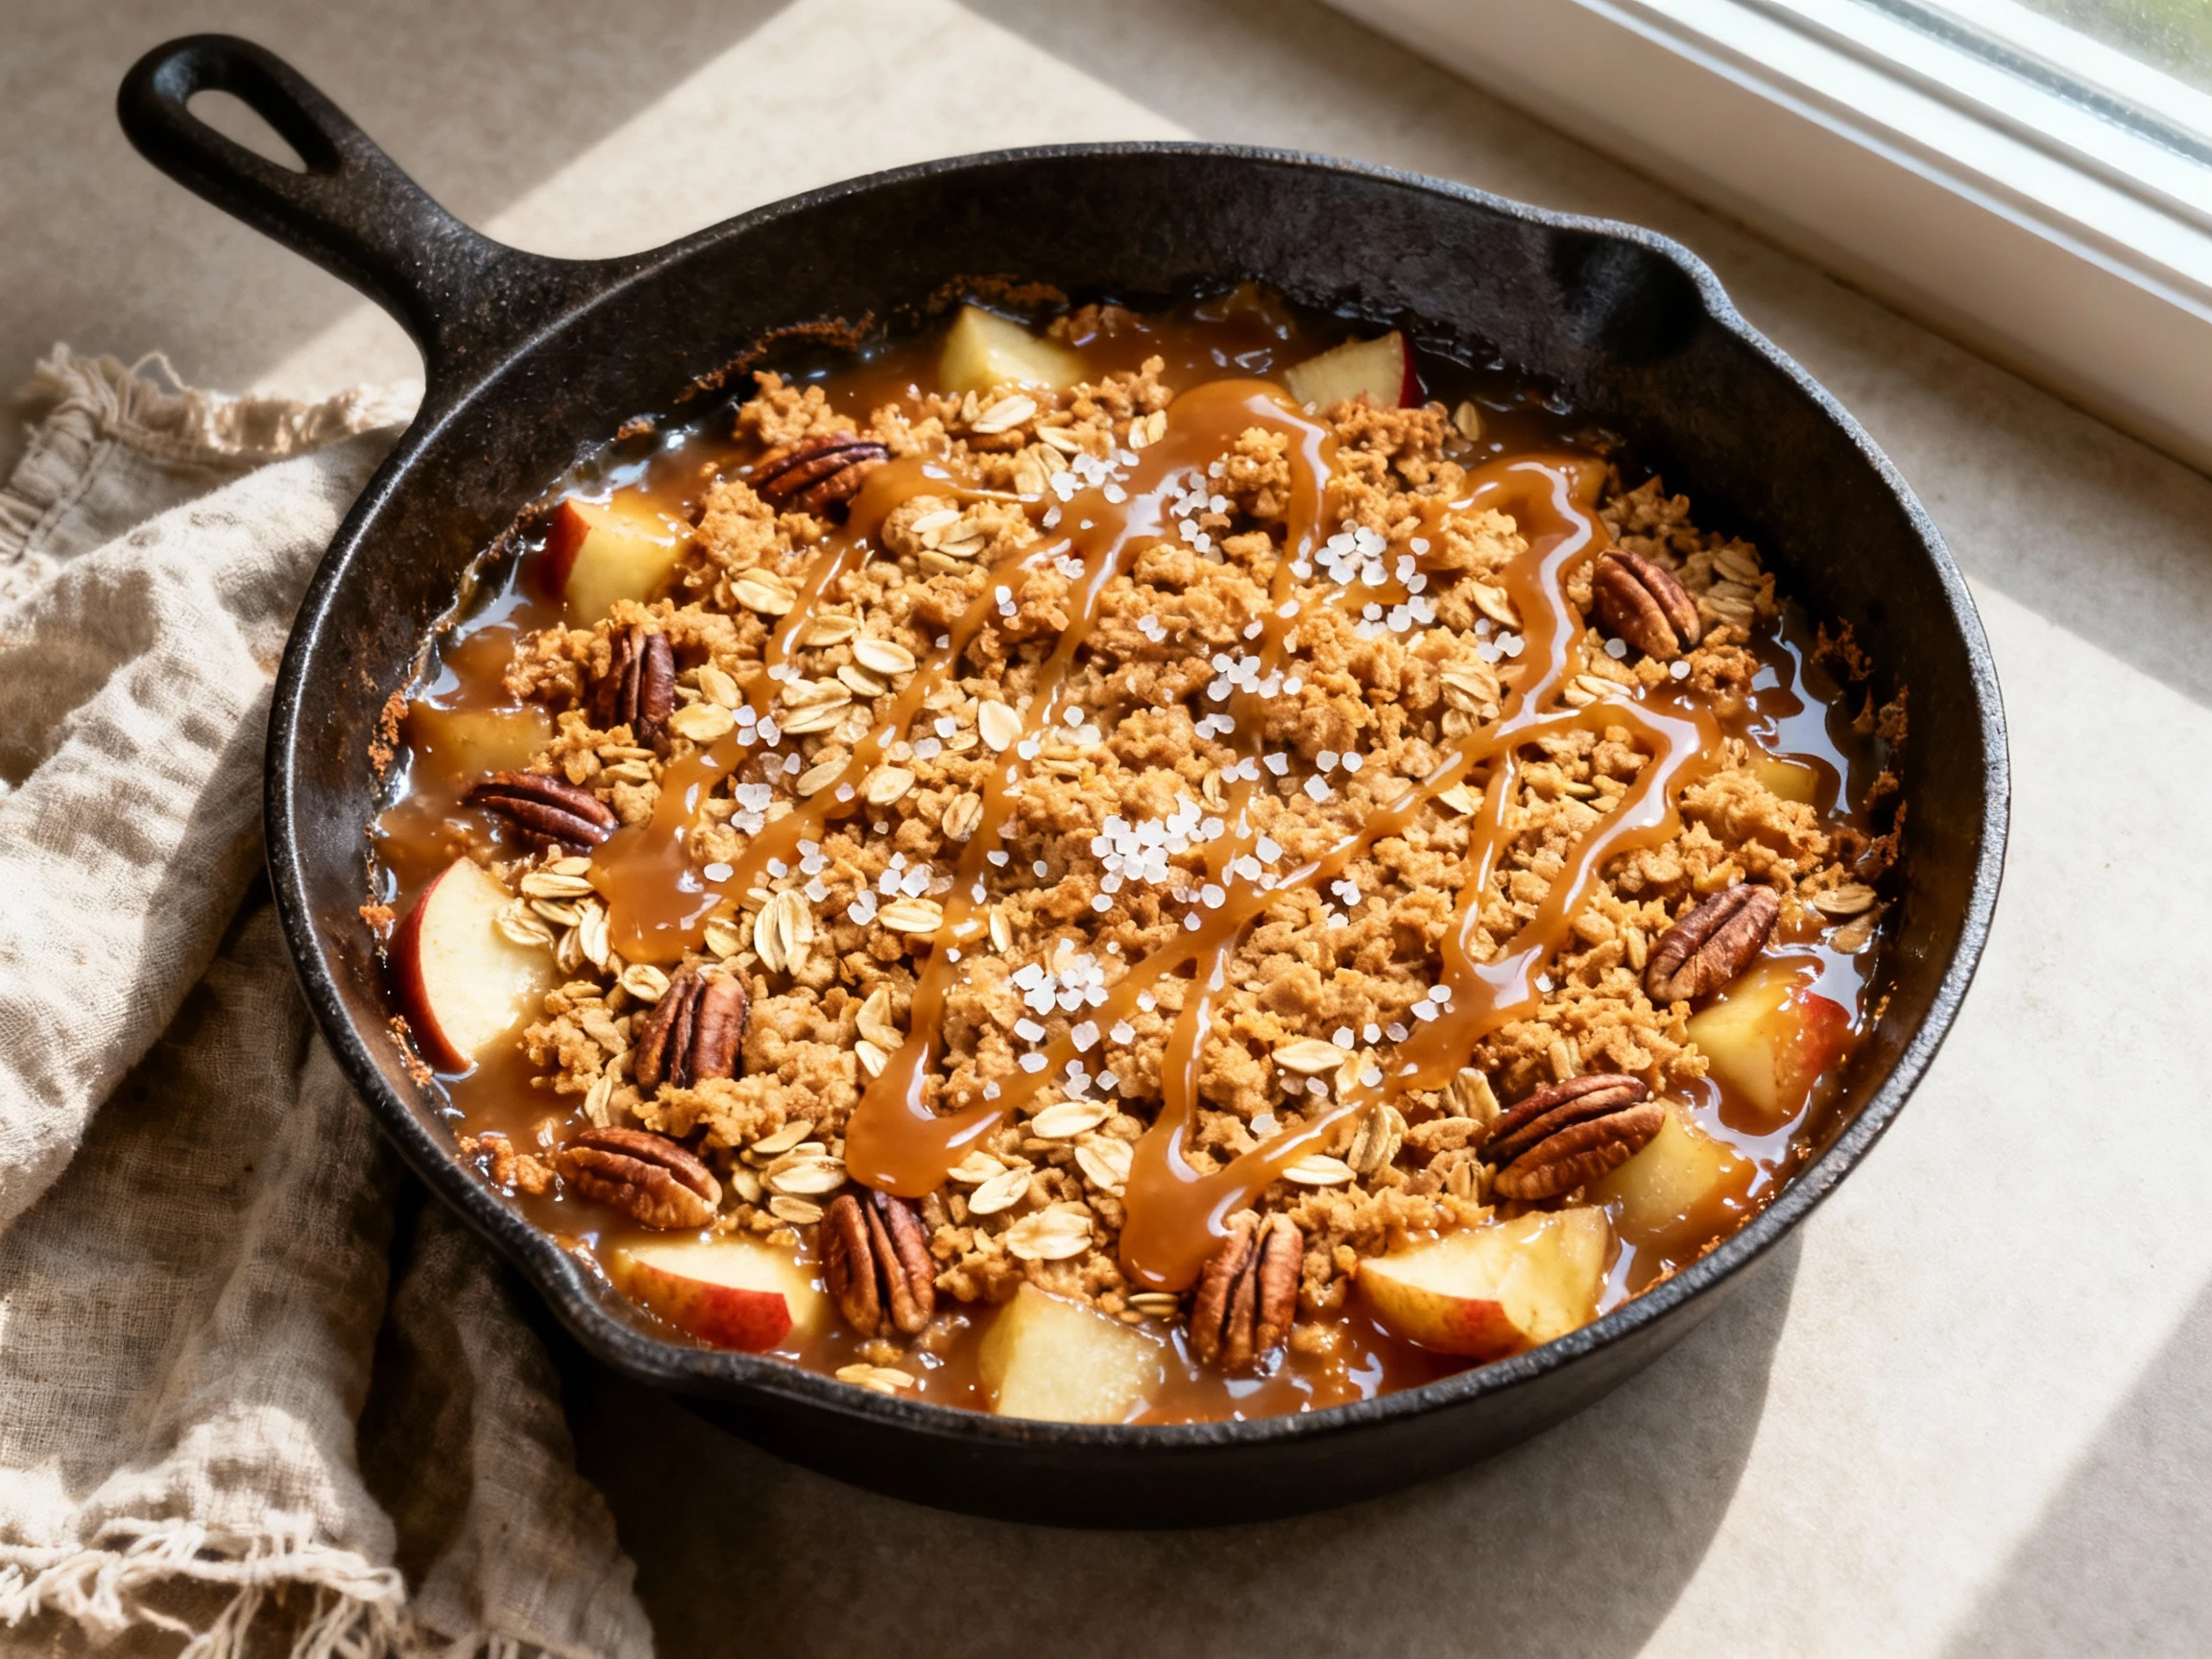
This is your ultimate cozy crowd-pleaser: warm apples, crackly crumble, and a salted-caramel finish that hits every note—sweet, tart, buttery, and just a little indulgent. It’s engineered for simplicity, so the steps are short and the payoff is huge. You can bake it in a skillet (hello, drama) or a standard pan and still get the same gooey, golden results. And yes, you can shortcut with store-bought caramel and still look like you have a secret pastry lab.
- Big flavor, low effort: Classic apple-spice base with a one-bowl crumble.
- Flexible bakeware: Works in a 10-inch cast-iron skillet or a 9×9 pan.
- Smart textures: Oats and pecans add crunch; caramel adds luxe.
- Make-ahead friendly: Stays fabulous for days and reheats like a dream.
- Scale up or down: Double for a party, halve for date night.
Shopping List – Ingredients
- 6 medium apples (Granny Smith + Honeycrisp combo), peeled and sliced
- 2 tablespoons lemon juice
- 1/2 cup granulated sugar (for the filling)
- 1/4 cup packed brown sugar (for the filling)
- 1 teaspoon ground cinnamon
- 1/4 teaspoon ground nutmeg
- 1/4 teaspoon kosher salt
- 1 teaspoon vanilla extract
- 2 tablespoons cornstarch
- 3/4 cup caramel sauce, divided (store-bought or homemade)
- 1 cup old-fashioned oats
- 3/4 cup all-purpose flour
- 1/2 cup packed brown sugar (for the crumble)
- 1/2 cup chopped pecans (optional, for crunch)
- 1/2 teaspoon kosher salt (for the crumble)
- 8 tablespoons unsalted butter, chilled and cubed
- Coarse sea salt, for finishing (optional but recommended)
- Vanilla ice cream, for serving (optional)
Cooking Instructions
- Preheat the oven to 350°F (175°C) and lightly grease a 10-inch cast-iron skillet or a 9×9 baking pan. A metal pan browns a bit faster; glass is fine too, just keep an eye on it.
- Prep the apples: peel, core, and slice them into 1/4-inch pieces. Toss with 2 tablespoons lemon juice to keep them bright and punchy.
- Make the filling: in a large bowl, mix 1/2 cup granulated sugar, 1/4 cup brown sugar, 1 teaspoon cinnamon, 1/4 teaspoon nutmeg, 1/4 teaspoon salt, 2 tablespoons cornstarch, and 1 teaspoon vanilla. Add apples and toss until evenly coated.
- Transfer the coated apples to the prepared skillet/pan. Drizzle 1/3 to 1/2 cup caramel sauce over the apples for a gooey center. Don’t overthink it—just zigzag that caramel like you mean it.
- Make the crumble: in another bowl, whisk 1 cup oats, 3/4 cup flour, 1/2 cup brown sugar, and 1/2 teaspoon salt. Stir in 1/2 cup chopped pecans if using. Add the 8 tablespoons chilled butter and cut it in with your fingers or a pastry cutter until the mixture looks like chunky wet sand.
- Cover the apples evenly with the crumble. Bake for 35–40 minutes, until the top is golden and the edges are bubbly. If your apples are super firm, give it an extra 5 minutes.
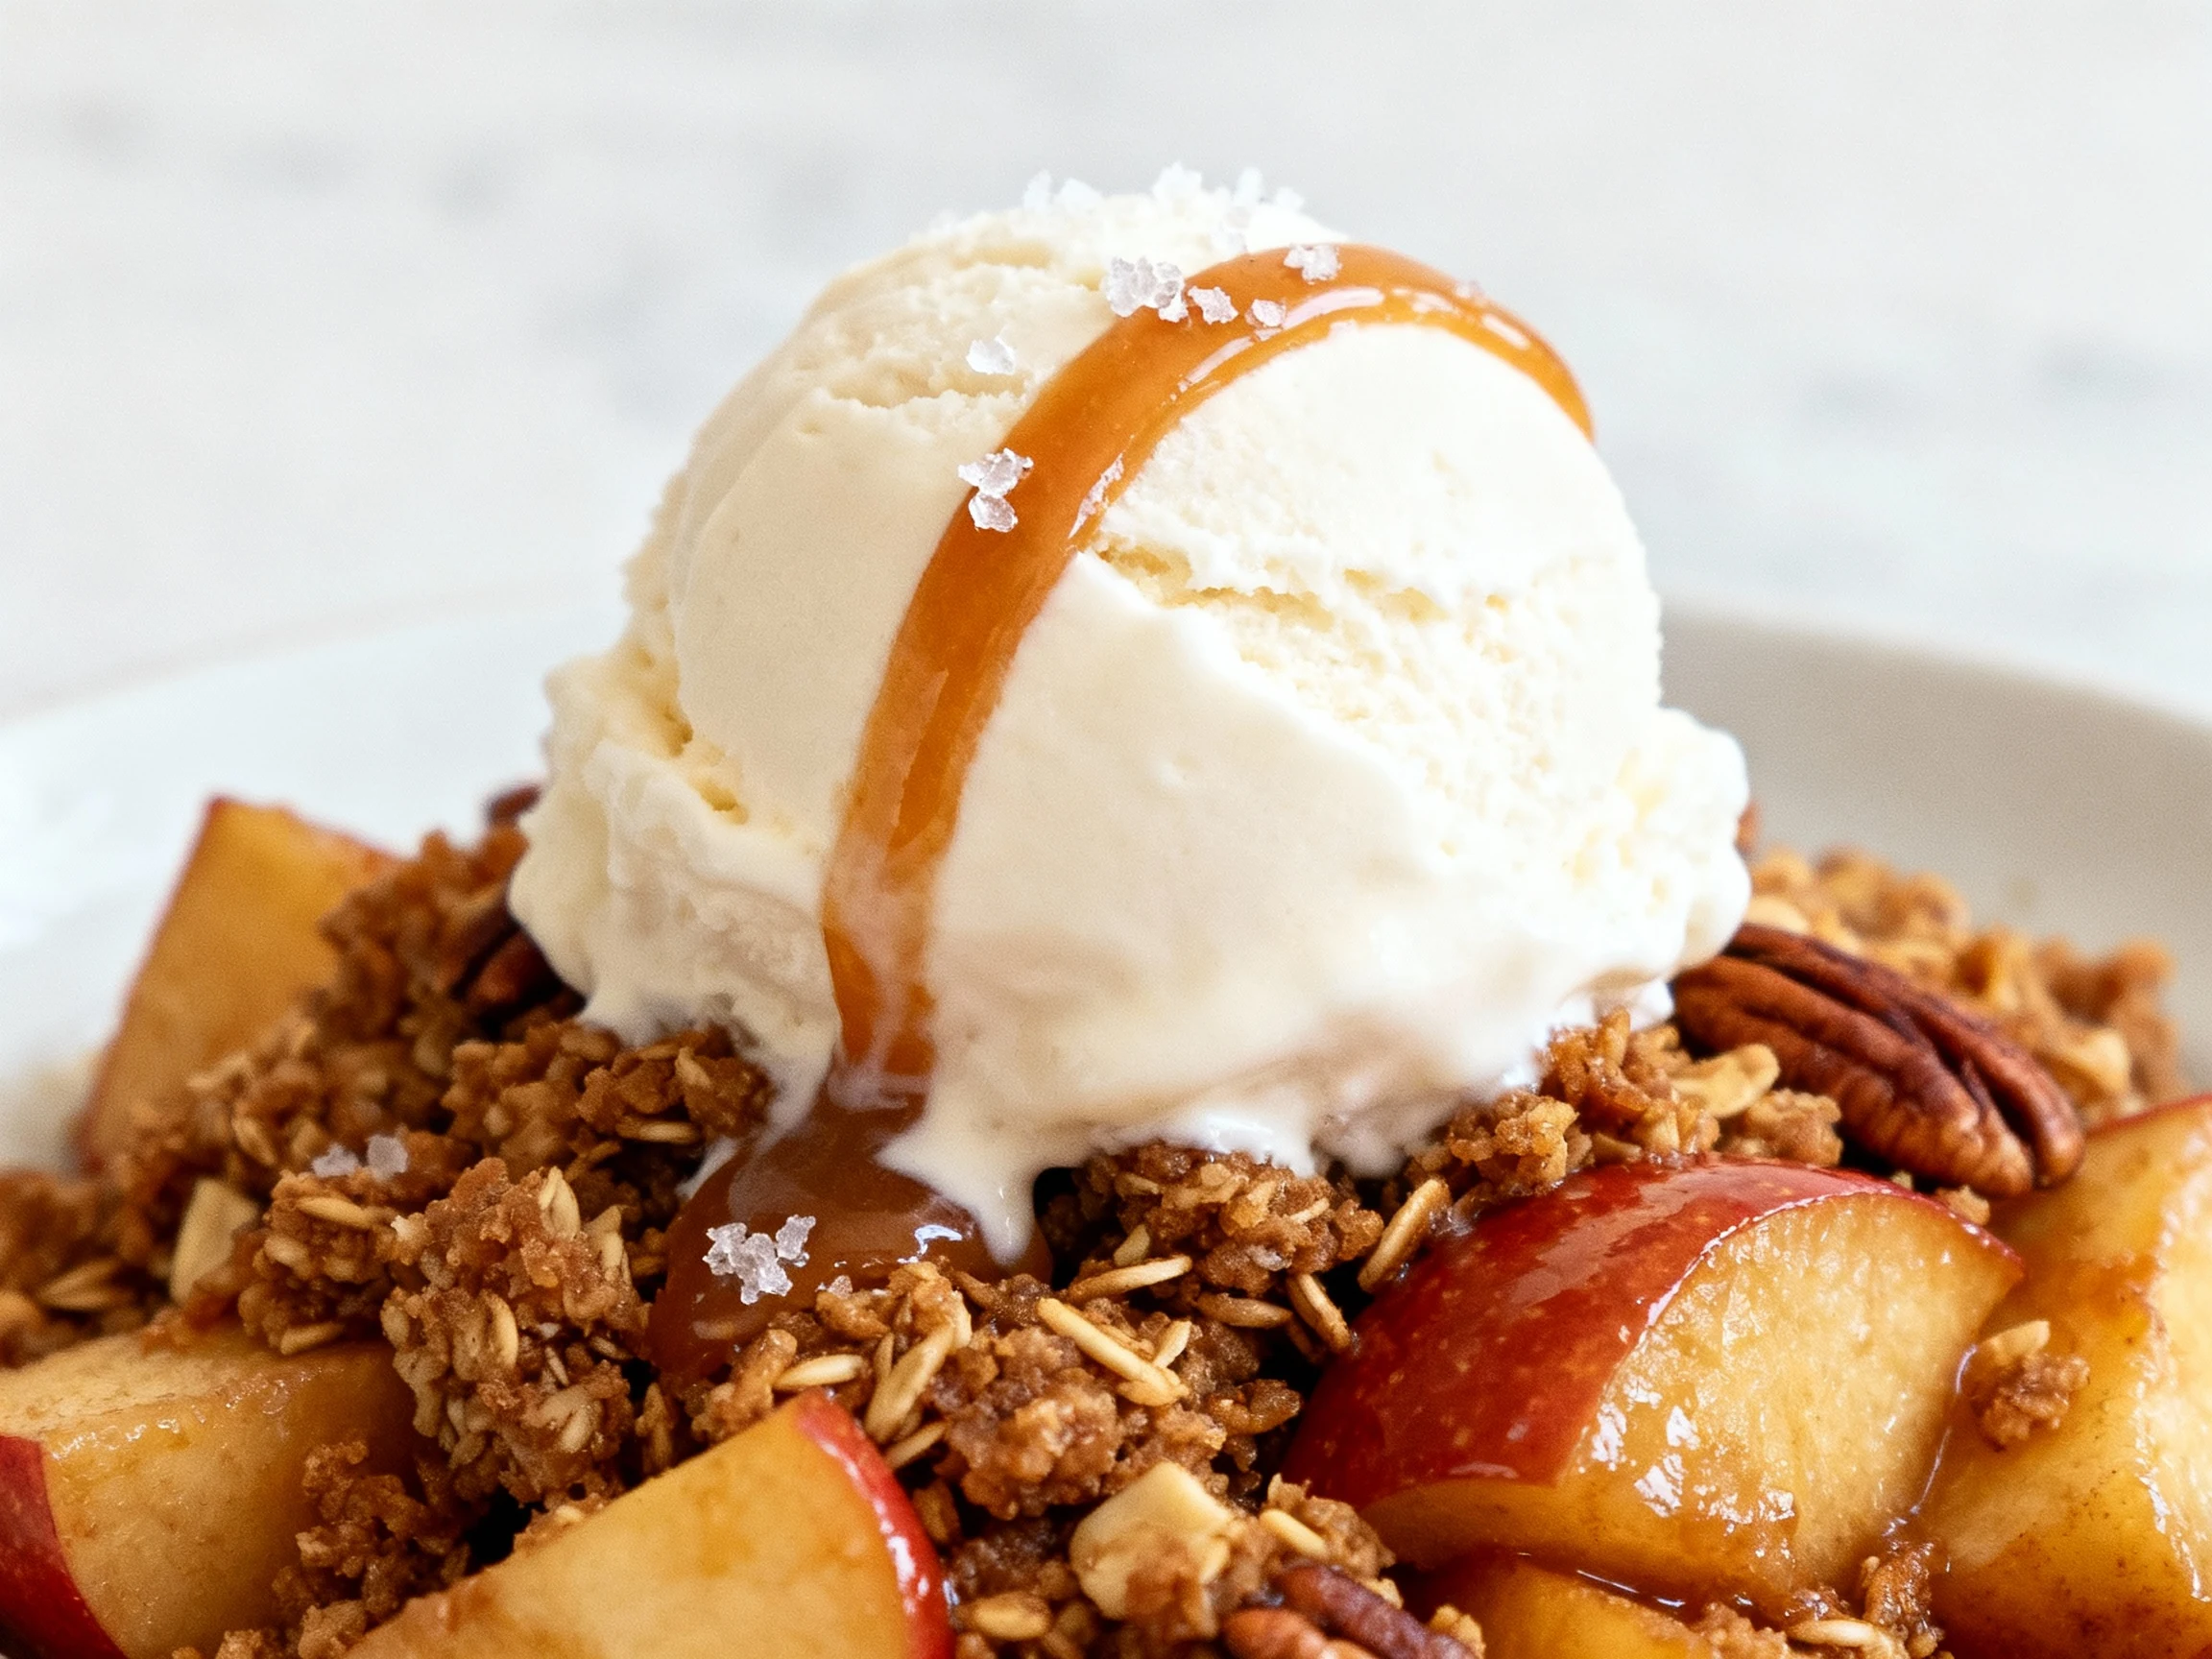
- Let the pan rest for 10 minutes so the juices thicken (yes, resting time actually matters). Drizzle on the remaining 1/4 cup caramel and finish with a pinch of coarse sea salt.
- Serve warm with vanilla ice cream. If anyone says “this is too rich,” give them a smaller scoop and a bigger smile.
Keeping It Fresh
Cool the dessert to room temp, then cover and refrigerate. It stays delicious for up to 4 days. Reheat in a 350°F oven for 10–15 minutes to re-crisp the topping; microwave individual portions for 45–60 seconds when you’re impatient (no judgment).
Want to freeze? Absolutely. Freeze tightly wrapped for up to 2 months. Thaw overnight in the fridge and reheat at 350°F until warm and crisp again. FYI, oven reheating beats microwave every time for texture.
Storing leftovers right in the skillet is fine, but cover it well. If the topping softens, a quick oven blast brings back the crunch like magic.
Benefits of This Recipe
- High-impact flavor: Classic apple-cinnamon base with luxe caramel notes.
- Beginner-friendly: No fancy techniques, no specialized tools.
- Budget-conscious: Apples + pantry staples = bakery vibes without the bill.
- Flexible timing: Bake now or assemble ahead and chill; it’s forgiving.
- Party-perfect: Skillet presentation looks rustic and impressive.
- Customizable: Adjust sweetness, spice, and crunch to taste.
- Easy cleanup: One bowl for the crumble, one for apples—done.
Avoid These Mistakes
- Skipping cornstarch: Without a thickener, the filling can get watery and sad.
- Using only soft apples: Mix tart + crisp varieties for texture that doesn’t vanish.
- Overmixing the crumble: You want clumps; paste is a no.
- Underseasoning: A generous pinch of salt and enough spice makes everything pop.
- Not resting after baking: Those 10 minutes set the sauce; patience pays dividends.
- Overbaking: The topping should be golden, not brown-brown. Dry crumble = meh.
- Drowning in caramel: Drizzle in layers, not pools. Balance is the goal, not a sugar swamp.
Recipe Variations
- Salted Caramel Apple Galette: Swap crumble for a rustic pie crust, pile apples in the center, fold edges, bake until golden, then glaze with caramel.
- Caramel Apple Cheesecake Bars: Press a graham crust, spread cheesecake batter, layer spiced apples, bake, and finish with caramel. Decadent? Absolutely.
- Air Fryer Mini Crisps: Portion into ramekins and air fry at 350°F for 12–15 minutes. Fast, cute, and portion-controlled (sort of).
- Bourbon-Caramel Upgrade: Stir 1 tablespoon bourbon into the caramel. The aroma alone will make guests think you know things.
- Gluten-Free Crunch: Use certified GF oats and swap flour for almond flour. Crisp still happens, IMO it’s extra nutty-delicious.
- Apple-Pear Blend: Go 50/50 apples and firmer pears for a lighter, floral twist.
- Hand Pie Shortcut: Spoon spiced apples into store-bought pie dough rounds, seal, bake, and dunk in warm caramel for handheld bliss.
FAQ
What apples work best for this dessert?
Use a combo for balance: Granny Smith for tart structure and Honeycrisp for juicy sweetness. You can mix in Braeburn or Pink Lady too. The key is choosing apples that hold shape under heat—mushy varieties are not your friend.
Can I use store-bought caramel sauce?
Yes. Pick a thicker sauce so it doesn’t vanish into the filling. If it’s runny, reduce it briefly on the stove until it coats a spoon. A pinch of salt gives that bakery-level vibe and cuts sweetness.
How do I make this gluten-free?
Swap the flour with almond flour or a 1:1 GF blend and make sure your oats are certified gluten-free. Texture stays crunchy and the flavor gets a nice nutty boost. No other changes needed.
Do I need to peel the apples?
Peeling gives a silkier texture, but if you love a rustic finish, leave the skins on. Just slice a little thinner. The bake time stays roughly the same; check doneness by how tender the apples feel.
Why is my filling watery?
Most likely the cornstarch ratio was off or the apples were extra juicy. Make sure you use 2 tablespoons cornstarch and let the dessert rest for 10 minutes after baking so the juices set. If you cut very thin slices, they release more liquid—thicker slices help.
Can I assemble it ahead?
Yes. Assemble the apple layer and the crumble separately, then store both in the fridge for up to 24 hours. Top and bake when you’re ready. Add caramel right before baking and again after for the best texture.
Can I double the recipe for a crowd?
Absolutely. Use a 9×13 pan and bake for 40–50 minutes. Watch for the same signals: golden top and bubbling edges. A bigger pan buys you breathing room when guests “drop by” with three extra friends.
My Take
I’m a big believer that the best fall desserts aren’t complicated—they’re strategic. This one leans on smart choices: tart apples for structure, a no-fail crumble, and caramel used like a secret weapon. It plays well with your schedule, scales gracefully, and makes your kitchen smell like happiness. TBH, if you serve this warm with a salt flick and a melting scoop of vanilla, people will think you have a pastry chef in your contacts—and that’s a win I’ll take any day.
Printable Recipe Card
Want just the essential recipe details without scrolling through the article? Get our printable recipe card with just the ingredients and instructions.