Sponge Cake Recipes That Look Bakery-level Fast
Fluffy, tall, and shockingly easy: you’ll get a reliable sponge, pro-level lift, and simple flavor twists for any occasion.
You don’t need a fancy mixer, a pastry degree, or a grandmother named “Nonna” to make a sponge cake that makes people suspicious. You need air, heat, and a few rules you actually follow. This is the kind of cake that turns “I brought dessert” into “Wait… you made this?” in under an hour. And yes, it’s light enough to eat a second slice without immediately regretting your life choices. Want the soft bounce, the tall rise, and that clean vanilla aroma? Cool. Let’s do it.
The Secret Behind This Recipe
The real magic is structure built from air. Sponge cake doesn’t rely on heavy butter creaming for lift; it relies on eggs whipped into a stable foam, then treated gently so that foam survives the bake. Think of it like building a skyscraper out of bubbles and telling everyone to stop bumping the table.
You win by controlling three things: temperature, whip quality, and folding technique. Warm eggs whip bigger, but too warm turns thin and sad. Under-whipped eggs collapse; over-whipped eggs turn dry and stubborn. And folding? You don’t “mix.” You invite the flour in, then politely show it the exit before it glues your batter into a brick.
Final secret: pan prep matters. A sponge wants to climb. If you grease the sides heavily, it slips and falls like it forgot its gym membership. Use parchment on the bottom, keep the sides mostly clean, and let the cake grip its way up.
What Goes Into This Recipe – Ingredients
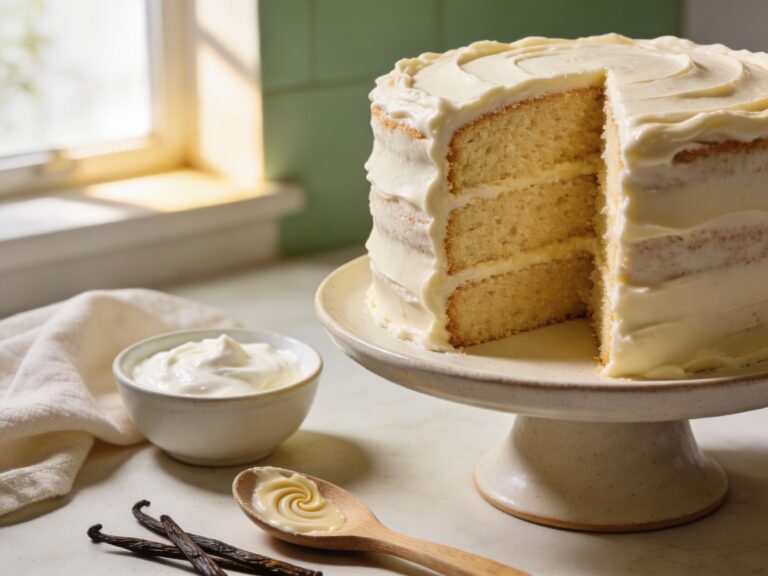
This ingredient list makes a classic vanilla sponge you can use for layer cakes, trifles, strawberry shortcake, or “I ate it straight from the cooling rack” moments.
- Large eggs (room temperature), 4
- Granulated sugar, 3/4 cup
- All-purpose flour, 3/4 cup
- Cornstarch, 2 tablespoons (for tenderness)
- Baking powder, 1 teaspoon
- Fine salt, 1/4 teaspoon
- Vanilla extract, 2 teaspoons
- Milk, 2 tablespoons (warm)
- Neutral oil (or melted butter), 2 tablespoons (for moisture)
- Lemon zest (optional), 1 teaspoon (for a bright, bakery vibe)
Optional for serving: lightly sweetened whipped cream, berries, citrus curd, jam, or a simple dusting of powdered sugar.
Cooking Instructions
This listicle format keeps you moving fast, because sponge cake rewards confidence and punishes chaos.
-
Preheat like you mean it. Heat oven to 350°F (175°C). Line the bottom of an 8-inch round pan with parchment. Leave the sides ungreased or only very lightly greased.
-
Set up your dry mix. Sift flour, cornstarch, baking powder, and salt together. Sifting isn’t a “cute suggestion” here; it prevents flour pockets and keeps the crumb airy.
-
Warm the eggs (optional but powerful). If your eggs feel cold, place them (in shell) in warm water for 5 minutes. Warm eggs whip higher and faster, FYI.
-
Whip eggs and sugar to ribbon stage. Beat eggs and sugar until pale, thick, and glossy. When you lift the whisk, the batter should fall in a ribbon that sits on the surface for a few seconds before disappearing.
-
Add vanilla with restraint. Beat in vanilla (and optional lemon zest) briefly. Don’t deflate your foam by mixing forever because you got emotionally attached to the mixer.
-
Fold in dry ingredients in 2–3 additions. Sprinkle in a third of the dry mix, then fold with a spatula using gentle, sweeping motions. Rotate the bowl as you go. Repeat until just combined.
-
Protect the foam when adding milk and oil. Mix warm milk and oil (or melted butter). Spoon a small amount of batter into that liquid and stir to combine, then pour it back into the main batter and fold gently. This prevents the fat from sinking and wrecking your lift.
-
Pan it cleanly. Pour batter into the pan. Tap once lightly to pop huge bubbles, then stop. Excess tapping equals deflation, and you’ll get a sad, flat cake that whispers “why.”
-
Bake without drama. Bake 22–28 minutes, until the top springs back and a toothpick comes out clean or with a few moist crumbs. Avoid opening the oven early; your cake doesn’t need a performance review mid-bake.
-
Cool the right way. Let cool 10 minutes, then run a thin knife around the edge and turn out onto a rack. Cool completely before slicing or layering.
Want layers? Chill the fully cooled cake for 30 minutes before slicing. Cold sponge cuts cleaner and fights crumbling.
Storage Instructions
At room temp, store the plain sponge tightly wrapped for up to 2 days. Keep it away from heat and sunlight, unless you enjoy surprise dryness.
In the fridge, wrap well and store up to 5 days. Bring slices to room temp before serving so the crumb softens and the flavor wakes up.
For freezing, wrap the cooled cake in plastic wrap, then foil, and freeze up to 2 months. Thaw overnight in the fridge or a couple hours at room temp, still wrapped to prevent condensation from turning the surface gummy.
What’s Great About This
This sponge hits that rare sweet spot: light but not flimsy, simple but impressive. It’s the cake equivalent of showing up looking effortless when you absolutely made an effort.
- Versatile base for layer cakes, roulades, and trifles
- Clean flavor that loves fruit, coffee, citrus, or chocolate
- Soft, springy crumb that stays tender with the milk-and-oil step
- No heavy frosting required, unless you want it
- Beginner-friendly once you know what ribbon stage looks like
IMO, it’s also the best “I need a dessert that looks expensive” option when you don’t want to spend your whole day baking.
Avoid These Mistakes
Sponge cake fails in predictable ways. The good news: you can avoid every one of these with a tiny bit of discipline.
- Under-whipping the eggs leads to a short, dense cake. You need thick, pale, ribboning batter.
- Over-folding after flour develops gluten and knocks out air. Stop folding the second you stop seeing streaks.
- Pouring oil straight into the foam deflates it fast. Always temper the fat with a bit of batter first.
- Greasing the pan sides heavily makes the cake slide and collapse. Let it climb.
- Opening the oven too early causes a sinkhole. Your curiosity can wait.
- Cutting while warm compresses the crumb and makes it gummy. Let it cool completely.
If your cake domes a lot, your oven may run hot. If it sinks, you likely under-baked or deflated the batter. Yes, it’s that blunt.
Alternatives
Once you nail the base sponge, you can remix it without reinventing your whole life. Here are easy, reliable variations.
- Chocolate sponge: Replace 2 tablespoons flour with 2 tablespoons unsweetened cocoa powder and sift extra well.
- Orange or lemon sponge: Add 1 tablespoon zest and swap milk for citrus juice, then reduce juice to 1 tablespoon if it tastes too sharp.
- Matcha sponge: Add 1–2 teaspoons matcha powder (sifted) and pair with whipped cream and berries.
- Coffee sponge: Dissolve 1 teaspoon instant espresso in the warm milk before mixing.
- Gluten-free option: Use a 1:1 gluten-free baking blend plus the cornstarch; expect a slightly more delicate crumb.
- Dairy-free option: Use plant milk and oil instead of butter; keep the warm liquid step the same.
For fillings, keep it simple: whipped cream, jam, and fruit beat a heavy buttercream if you want that classic airy vibe.
FAQ
Why did my sponge cake collapse after baking?
Most collapses come from under-baking, opening the oven early, or deflating the batter during folding. Bake until the center springs back and the cake pulls slightly from the edges, then cool properly on a rack.
What does “ribbon stage” actually look like?
When you lift the whisk, batter should fall in a thick ribbon that stays visible on the surface for a few seconds. If it disappears immediately, keep whipping; if it looks clumpy and dry, you went too far.
Can I make this sponge cake without a stand mixer?
Yes. A hand mixer works well; you’ll just whip longer. You can do it by hand with a whisk if you enjoy cardio and mild regret.
How do I keep sponge cake moist?
Use the warm milk-and-oil step, don’t over-bake, and wrap the cooled cake tightly. For layer cakes, brushing with a light syrup also helps, especially if you’re storing it overnight.
Can I bake this in a sheet pan for a roll cake?
Yes, but adjust bake time down since it’s thinner. Line the pan with parchment, bake until springy, then roll while warm with a towel to set the shape before filling.
Is sponge cake the same as chiffon or genoise?
They’re related but not identical. Genoise typically uses melted butter and relies heavily on egg foam; chiffon uses oil and often includes chemical leavening for extra lift. This recipe sits in the easy, reliable “classic sponge” zone.
The Bottom Line
A great sponge cake isn’t fragile magic; it’s repeatable technique. Whip to ribbon stage, fold gently, protect the foam when adding fat, and let the cake climb a mostly ungreased pan. Do that, and you’ll get a fluffy, bakery-style sponge that plays nicely with fruit, cream, and basically any flavor you throw at it. Now go make one and casually pretend it was no big deal.
Printable Recipe Card
Want just the essential recipe details without scrolling through the article? Get our printable recipe card with just the ingredients and instructions.