Yellow Squash Recipes You’ll Crave — Crispy Zesty Easy
Transform garden squash into a 30-minute, budget-friendly skillet: crisp edges, lemon-garlic vibes, and easy swaps for air fryer, grill, or dairy-free
You bought squash because it looked sunny and cheap, and now it’s staring at you like a dare. Here’s the move: turn those golden veggies into a crunchy, lemony, Parmesan-kissed side that steals the show in under 30 minutes. No fancy tools, no chef ego—just a reliable technique that makes “meh” squash addictive.
We’ll use one base method, then give you high-impact variations so you can pivot between oven, skillet, air fryer, or grill. Your future self will thank you when picky eaters go back for seconds. And your wallet? It will high-five you for keeping dinner in the comfort zone of affordable and fast.
What Makes This Recipe So Good
- Fast and foolproof: From cutting board to table in about 30 minutes, no culinary gymnastics required.
- Crispy edges, tender centers: A quick salting step draws out excess moisture so the squash actually browns—yes, that’s the secret.
- Big flavor, low cost: Lemon, garlic, and Parmesan deliver restaurant-level payoff with pantry staples.
- Flexible: Bake, air fry, or grill—same core ingredients, different vibes, same win.
- Customizable: Make it dairy-free, gluten-free, or spicy; add herbs; swap in zucchini if that’s what’s lurking in the fridge.
- Meal-prep friendly: Pre-slice and salt the squash, then finish later for fast weeknight execution.
- Kid- and crowd-pleasing: Crunch plus cheese equals “yes” from people who usually vote “no” on vegetables.
Ingredients Breakdown
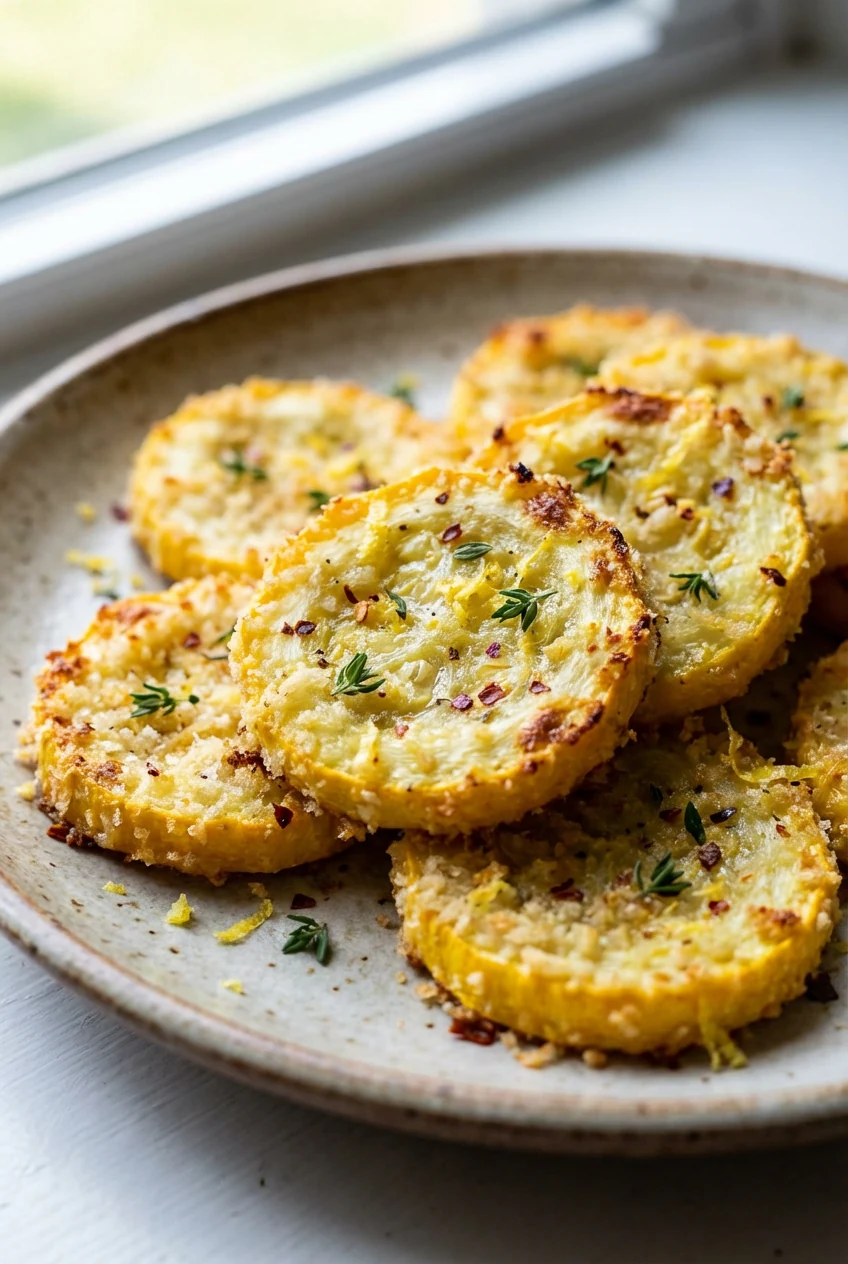
- 4 medium yellow squash (about 2 lb), sliced 1/4-inch thick: Straightneck or crookneck both work. Thin, even slices = better browning.
- 1 teaspoon kosher salt (plus more to taste): Used to pre-salt the squash and draw out water for crisp, not mush.
- 2 tablespoons olive oil: Helps the squash sear and the topping toast. Use a neutral oil if you prefer.
- 3 cloves garlic, minced: Aromatic backbone. Garlic powder also works if you’re in a rush.
- 1 cup panko breadcrumbs: Light, airy crunch. Gluten-free option: Use GF panko or almond flour for a lower-carb vibe.
- 3/4 cup freshly grated Parmesan: Melty-salty goodness. Freshly grated beats pre-shredded for better browning.
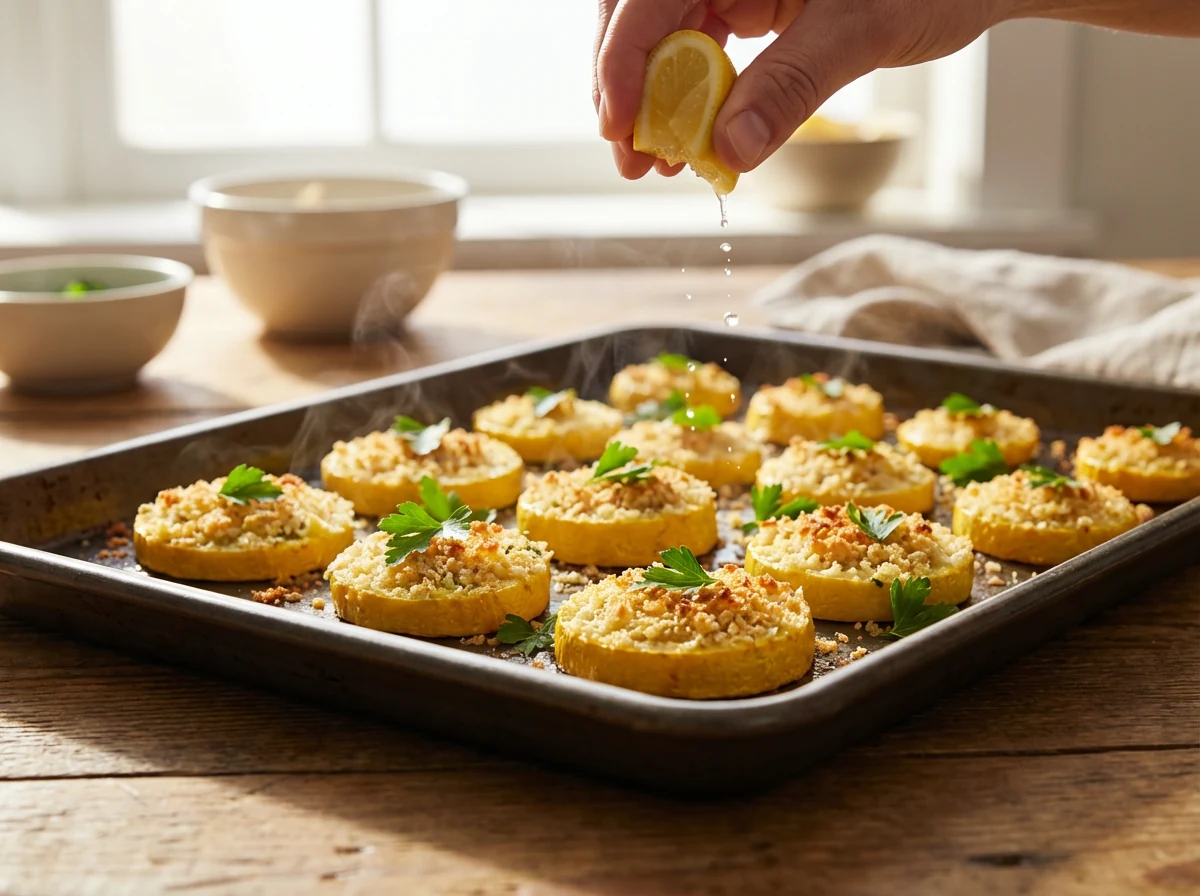
- 1 teaspoon lemon zest + lemon wedges for serving: Zest wakes up the flavors; a final squeeze makes it pop.
- 1 teaspoon fresh thyme leaves: Or 1/2 teaspoon dried Italian seasoning. Herbs add depth without effort.
- 1/4 teaspoon red pepper flakes (optional): Gentle heat for the spice-curious.
- 1/4 teaspoon black pepper: Balances the tang and richness.
- 1 tablespoon melted butter (optional): Mix into the crumb topping for extra golden crunch. Skip for dairy-free.
- 2 tablespoons chopped fresh parsley: Fresh finish and color. Basil works great too.
Step-by-Step Instructions
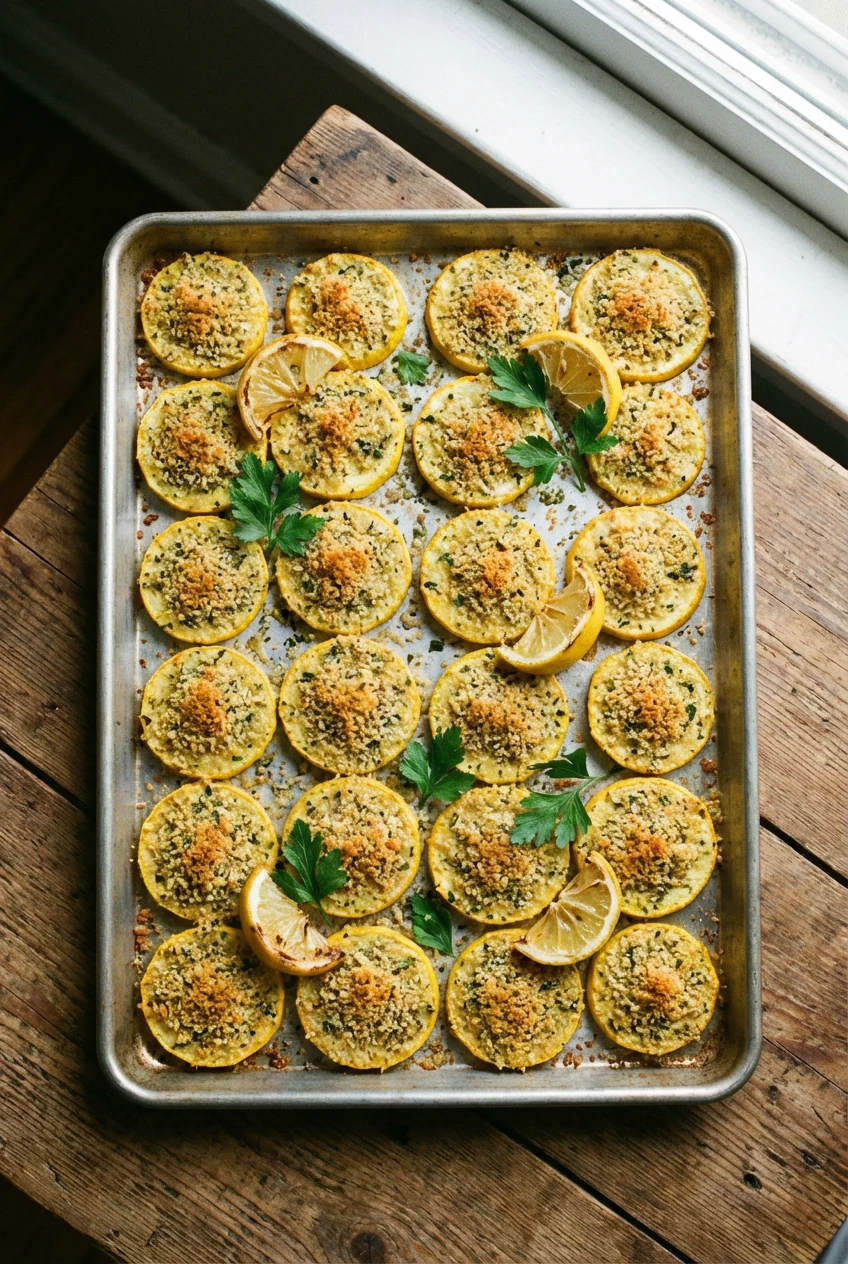
- Prep the squash: Slice into 1/4-inch rounds. Lay on a paper towel–lined sheet and sprinkle evenly with 1 teaspoon kosher salt. Let sit 10 minutes to draw out water.
- Preheat the oven: Set to 425°F (220°C). Place a large sheet pan inside while it heats for better browning.
- Pat dry: Blot the salted squash thoroughly. The more moisture you remove now, the crispier the finish—science at work, folks.
- Oil and season: Toss squash with olive oil, minced garlic, and black pepper. Keep the salt light here since the slices were pre-salted.
- Make the topping: In a bowl, combine panko, Parmesan, lemon zest, thyme, red pepper flakes, and melted butter (if using). Stir until the crumbs look evenly damp.
- Arrange and top: Carefully remove the hot sheet pan. Spread squash in a single layer—no crowding. Spoon a little topping onto each round, pressing gently so it adheres.
- Bake: Return pan to the oven and bake 12–15 minutes, until the squash is tender and the crumb is golden.
- Optional broil: For extra crunch, broil 1–2 minutes. Watch closely—parmesan goes from golden to “oops” fast.
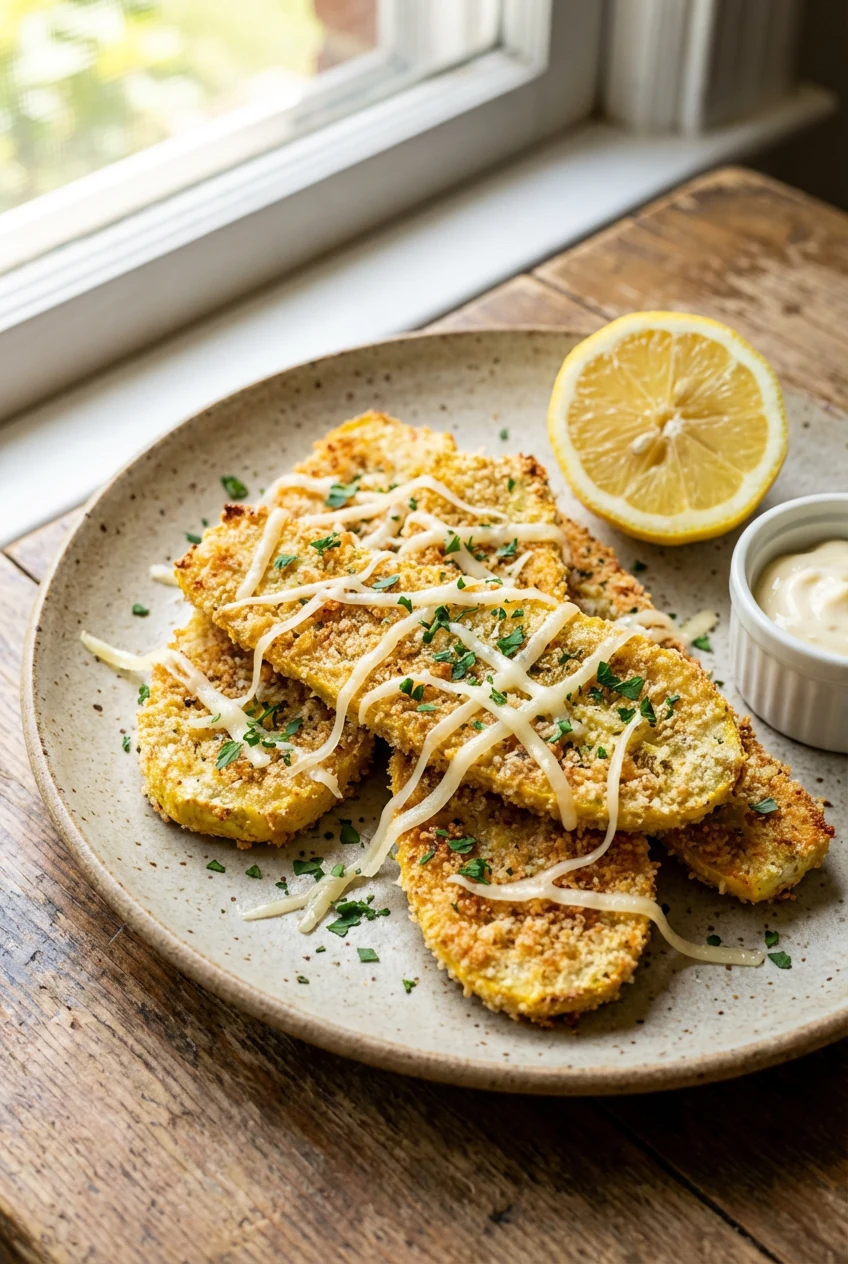
- Finish: Transfer to a platter. Squeeze lemon over the top and shower with parsley. Taste and add a pinch of salt if needed.
- Serve: Pair with grilled chicken, salmon, pasta, or a big salad. It’s a side that behaves like a main character.
Preservation Guide
- Fridge storage (3–4 days): Cool completely, then store in an airtight container. Reheat on a sheet pan at 400°F for 5–8 minutes to re-crisp. Microwaving = soft topping (FYI).
- Freezing (not ideal, but possible): Bake without the topping, cool, then freeze slices in a single layer. Reheat from frozen at 425°F; add topping in the last 5 minutes. Texture won’t be as crisp—trade-offs are real.
- Make-ahead prep (best option): Slice and pre-salt up to 24 hours ahead. Pat dry and refrigerate. Mix the crumb topping and store separately, then assemble and bake when ready.
- Leftover upgrades: Chop and toss into omelets, grain bowls, or a quick tomato pasta. Waste nothing; flavor everything.
Benefits of This Recipe
- Nutrient-packed: Yellow squash delivers vitamins A and C, fiber, and hydration with minimal calories.
- Budget-friendly: Peak-season squash is cheap, and the rest of the ingredients are pantry heroes—IMO one of the best value sides.
- Better texture: The pre-salt technique prevents sogginess and gives you restaurant-level crisp at home.
- Diet-inclusive: Easy to make gluten-free or dairy-free while keeping flavor high.
- Scalable: Double for a crowd, halve for two—just keep the sheet pan uncrowded.
- Low-lift, high-reward: Minimal effort, maximum “where has this been all my life?” reactions.
What Not to Do
- Don’t skip the salting step: It’s the difference between crisp edges and soggy disappointment.
- Don’t crowd the pan: Overlapping slices steam instead of brown. Use two pans if needed.
- Don’t drown the squash in oil: A light coat is enough. Too much oil kills the crunch.
- Don’t rely on pre-grated cheese with fillers: Anti-caking agents inhibit melting and browning. Freshly grated is king.
- Don’t forget acidity: A squeeze of lemon at the end keeps everything lively. Without it, flavors feel flat.
- Don’t walk away during broil: Parmesan goes from perfect to scorched faster than you think.
Alternatives
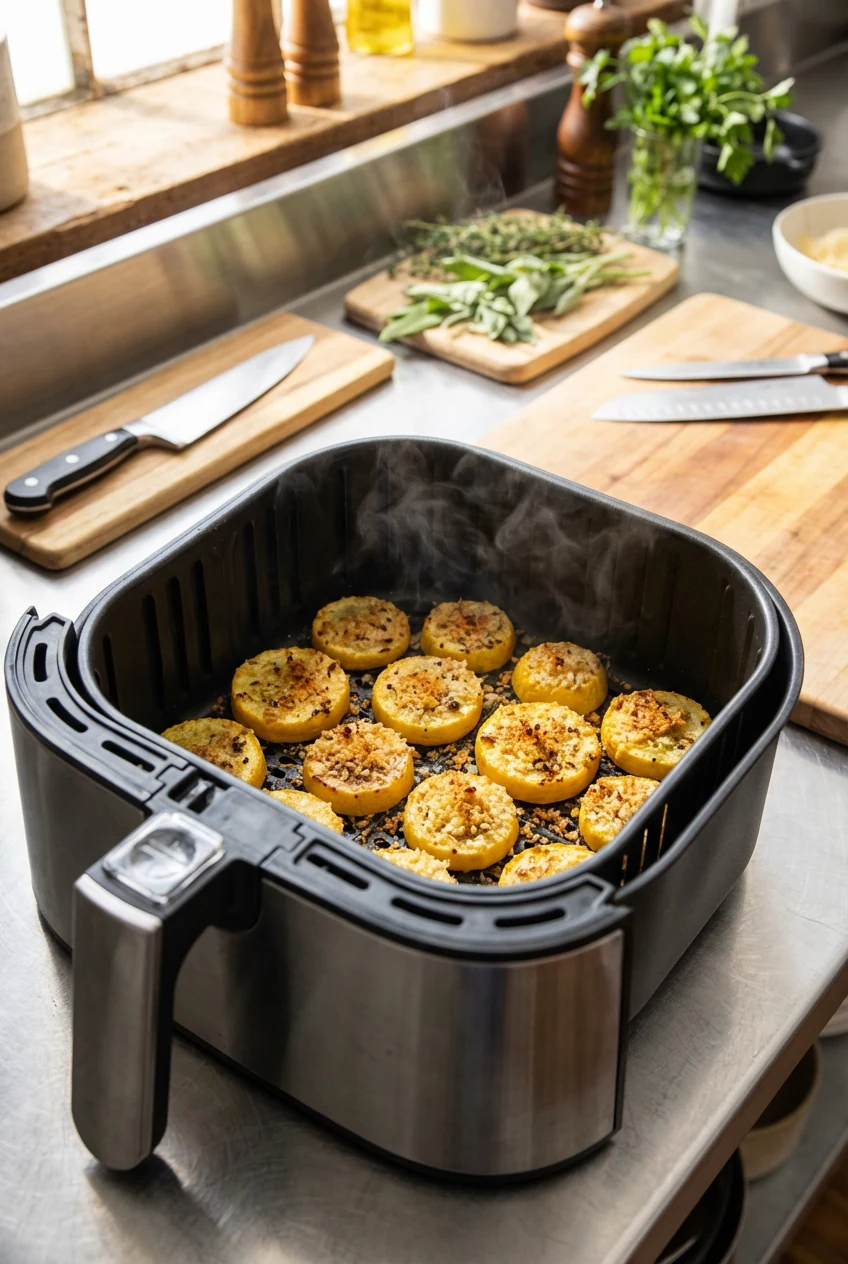
- Air Fryer Crunch: 400°F, 8–10 minutes, flipping halfway. Same topping. Batch-cook to avoid crowding.
- Grilled Planks: Slice squash lengthwise into 1/2-inch planks. Oil, salt, pepper. Grill 3–4 minutes per side. Finish with lemon and herbs; serve with shaved Parmesan.
- Skillet Sauté: Olive oil + onion + garlic + squash half-moons. Cook until golden, then add cherry tomatoes and basil. Shower with Parmesan.
- Cheesy Bake: Layer squash in a small casserole with mozzarella and marinara. Bake at 375°F until bubbly; finish with Parm and basil.
- Dairy-Free Upgrade: Swap Parmesan for toasted almond crumbs + nutritional yeast + lemon zest. Same crunch, savory pop, no dairy.
- Low-Carb Swap: Use almond flour instead of panko and a sprinkle of Pecorino Romano; keep servings moderate.
- Soup Starter: Sauté squash with onion, garlic, and a pinch of curry. Add stock, simmer, blend. Finish with coconut milk.
- Zoodle Side: Spiralize squash, quick sauté in olive oil with garlic, finish with lemon and herbs. Light, fast, unfussy.
FAQ
Is yellow squash the same as zucchini?
No. They’re cousins with similar textures, but yellow squash (straightneck or crookneck) is usually slightly sweeter and softer. You can swap one for the other in most recipes, adjusting cook time by a minute or two.
Do I need to peel yellow squash?
Skip peeling. The skin is thin and edible, adds color, and helps the slices hold shape. Just rinse, trim the ends, and you’re good.
How do I keep the squash from turning mushy?
Pre-salt to draw out moisture, pat dry aggressively, and avoid crowding the pan. High heat (425°F) plus a light oil coat equals browning instead of steaming.
Can I make this without breadcrumbs?
Yes. Use almond flour or crushed pork rinds for a low-carb option, or toasted quinoa for a gluten-free crunch. You’ll still get crisp topping with the lemon and herb combo.
Is this recipe keto-friendly?
Not as written due to panko. Swap panko for almond flour, use a moderate amount of Parmesan, and watch portions to keep carbs in check.
Can I air fry this recipe?
Absolutely. 400°F for 8–10 minutes, flipping halfway. Work in batches so slices don’t overlap, and add the topping after flipping for best browning.
Why does my squash taste bitter sometimes?
Rarely, squash can contain elevated cucurbitacins, which taste bitter. If you notice pronounced bitterness, don’t eat it—discard the batch. Buy from trusted sources and avoid overgrown, very mature squash.
How thick should I slice the squash?
About 1/4 inch is the sweet spot—thin enough to crisp, thick enough to stay tender. Thicker slices need more time and risk steaming; thinner slices burn faster.
Can I make it ahead for a party?
Yes. Slice and pre-salt up to a day ahead, mix the topping, and store both separately. Assemble and bake right before serving for maximum crunch.
In Conclusion
When you treat squash like a star and not an afterthought, dinner gets exciting. A little salt, big heat, and a crunchy, lemony topping transform simple produce into a side everyone fights over. Keep the base method, pivot to oven, air fryer, or grill, and customize for your crowd. The result? A fast, affordable dish that delivers more flavor than it has any right to—no chef coat required.
Printable Recipe Card
Want just the essential recipe details without scrolling through the article? Get our printable recipe card with just the ingredients and instructions.